In this article, you will find the latest set of 100 E&I (Electrical & Instrumentation) QA/QC (Quality Assurance & Quality Control) interview questions and detailed answers.
QA QC Interview Questions

These are intended to help you understand typical topics, responsibilities, and best practices in E&I QA/QC roles. Please note that actual interview questions may vary from company to company, but these offer a solid foundation for your interview preparation.
1. What is the primary role of QA/QC in E&I projects?
The QA/QC team ensures that all electrical and instrumentation installations, tests, and commissioning activities comply with established codes, industry standards, client specifications, and project requirements. They develop quality plans, conduct inspections, maintain documentation, and verify that the finished system meets the design intent while satisfying safety, reliability, and regulatory requirements.
2. What industry standards are commonly referenced in E&I QA/QC?
Typical industry standards include IEC (International Electrotechnical Commission) standards for electrical components and systems, IEEE for electrical design criteria and testing, ISA (International Society of Automation) standards for instrumentation, NFPA 70 (National Electrical Code) for electrical safety, and ISO 9001 for overarching quality management systems. The local or regional regulatory codes (like BS, DIN, or AS standards) may apply depending on the project location.
3. How do you verify that installed instrumentation meets the project requirements?
Verification involves reviewing approved data sheets, installation drawings, and manufacturer certificates to confirm correct model numbers, materials, and calibration ranges.
Inspections also cover physical installation details such as mounting orientation, accessibility, and weatherproofing. Functional testing and calibration checks confirm that each device’s performance matches project specifications.
4. Explain the difference between Quality Assurance (QA) and Quality Control (QC).
Quality Assurance is proactive – it involves establishing processes, procedures, and documentation that ensure quality is embedded throughout the project lifecycle.
Quality Control is reactive – it focuses on inspecting and testing finished products or installations to confirm they meet quality criteria. QA sets the framework (standards, protocols), and QC verifies compliance (inspections, tests).
5. Can you describe the typical contents of an ITP (Inspection and Test Plan)?
An ITP typically includes:
- Activity Description: The task or step to be inspected (e.g., cable pulling, instrument calibration).
- Inspection Criteria/Specifications: Reference standards or acceptance criteria.
- Inspection Type: Whether it’s a witness, hold, or review point.
- Responsibility: Who performs the inspection (QC inspector, third party, client).
- Records/Reports: Documentation to be generated (test reports, certificates).
6. Why is loop checking important in instrumentation?
Loop checking ensures that the entire signal path from the field instrument, through wiring and marshalling, to the control system is correct and functioning as intended.
It identifies wiring mistakes, calibration errors, or defective components before the system is commissioned, preventing costly downtime or safety incidents later on.
7. What is a punch list, and how is it handled during a project?
A punch list (or snag list) is a record of all outstanding, incomplete, or non-compliant items identified during inspections or walk-downs. Each item is assigned a priority and corrective action.
The QA/QC team, along with construction and commissioning personnel, resolves these issues before final project handover. A punch list is typically cleared by re-inspections and final approval from the responsible authority.
8. How do you ensure proper cable termination in E&I installations?
Proper cable termination involves confirming the correct cable type, checking insulation integrity, using the correct lugs or ferrules, and ensuring proper torque on terminal screws. QA/QC verifies that cable cores are labeled correctly, the insulation is stripped within specification, and adequate protection (such as heat-shrink tubing) is provided to prevent moisture or mechanical damage.
9. What is a Megger test, and why is it performed?
A Megger test measures the insulation resistance of cables, motors, and other electrical components. It helps detect insulation degradation or faults that could lead to electrical shorts, arcing, or failures. As part of QA/QC, Megger tests confirm that equipment meets the minimum insulation resistance specified by relevant standards or project specifications before energizing.
10. In instrumentation calibration, what does a 4–20 mA current loop signify?
A 4–20 mA current loop is a standard signal range used for transmitting process variable information (e.g., temperature, pressure, flow) from field instruments to control systems.
The “live zero” of 4 mA allows detection of open circuits or power failures (which typically read as 0 mA). The loop is less susceptible to voltage drops and electrical interference, making it a robust standard for industrial applications.
11. Explain the importance of traceability in QA/QC documentation.
Traceability ensures that every inspection, test, or calibration result can be linked back to the relevant procedure, standard, device serial number, date, and inspector. This chain of evidence verifies compliance and supports future audits or investigations.
Maintaining traceability builds credibility with clients and regulatory authorities, proving that work was completed properly and in accordance with specified standards.
12. What are some common QA/QC documents in E&I projects?
Typical documents include:
- Inspection & Test Plans (ITPs)
- Method Statements
- Calibration Certificates
- Inspection Reports (e.g., cable inspection, instrumentation checks)
- Non-Conformance Reports (NCRs)
- Material Approval Records
- Vendor Documentation
13. Describe a Non-Conformance Report (NCR) and its purpose.
An NCR is a formal document used when an installation, material, or process deviates from the approved standards or specifications. Its purpose is to record the non-conformance, identify the root cause, prescribe corrective actions, and track closure. This process helps maintain project integrity and ensures issues are documented and resolved systematically.
14. How do you approach identifying the root cause of a non-conformance in instrumentation?
Root-cause analysis can involve reviewing installation methods, calibration logs, material quality, and environmental factors. Techniques like the “5 Whys” or Ishikawa (fishbone) diagrams help systematically investigate all potential contributory factors. By analyzing both technical and procedural aspects, QA/QC can identify underlying causes and implement corrective and preventive measures.
15. What is a functional test, and why is it crucial in E&I QA/QC?
A functional test verifies that equipment or a system operates according to design specifications under simulated or real operating conditions. In E&I, this could involve verifying that a sensor accurately tracks a process variable, an actuator moves as commanded, or a control loop remains stable. Functional testing is crucial because it is the final step to confirm that the system will perform safely and reliably in service.
16. How do you ensure proper grounding of electrical and instrumentation equipment?
Proper grounding involves confirming grounding conductors are correctly sized and installed, all metal parts are bonded together, and the grounding network meets project specifications and electrical code requirements. Inspections check continuity from equipment to earth, measure earth resistance with a ground resistance tester, and ensure corrosion-resistant connections.
17. What is an FAT (Factory Acceptance Test) in E&I projects?
An FAT is performed at the supplier’s or manufacturer’s facility before the equipment is shipped to the site. It verifies that the equipment (e.g., control panels, switchgear, or packaged skids) functions per design, meets performance requirements, and has the correct documentation. QA/QC, along with the client and vendor, witness or perform tests, review all results, and address any issues before shipment.
18. How do you inspect and test a newly installed PLC system?
Inspection begins with verifying correct hardware installation—CPU modules, I/O modules, proper wiring, and labeling. Next, functional tests confirm each input and output is responding correctly, and the controller logic (software) matches the intended control scheme. The QA/QC ensures that firmware versions, configuration settings, and communication networks (Ethernet, fieldbus) meet design requirements.
19. Describe a typical calibration process for a pressure transmitter.
Answer:
- Initial Checks: Inspect the transmitter for physical damage and confirm zero settings.
- Apply Pressure: Use a pressure source or calibrator to apply known increments of pressure across the span (0%, 25%, 50%, 75%, 100%).
- Record Output: Measure transmitter output (4–20 mA or digital reading) at each step.
- Adjustment: If readings deviate from the expected values, adjust zero and span per manufacturer instructions.
- Certification: Document the final calibration data on a certificate or test record.
20. What does a ‘continuity test’ involve, and when would you conduct it?
A continuity test verifies that an electrical path is complete, ensuring there are no breaks or loose connections in wiring or grounding. It’s conducted before energizing cables, during loop checks, and when troubleshooting suspected open circuits. A multimeter or dedicated continuity tester is typically used for this purpose.
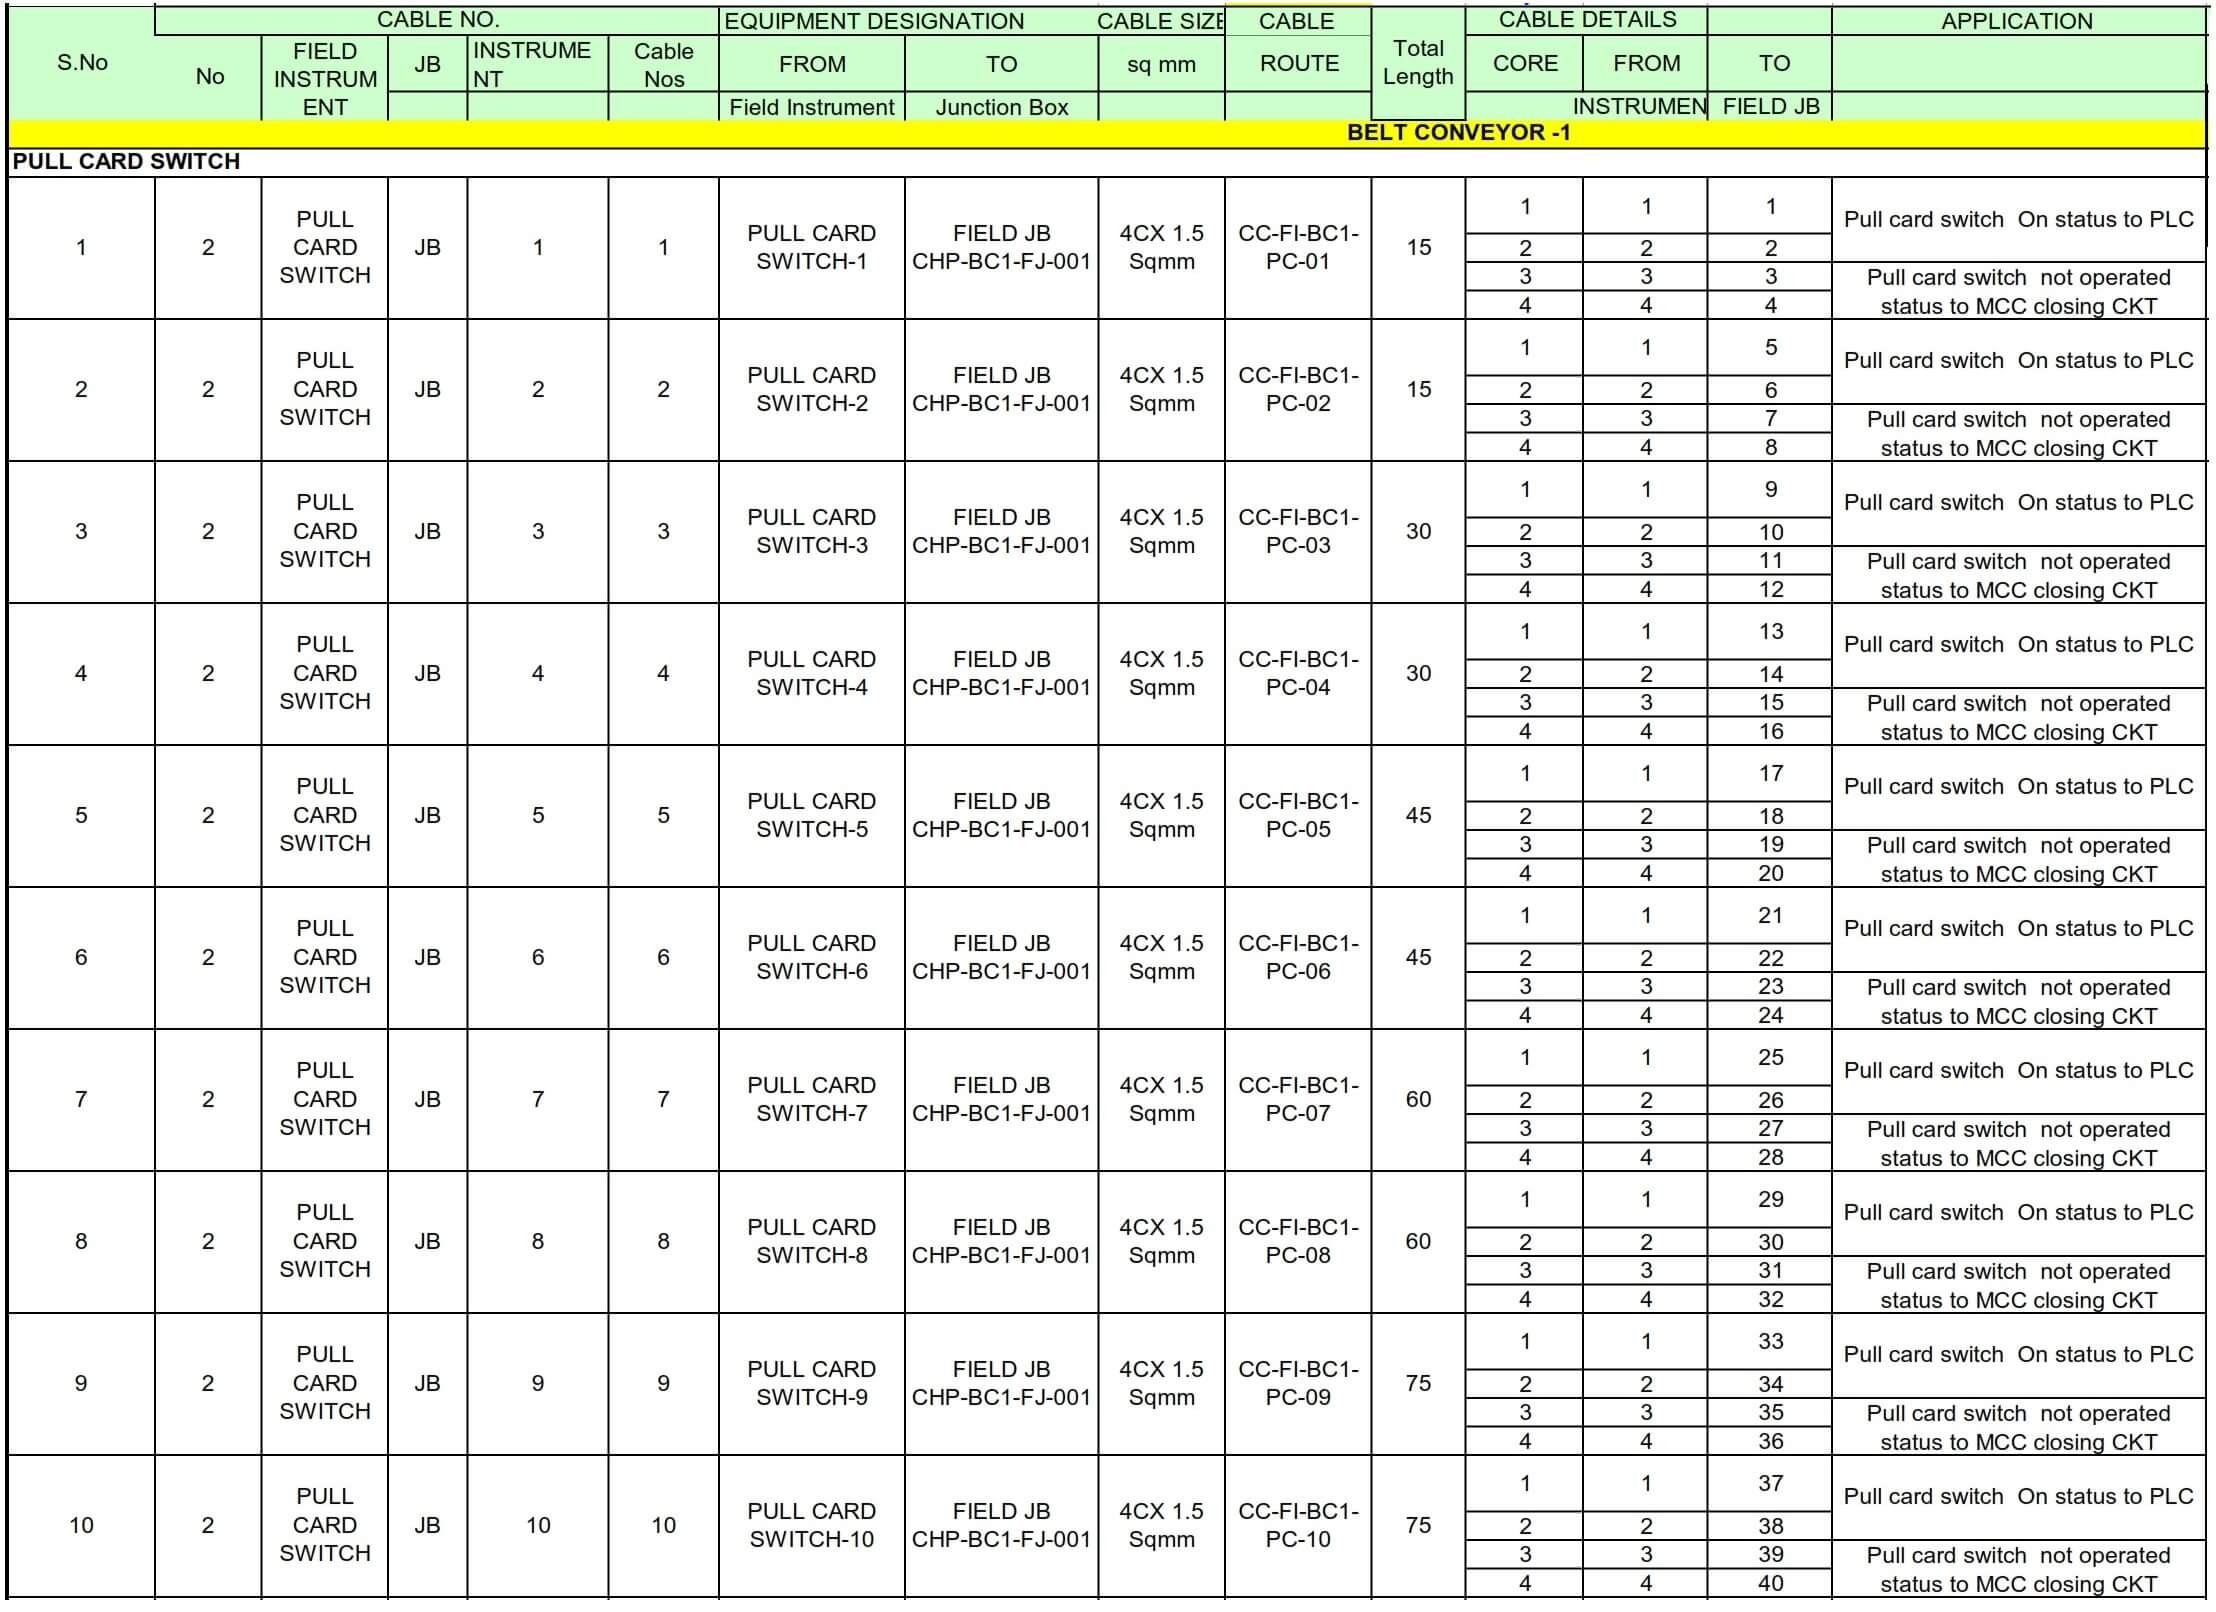
21. Explain what ‘cable schedule’ is and its significance in QA/QC.
A cable schedule lists all the cables used in a project, including cable type, length, routing, source, and destination terminals. It is significant because it helps QA/QC confirm correct cable installation, alignment with design drawings, labeling accuracy, and compliance with voltage or signal requirements.
22. How do you verify the correct orientation and installation of flow transmitters?
Verifying flow transmitter orientation involves checking manufacturer guidelines. For differential pressure transmitters, high- and low-pressure ports must align correctly with the process piping.
For magnetic or vortex flow meters, the measuring direction arrow must match the process flow direction. QA/QC also confirms the transmitter is installed at the right elevation and ensures there are appropriate straight pipe runs upstream and downstream.
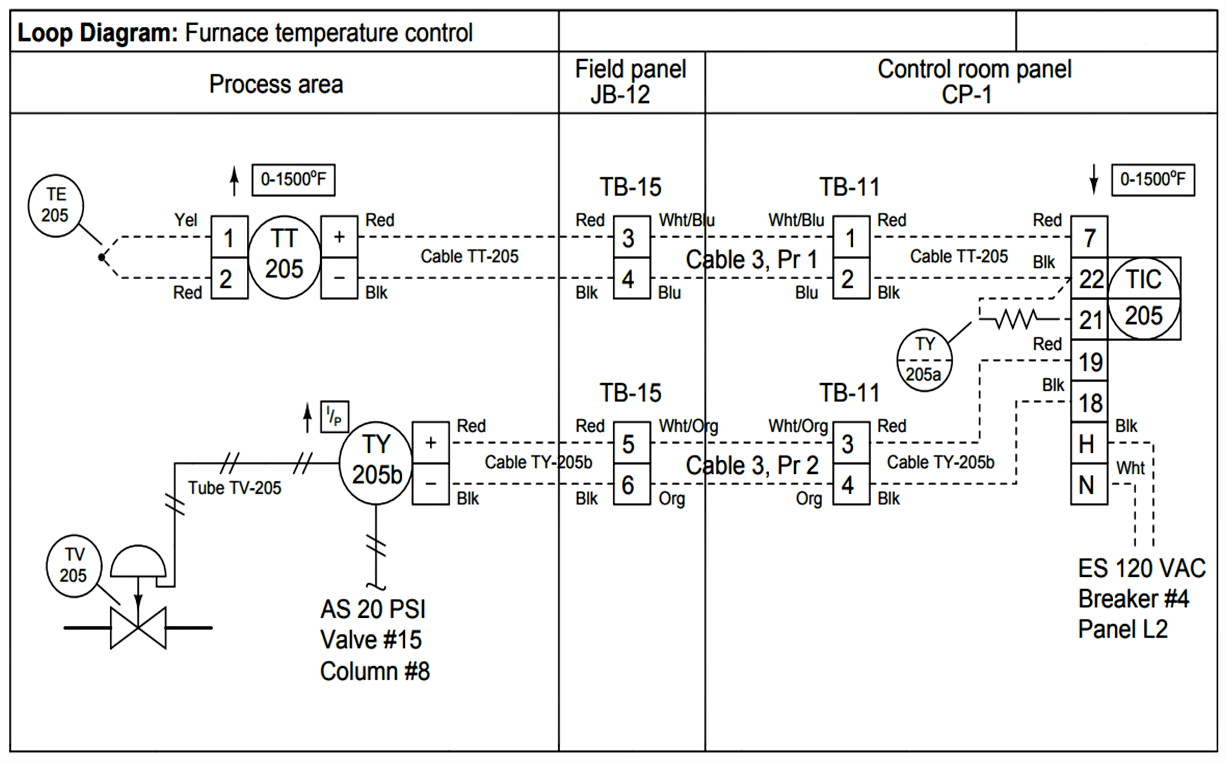
23. What is a ‘loop diagram,’ and why is it critical for QC inspections?
A loop diagram is a detailed schematic showing how a particular instrument loop is connected from the field device, through junction boxes or marshalling panels, to the control system. It is critical because it specifies each wire, terminal, power supply, signal range, and grounding reference. QC inspectors use loop diagrams to validate correct wiring, tagging, and final loop integrity.
24. What steps do you follow to perform a cable insulation resistance test for LV motors?
Answer:
- Lockout-Tagout: Ensure the motor is electrically isolated.
- Disconnect the Motor Leads: Isolate windings from external circuits.
- Test with a Megger: Apply the recommended voltage (e.g., 500 V or 1000 V DC for LV motors).
- Measure Insulation Resistance: Compare results with OEM minimum requirements.
- Document & Evaluate: Record values, address any deficiencies, and repeat if repairs are made.
25. How do you handle instrumentation that fails calibration during inspection?
If an instrument fails calibration, QA/QC first re-checks for obvious issues: leaks, improper connections, or zero shifts due to handling. If still out of tolerance, the device undergoes a detailed troubleshooting procedure, possibly involving repairs or part replacement. If it remains unsalvageable, it is rejected, replaced, or sent back to the manufacturer, and a Non-Conformance Report may be issued.
26. Why is it important to check hazardous area certifications for instruments in explosive environments?
In explosive or hazardous areas (e.g., refineries, chemical plants), equipment must meet ATEX, IECEx, or similar certifications to ensure it won’t ignite flammable gases or dust. QA/QC checks nameplates, certificates, and installation procedures (intrinsically safe wiring or flameproof enclosures) to guarantee compliance and maintain site safety.
27. What is an RFI (Request for Information) in a QA/QC context, and when is it used?
An RFI is a formal query raised when clarification or additional details about drawings, specifications, or procedures are required.
In QA/QC, RFIs may be used if inspectors find discrepancies in the documentation or if a design issue arises that needs engineering input. RFIs help maintain clear communication and ensure correct execution of project requirements.
28. How do you verify calibration certificates from vendors?
Answer:
- Check Certificate Validity: Confirm date, instrument serial number, and calibration due date.
- Certification Body: Ensure the lab or vendor is accredited (e.g., ISO/IEC 17025).
- Standards & Traceability: Verify references to national or international standards used.
- Data Integrity: Confirm test data is present and within tolerance.
- Signatures: Look for authorized signatory and official stamp.
29. What are the key steps in managing QA/QC documentation during project closeout?
Answer:
- Compilation: Gather all approved inspection records, test certificates, as-built drawings, and calibration reports.
- Organization: Sort documents by system or discipline, ensuring easy traceability.
- Final Review: Confirm each file is correct, complete, and properly signed off.
- Submission: Provide documents to the client or relevant authority for final acceptance.
- Archiving: Store a secure backup in line with project or legal retention requirements.
30. Why do you need to measure loop resistance in 4–20 mA loops?
Loop resistance measurement ensures the power supply and the transmitter can drive the signal through the total loop impedance without distortion. If loop resistance is too high, the transmitter may not achieve 20 mA at the receiving end, causing inaccurate readings. QA/QC checks loop resistance to maintain signal integrity and confirm compliance with the design.
31. How would you handle a discrepancy between the engineering drawing and site conditions?
When a discrepancy is noted, QA/QC raises an RFI or a Technical Query to the engineering team or relevant authority. They document the issue, propose a solution if possible, and wait for official approval or updated drawings before continuing. This prevents unauthorized modifications that could compromise safety or function.
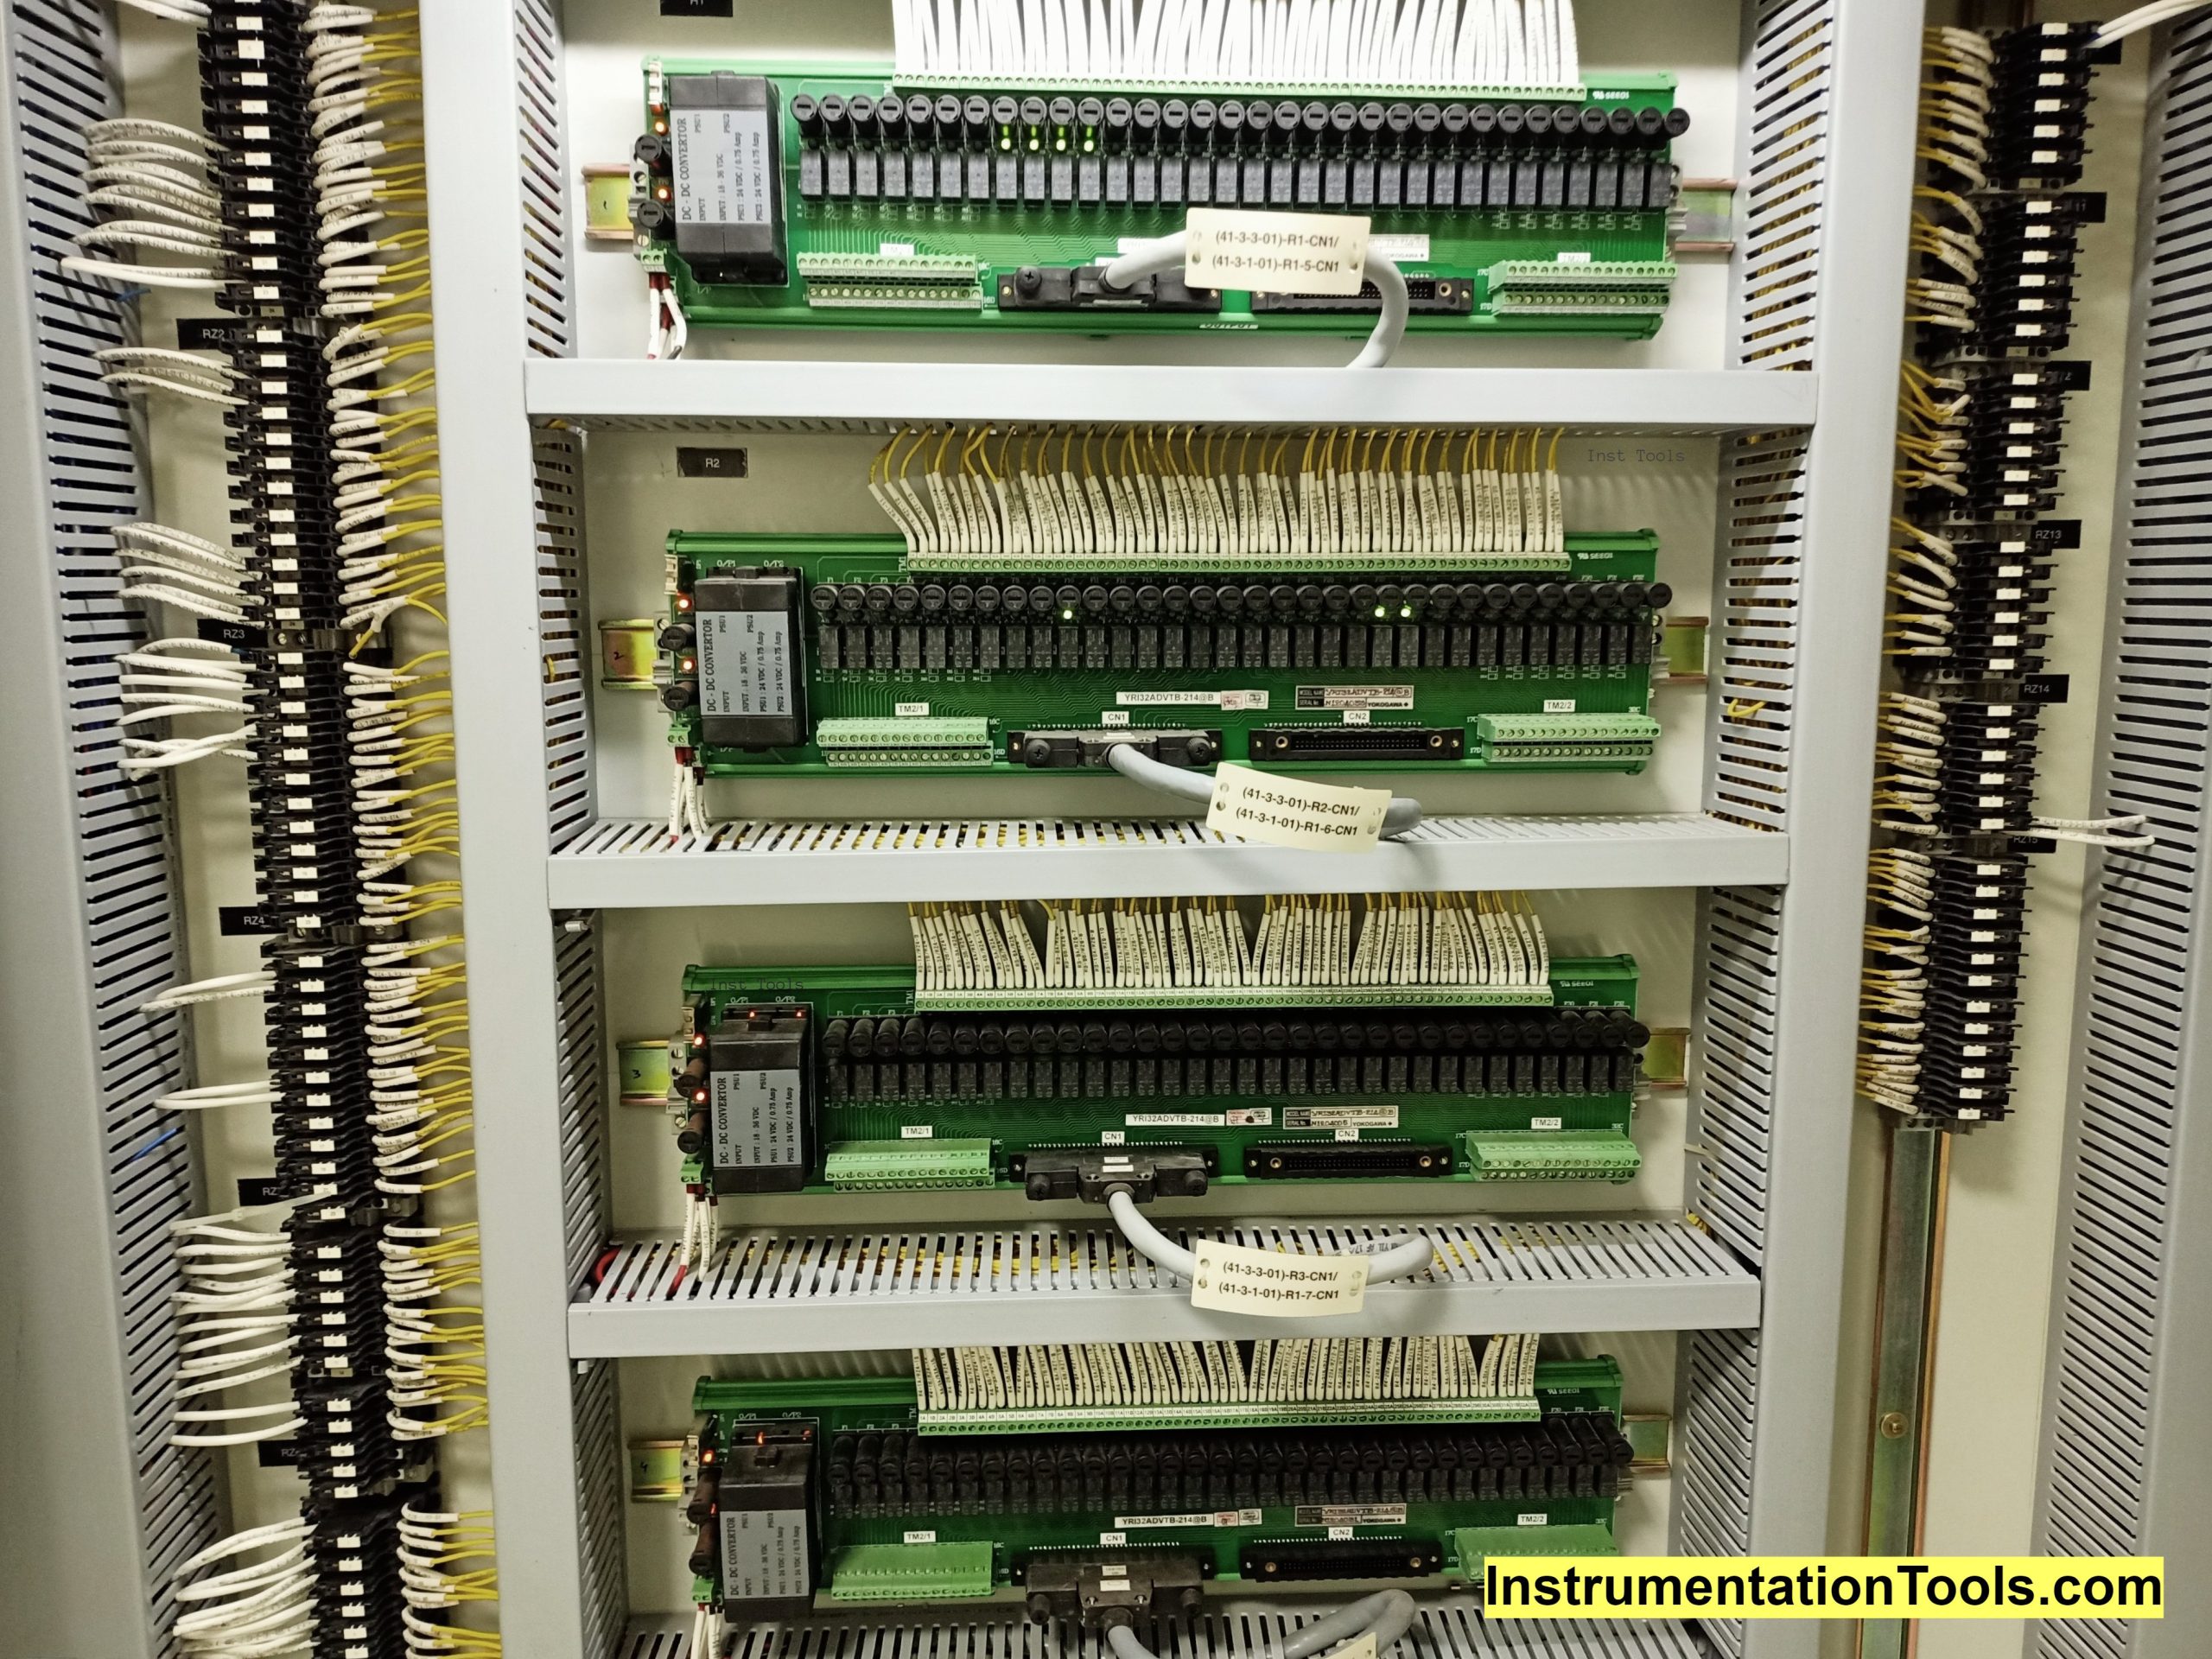
32. What is a marshalling panel, and how do you inspect it for QC?
A marshalling panel is an intermediate termination point where field instrument cables connect to the control system I/O. QC inspection involves verifying correct terminal block labeling, cable segregation (analog vs. digital vs. power), grounding, and proper shield termination. Inspectors also compare the panel’s wiring with loop diagrams and check for neat cable dressing and bundling.
33. Why is temperature compensation important in certain instruments?
Physical properties can change with temperature, leading to measurement drift or inaccuracies. Temperature compensation ensures the instrument adjusts its output based on ambient or process temperature. QA/QC checks that devices requiring compensation (like RTDs, strain gauges, or flow transmitters) are properly configured to maintain accuracy under varying temperature conditions.
34. Explain the importance of a control valve stroke test.
A stroke test checks how a control valve responds to input signals, measures travel distance or rotation, and confirms the valve’s ability to reach its full open and closed positions. It identifies mechanical binding, actuator issues, or calibration errors in the positioner. Performing stroke tests ensures the control loop will effectively regulate the process when operational.
35. How do you confirm a cable tray installation complies with quality standards?
QA/QC inspects the tray material, support spacing, tray bonding/grounding, and load capacity. They also check for sharp edges that could damage cables, proper tray width, adequate clearance for cable bending radius, and fireproofing requirements if mandated by the project. Compliance is verified against project specifications and relevant installation guidelines.
36. What is the purpose of color coding in instrument wiring?
Color coding helps identify wire functions (e.g., power, return, signal, ground) or system usage (e.g., thermocouple leads). It reduces the likelihood of cross-connections or incorrect terminations. QA/QC verifies adherence to project-specific color coding schemes or international standards, ensuring consistent, safe, and reliable wiring.
37. Describe an Earth Loop Impedance Test and when it’s conducted.
An Earth Loop Impedance Test measures the total impedance in the earth fault loop path, the route current would follow during a ground fault. It’s typically done after electrical installations are complete, before energizing, to ensure protective devices (fuses, circuit breakers) will trip quickly in fault conditions. The lower the impedance, the faster the fault current can be interrupted, improving safety.
38. How do you test the polarity of field wiring in an E&I system?
Using a DC supply and a voltmeter, you can confirm the positive and negative leads are correctly identified. Alternatively, with instruments that require polarity (e.g., 2-wire transmitters), check that the signal generator or power supply is connected to the correct terminals. Polarity errors can lead to no signal readings or equipment damage, so QA/QC verifies proper labeling and continuity.
39. What is the main difference between a P&ID and an Isometric drawing in E&I?
A P&ID (Piping & Instrumentation Diagram) shows the functional relationships between instrumentation, control components, and process equipment. It’s a high-level schematic representation. In contrast, an Isometric drawing shows the actual 3D layout or route of piping in a more detailed manner, including dimensions and orientation. For QA/QC, P&IDs are used to verify design requirements, while isometrics guide physical installation checks.
40. Why is verifying instrument impulse line slope important?
Instrument impulse lines especially for differential pressure transmitters, must be sloped to prevent trapped air or fluid buildup that can cause measurement errors. The slope direction depends on whether the process fluid is a gas or liquid and whether the transmitter is mounted above or below the process tap. QA/QC checks slopes and routing to maintain consistent and accurate pressure sensing.
41. Explain the difference between a limit switch and a proximity switch in QA/QC context.
A limit switch is a mechanically actuated switch typically triggered by physical contact with a moving part, while a proximity switch detects the presence of an object without physical contact (e.g., inductive, capacitive, or optical). QA/QC checks for correct mounting, alignment, and cable routing to ensure reliable operation under intended process conditions.
42. How do you test vibration sensors and confirm they’re functioning properly?
Testing vibration sensors involves:
- Physical Inspection: Checking mounting, orientation, and cable integrity.
- Simulated Vibration: Using a known vibration source or calibrator.
- Signal Output Verification: Confirming the sensor’s output (mV/g or 4–20 mA) matches expected values across the calibration range.
43. What types of checks are involved in final QA/QC walk-downs before commissioning?
Final walk-downs include verifying:
- All cables are terminated and labeled.
- Instruments are installed, calibrated, and accessible.
- Earthing and bonding are correct.
- No physical damage or missing components.
- Punch list items are resolved.
- Signage and safety labeling are in place.
44. How do you confirm that a safety instrumented function (SIF) meets its SIL requirement?
Compliance with a Safety Integrity Level (SIL) involves verifying the design per IEC 61508/61511 standards, reviewing calculations for Probability of Failure on Demand (PFD), and confirming redundancy or diagnostics as required. QA/QC ensures all components in the SIF loop (sensor, logic solver, final element) are installed, tested, and documented. A functional test verifies the system responds within safe time limits.
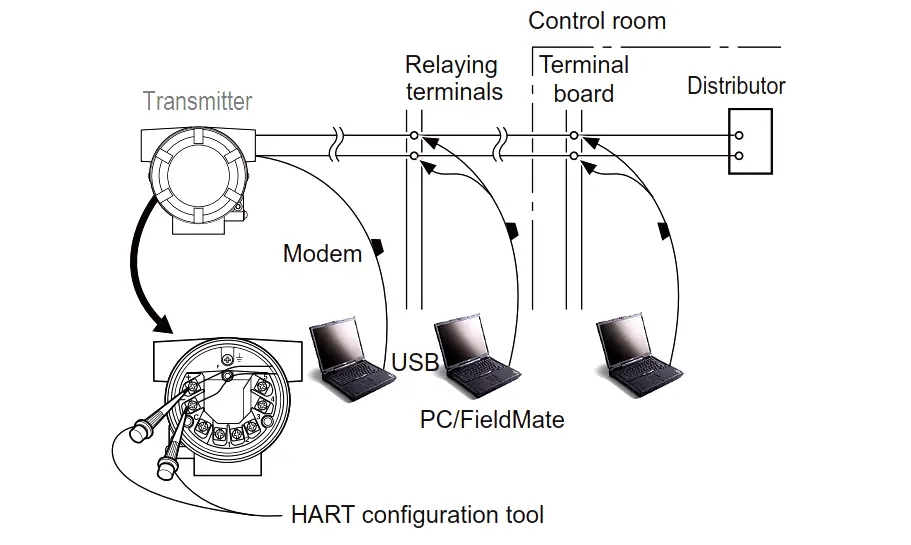
45. What are the benefits of using digital fieldbus systems like HART, PROFIBUS, or FOUNDATION Fieldbus in QA/QC?
Digital fieldbus systems provide diagnostics, multi-variable data, and easier device configuration. QA/QC can perform remote calibrations, check device status, and identify network faults quickly. Furthermore, advanced diagnostics can help detect wiring issues, sensor drift, or device malfunctions, reducing downtime and improving reliability.
46. How would you address a situation where multiple instruments show the same drift error after a factory calibration?
In such a scenario, QA/QC suspects a systematic issue—perhaps a faulty batch, incorrect calibration procedure, or environmental condition. A thorough investigation includes reviewing calibration procedures, verifying the test setup, cross-checking with reference instruments, and checking shipping/handling records. If confirmed, the entire batch might need recalibration or replacement, and the vendor is notified to rectify the problem.
47. Define ‘process calibration’ and how it differs from ‘lab calibration.’
Process calibration involves calibrating instruments in situ, under actual operating condition to account for installation effects and process environment. Lab calibration is done in a controlled environment, typically at a calibration bench with stable temperature and humidity. Process calibration is more realistic but more challenging to control, while lab calibration is more precise but might not perfectly replicate real plant conditions.
48. What is the significance of HART communicators in QA/QC?
HART communicators allow access to digital device parameters (range, damping, diagnostics) while also reading the 4–20 mA signal. They help QA/QC teams configure, troubleshoot, and calibrate smart transmitters in the field. This tool is essential for capturing detailed diagnostic data and verifying that device settings match project requirements.
49. Explain how you’d perform a continuity and polarity check on a thermocouple circuit.
Answer:
- Disconnect the Thermocouple: Isolate it from any transmitter or junction box.
- Continuity Check: Use a multimeter to ensure an unbroken circuit from the positive to negative lead.
- Polarity Check: Identify correct polarity with the color coding or by confirming the positive lead is more electropositive.
- Verification: Reconnect the thermocouple and confirm the proper temperature reading at the transmitter or DCS.
50. What does ‘span’ mean in instrumentation calibration?
‘Span’ refers to the difference between the lower and upper measurement limits of an instrument. For instance, if a pressure transmitter is calibrated from 0 psi to 100 psi, the span is 100 psi. Calibrating the span ensures the instrument accurately measures across its intended operating range.
51. How do you ensure correct labeling and tagging of instruments for QA/QC?
QA/QC references P&IDs, data sheets, and the project’s tag numbering convention to confirm each instrument or device has the correct tag. Physical labels must be durable, legible, and in the correct location (often near the device or on the cable). Inspectors verify the label’s accuracy against project documentation and ensure it won’t fade or detach under plant conditions.
52. Why are cable glanding and sealing important in E&I QA/QC?
Cable glands protect against water ingress, dust, and mechanical strain, while also maintaining hazardous area ratings where applicable. Proper sealing ensures the cable’s outer jacket is clamped, preventing tension on conductors and preserving enclosure integrity. QC inspectors check gland type, size, tightness, and ensure the correct IP or explosion-proof rating is achieved.
53. What is the role of an IR test in ensuring motor health?
An Insulation Resistance (IR) test helps identify potential deterioration in motor windings or internal insulation. By applying a DC voltage (via Megger), you measure the resistance to ground. If the value is too low, it indicates moisture or insulation breakdown, potentially leading to motor failure. QA/QC logs IR results to confirm readiness for service.
54. Why would you perform a dryness test for instrument air lines?
Moisture in instrument air can damage pneumatic instruments, cause rust in piping, or freeze in cold climates. A dryness test checks the dew point or moisture content to ensure the air supply meets the required specification (often ISO 8573-1 class). QA/QC includes dryness tests in the commissioning phase to guarantee air-driven equipment operates reliably.
55. How do you verify correct polarity in a DC power system for instrumentation loops?
Use a DC voltmeter to check voltage across the power terminals. The meter’s polarity indication (positive or negative reading) will confirm the correct orientation. QA/QC also cross-references labeling on distribution panels or power supplies. Proper polarity is crucial for 2-wire transmitters and loops that rely on a precise DC supply.
56. What is the difference between a ‘soft tag’ and ‘hard tag’ for instruments?
A ‘soft tag’ is the logical identification used within control software or a database, while a ‘hard tag’ is the physical label attached to the instrument or panel. QA/QC teams ensure both match so that the field device (hard tag) corresponds exactly to the logic or historian references (soft tag).
57. Why do QA/QC inspectors often check ‘pull tension’ records during cable installation?
Excessive pulling tension can damage cable insulation or conductors, leading to potential failure. Cable installation specifications usually define the maximum allowable pulling force. By reviewing pull tension logs, QA/QC can confirm safe handling and maintain cable integrity throughout installation.
58. Explain the purpose of verifying RTD ‘element calibration’ and ‘lead wire compensation.’
RTDs (Resistance Temperature Detectors) rely on precise resistance changes with temperature. Element calibration ensures the RTD’s resistance vs. temperature curve is accurate. Lead wire compensation corrects for added resistance from extension wires (which can skew readings). QA/QC checks that the transmitter or monitoring device is configured for the correct RTD type (e.g., Pt100, Pt1000) and lead compensation.
59. What are the common issues checked during a final instrument air leak test?
During an air leak test, QA/QC typically inspects:
- Fittings and connections for leaks.
- Tubing integrity and alignment.
- Valve packing or seat leaks.
- Pressure gauge stability over a defined hold period.
Any drop in pressure or audible hissing indicates a leak that must be repaired.
60. How do you confirm compliance with ‘redundant instrument loops’ for critical applications?
Critical loops often require dual or triple redundancy. QA/QC ensures each redundant sensor or transmitter is installed in the correct location, each has independent wiring, and the control system logic is programmed to handle the redundancy. Inspectors also confirm redundancy is tested, e.g., isolating one transmitter to verify the backup device seamlessly takes over.
61. Why is verifying the torque of electrical terminations important?
Improper torque can cause overheating, arcing, or loose connections, all of which compromise electrical safety and reliability. QA/QC teams use calibrated torque wrenches to confirm that terminations (in switchgear, panels, or motors) meet the manufacturer’s specified torque values. Proper torque ensures consistent contact pressure and reduces the risk of faults.
62. Describe the difference between an open loop test and a closed loop test for control systems.
Answer:
- Open Loop Test: The controller output is driven manually, and the system response is observed without automatic feedback control. This tests basic functionality and actuator movement.
- Closed Loop Test: The control loop is in automatic mode, responding to changes in the process variable. This validates the control strategy, tuning parameters, and system stability.
63. What does ‘proof testing’ mean in relation to safety instrumented systems (SIS)?
Proof testing is a periodic test to detect hidden failures in safety instrumentation that might not appear under normal operation. It involves simulating a demand or forcing the SIS logic to confirm the system reacts correctly (e.g., shutting a valve). QA/QC documentation of proof tests helps maintain SIL compliance and ensures the reliability of the safety system throughout its lifecycle.
64. How do you ensure that the correct cable tray fill percentage is not exceeded?
QA/QC checks cable tray fill calculations, which account for cable cross-sectional areas versus the tray’s free area. Inspectors verify the actual cables placed match the design and confirm any additions or changes still keep within the allowable fill percentage. Overfilling can lead to heat buildup, difficult maintenance, and potential cable damage.
65. What is the role of an IP rating in E&I QA/QC?
IP (Ingress Protection) ratings classify the degree of protection provided by enclosures against dust and water (e.g., IP54, IP65). QA/QC verifies that field devices, junction boxes, or panels carry the correct IP rating specified by the design, especially in harsh or outdoor environments. Inspectors check seals, gaskets, and cable glands to ensure compliance.
66. Explain how to inspect and test emergency shutdown (ESD) push buttons.
Answer:
- Visual Inspection: Confirm correct location, labeling, and mechanical condition.
- Function Test: Activate the ESD button under controlled conditions to verify the correct shutdown sequence.
- Reset Procedure: Confirm the ESD system resets properly and normal operations can resume.
QA/QC logs test details and ensures compliance with project and safety requirements.
67. How do you address the presence of electromagnetic interference (EMI) in instrument signals?
QA/QC ensures proper cable shielding, grounding, and cable routing away from high-voltage or high-current lines. Using twisted-pair shielded cables, installing ferrite beads, or implementing cable trays with EMI barriers can mitigate interference. In some cases, relocating instruments or upgrading to fiber optic lines may be necessary for high-noise environments.
68. What considerations do you have for finalizing instrumentation in high-temperature applications?
In high-temperature service, QA/QC checks special cable insulation (e.g., mineral insulated cables), temperature-rated transmitters, and protective heat shielding. The calibration range of the device must exceed the expected operating temperature. Adequate air gap or insulation is assessed to protect electronics, ensuring reliability and safe operation.
69. What’s the difference between a PT100 and a PT1000 RTD sensor?
A PT100 RTD has a resistance of 100 Ω at 0°C, while a PT1000 RTD has 1000 Ω at 0°C. PT1000 sensors yield higher overall resistance, making them less susceptible to lead resistance errors. The choice depends on required accuracy, lead wire length, and the transmitter’s input capability. QA/QC confirms the instrument and transmitter compatibility before installation.
70. How do you verify that instrument junction boxes are installed correctly?
QA/QC inspections confirm:
- Box location matches design documents.
- Correct IP or NEMA rating.
- Proper cable entry and gland sealing.
- Internal terminals are labeled and match wiring diagrams.
- Grounding and bonding are properly executed.
71. Why might you use thermowells in temperature measurement and how do you test them?
Thermowells protect temperature sensors from process pressure and flow conditions, allowing sensor removal without depressurizing the system. QA/QC checks material specifications (e.g., stainless steel or alloy), correct immersion length, and ensures no mechanical damage. Pressure tests or dye-penetrant tests can confirm weld integrity and ensure no leaks or cracks in the thermowell.
72. Explain how you’d verify the operation of an ultrasonic level transmitter.
Answer:
- Physical Inspection: Check mounting location, orientation, and clear line-of-sight to the liquid surface.
- Power & Signal: Confirm correct wiring and 4–20 mA or digital output.
- Functional Test: Simulate changing levels or partially fill the tank to observe transmitter response.
- Calibration & Configuration: Adjust gain or blanking distance to eliminate false echoes from tank obstructions.
73. What is a ‘dry contact’ versus a ‘wet contact’ in electrical terms?
A dry contact is a relay or switch contact that does not provide its own voltage; it simply closes or opens a circuit. A wet contact has an external power source or voltage connected through the contact, so it is “live.” QA/QC ensures correct wiring for dry vs. wet contact loops, especially in interlocks or external device signaling.
74. How do you perform a continuity and insulation check on instrument cable shields?
Answer:
- Continuity: Use a multimeter to confirm the shield is continuous from the field device to the termination point.
- Insulation Check: Ensure the shield is isolated from conductor cores to avoid ground loops or short circuits.
- Grounding Point: Verify that the shield is grounded at only one end (per typical design practice) to prevent noise coupling.
75. Why is functional testing of safety relays and interlocks critical?
Safety relays and interlocks are designed to detect fault conditions and initiate protective actions like shutting down equipment or preventing startup under unsafe conditions. Functional testing ensures these critical devices perform as intended. QA/QC documents each test step, verifying that the relay or interlock logic is correct and that the system transitions safely under fault simulations.
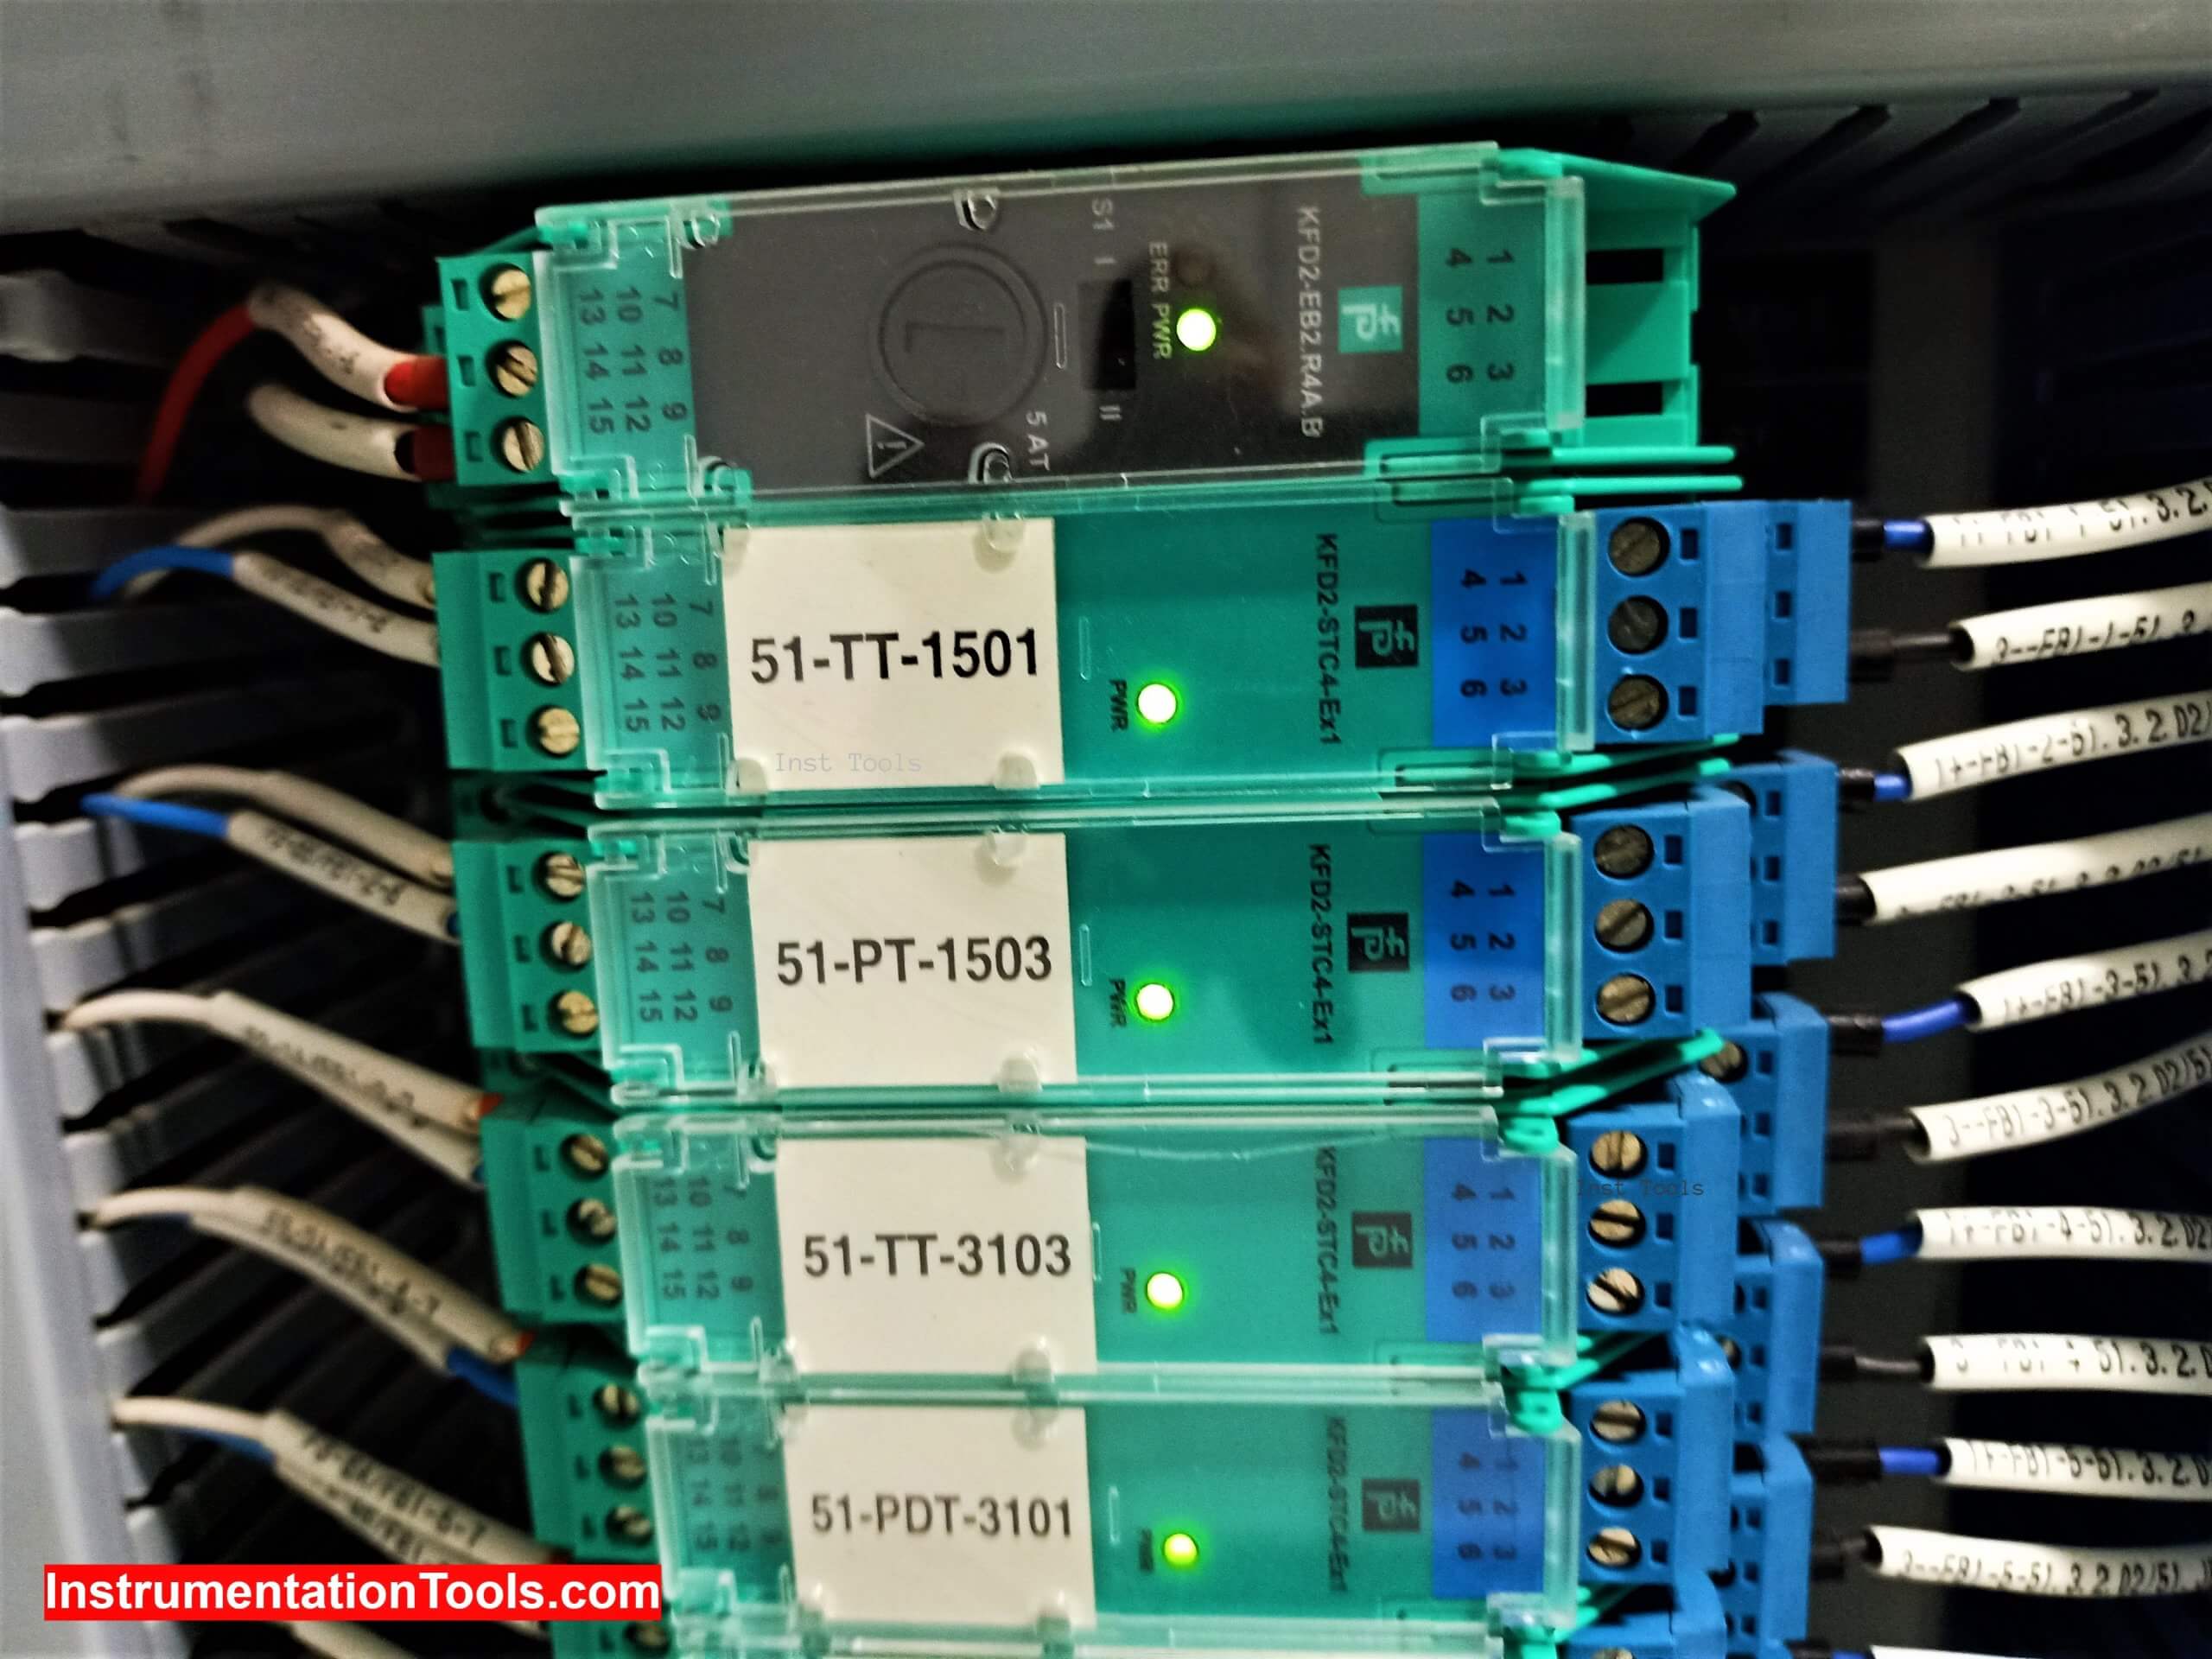
76. Explain the term ‘IS barrier’ in instrumentation and why it’s important.
An Intrinsic Safety (IS) barrier limits voltage and current in hazardous area instrument loops to safe levels, preventing sparks or excessive heat. QA/QC checks that the barrier is rated for the specific hazardous zone and that wiring meets IS guidelines (segregation, cable capacitance/inductance limits). Proper IS installation is crucial for explosion risk mitigation.
77. How do you confirm that installed enclosure heaters or thermostats for instruments are functioning properly?
QA/QC verifies the thermostat setpoint, physically inspects heater elements and wiring, and measures the temperature inside the enclosure under controlled conditions. They also confirm the enclosure’s rating and insulation. Testing often involves powering the heater, monitoring the thermostat’s activation point, and checking uniform heat distribution or correct shutoff temperature.
78. What considerations are needed when installing thermocouples in vibrating or high-flow environments?
Thermocouple leads and sheaths can suffer mechanical fatigue from constant vibration. QA/QC ensures robust mounting, suitable protective fittings, and enough support to avoid resonance. In high-flow environments, wear on the thermocouple tip must be considered, so additional shielding or using a heavier gauge thermocouple might be required.
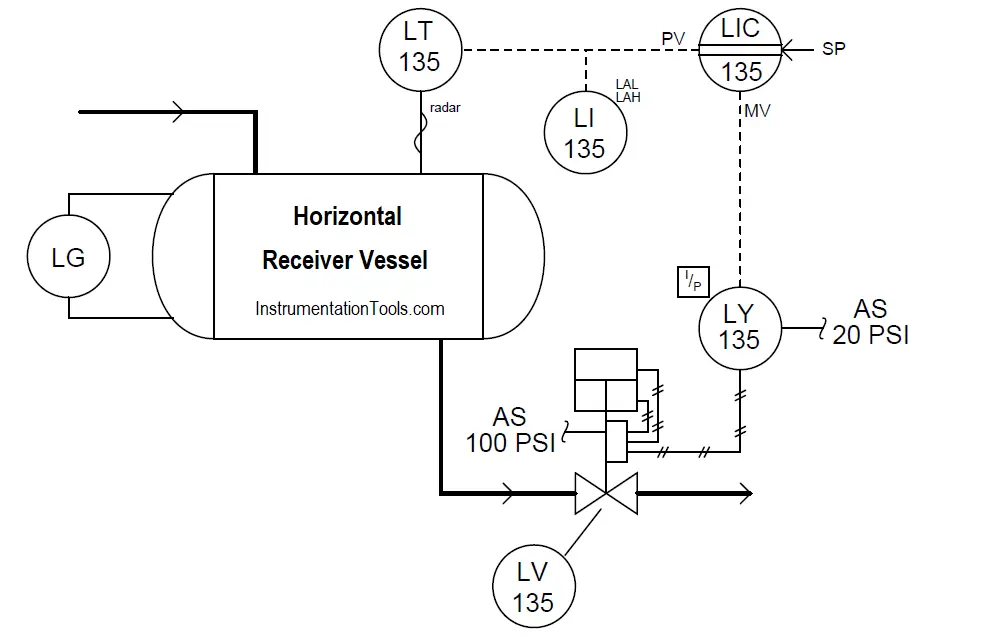
79. How is a field device typically labeled in a P&ID or loop diagram (e.g., FT, TT, PT)?
Instrumentation labeling follows ISA or similar standards:
FT = Flow Transmitter
TT = Temperature Transmitter
PT = Pressure Transmitter
LT = Level Transmitter
These identifiers appear on the P&ID or loop diagram and correlate to the instrument’s measured variable.
80. What role do safety certificates (Ex d, Ex i, etc.) play in QA/QC for E&I equipment?
These certificates confirm that the equipment meets specific design criteria for use in hazardous areas. For example, Ex d (Flameproof) ensures an enclosure can withstand internal explosion without igniting external gases, while Ex i (Intrinsic Safety) limits energy in the circuit. QA/QC checks nameplates, ATEX/IECEx documentation, and installation details to verify compliance.
81. Why is it important to check the temperature rating of cable insulation in a high-temperature application?
Cable insulation must withstand the maximum ambient or process temperature to avoid degradation, cracks, or short circuits. QA/QC ensures cables with appropriate temperature ratings (e.g., 90°C, 125°C) are used where necessary, protecting system reliability and safety.
82. How do you handle multi-core cable identification and termination checks?
QA/QC matches the cable core color codes or numbering with terminal designations in the wiring diagrams. Each core must be labeled clearly on both ends. Inspectors verify that the correct conductor goes to the correct terminal, ensuring no cross-termination. Proper documentation of multi-core cables simplifies troubleshooting and future modifications.
83. What is a solenoid valve, and how do you test it during commissioning?
A solenoid valve is an electrically controlled valve that uses a solenoid actuator to open or close fluid flow. Commissioning tests include:
- Electrical Continuity: Ensuring correct coil resistance.
- Functional Check: Applying voltage to confirm the valve opens/closes fully.
- Leak Test: Checking seat tightness for fluid or air leaks when closed.
84. What are your checks for instrument air supply pressure levels?
QA/QC verifies that the regulated air supply meets the instrument’s operating pressure range (often 20–100 psi). Inspectors confirm that supply lines are sized correctly, that filters and pressure regulators are installed where needed, and that the system can maintain stable pressure under normal load. Pressure gauges are checked for accuracy, and any drop or fluctuation is investigated.
85. How do you confirm earthing (grounding) integrity in a hazardous area?
By measuring earth continuity and resistance at each piece of equipment, ensuring bonding jumpers are installed per design, and verifying that connections are secure. In hazardous areas, the grounding system must comply with strict standards to prevent static charges that could ignite vapors. QA/QC documents test results, ensuring the ground path remains below specified ohmic values.
86. Explain how you’d verify the operation of a variable frequency drive (VFD) from a QA/QC perspective.
Answer:
- Visual Inspection: Confirm correct wiring, cooling/ventilation, and environmental rating.
- Power-up Test: Check input supply voltages and ensure no alarms on the VFD display.
- Functional Test: Command various speeds (ramp up/down), check motor current, and observe for abnormal vibrations or temperatures.
- Parameter Verification: Compare drive settings (acceleration time, current limits) with design specifications.
87. Describe how to ensure correct design and installation of instrument stanchions and supports.
Stanchions and supports must comply with structural drawings, be anchored securely, and avoid interfering with plant operations. QA/QC verifies the material (often galvanized steel or stainless steel), checks weld quality, and ensures the support height and orientation facilitate safe instrument access. Proper location and alignment prevent mechanical strain on impulse lines or cables.
88. What steps do you take to verify a motor’s phase sequence is correct?
Use a phase sequence meter or rotating phase indicator at the motor terminals to check phase rotation (L1-L2-L3). QA/QC compares results to the expected rotation direction. If reversed, swap two phases to correct motor rotation before final mechanical coupling. Incorrect phase sequence can damage equipment or disrupt process flow.
89. Why is verifying cable shield grounding at only one end important for analog signals?
Grounding the shield at both ends can create ground loops, introducing interference or noise into sensitive analog signals. Grounding at one end is usually sufficient to drain unwanted electromagnetic noise while preventing current loops. QA/QC ensures consistent application of this practice per project or vendor guidelines.
90. Explain how you’d test a limit switch on a control valve assembly.
Answer:
- Visual Check: Confirm correct mounting, mechanical clearance, and labeling.
- Manual Actuation: Move the valve to fully open/closed positions to see if the limit switch toggles.
- Electrical Check: Use a multimeter to verify switch contact continuity in both states.
- Functional Integration: Confirm the switch status is correctly indicated in the control system (e.g., DCS or PLC).
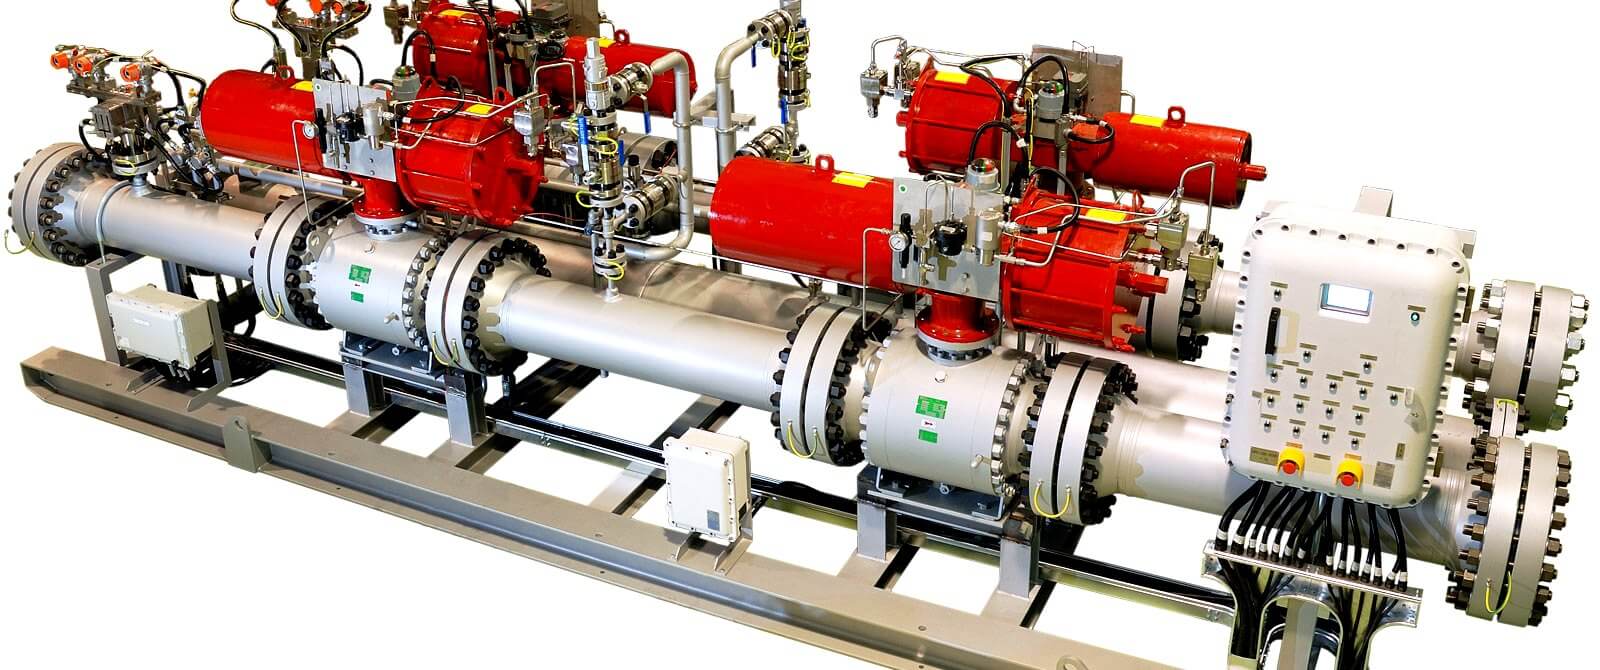
91. What is a HIPPS system, and why is QA/QC critical for it?
A HIPPS (High-Integrity Pressure Protection System) is a safety instrumented system designed to protect equipment from over-pressure events by shutting off flow when pressure exceeds a threshold. QA/QC is critical because HIPPS must meet stringent SIL requirements (usually SIL 2 or higher). Inspectors validate sensors, logic solvers, final elements, and test procedures to ensure the system’s reliability in preventing catastrophic failures.
92. How do you ensure correct sensor location for temperature measurement in large vessels?
QA/QC checks the engineering design specifying insertion depth, radial location, and height to match process requirements. Large vessels may need multiple sensors at different elevations for accurate temperature profiling. Inspectors confirm there are no obstructions blocking sensor insertion and that the thermowell or sensor is positioned to measure representative process conditions.
93. What tests would you perform on a freshly installed MCC (Motor Control Center)?
Answer:
- Visual and Mechanical Inspection: Check alignment, doors, latches, bus bars.
- Electrical Tests: Insulation resistance, phase continuity, torque checks.
- Functional Tests: Simulate start/stop signals, check breaker/trip units, control circuit wiring.
- Interlock Tests: Verify mechanical and electrical interlocks function as per design.
94. Why is verifying the actual length of thermocouple wires important in certain calibrations?
Thermocouple wire length can introduce additional resistance and potential voltage drops, which can affect calibration accuracy. Longer wires might require specific compensation or extension cables of the same thermocouple type. QA/QC confirms wire lengths and checks for consistent wire type to maintain a proper thermocouple junction reference.
95. Explain the importance of verifying the fail-safe position of control valves.
Fail-safe position (fail-open or fail-closed) ensures the system goes to the safest state during power loss, air supply failure, or emergency conditions. QA/QC checks actuator spring orientation, instrument air supply design, and DCS/PLC logic to confirm the valve physically moves to the correct position under fault conditions, safeguarding the process.
96. What is partial stroke testing for valves, and how is it relevant in QA/QC?
Partial stroke testing involves actuating a valve a small percentage of its travel to verify functionality without interrupting the process. It’s particularly relevant for safety valves, as it detects stiction or mechanical binding. QA/QC supports partial stroke tests by ensuring procedures are documented, instrumentation is in place, and test results are accurately recorded.
97. How do you confirm the correct calibration of a weigh scale or load cell?
Calibration involves applying known weights or using a certified load cell simulator across several points in the load range. QA/QC records the output signal (mV/V, 4–20 mA, or digital) at each load increment to check linearity and repeatability. Any deviation beyond tolerance is adjusted or corrected through calibration parameters, and a certificate is issued.
98. What is a grounding grid, and how do you inspect it for compliance?
A grounding grid is a network of interconnected conductors buried in the soil beneath an electrical substation or facility, designed to ensure reliable grounding for safety and equipment protection. QA/QC inspections check the grid layout, conductor sizes, welding or clamp connections, and measure ground resistance. Compliance is confirmed with design drawings and site test results.
99. How do you verify lightning protection systems on E&I structures?
QA/QC checks that air terminals (lightning rods) are at the correct height, down conductors follow the most direct path, and ground rods are installed with proper spacing. The system’s resistance to ground is measured. The bonding of metal structures ensures potential equalization. Proper lightning protection minimizes the risk of catastrophic damage or personnel hazards.
100. What final advice would you give for maintaining a robust QA/QC program in E&I?
Maintain thorough documentation at each project stage and ensure all participants, engineers, inspectors, contractors, understand quality standards. Regular audits and updated checklists help identify non-conformances early. Get proper training in relevant standards and tools (e.g., calibration instruments, test equipment). Finally, foster open communication between QA/QC and the project team to address issues promptly and keep quality at the forefront.
Conclusion
These 100 questions and answers provide a broad, in-depth look at the aspects of QA/QC within Electrical and Instrumentation engineering. A strong understanding of standards, inspection methods, calibration procedures, and documentation practices is essential for anyone seeking a QA/QC role in E&I projects. Always be prepared to adapt to project-specific codes, procedures, and client requirements, as these can vary depending on local regulations and industry practices.
Read Next:
- Top 100 Valve Questions and Answers
- Ladder Logic Questions and Answers
- PLC Wiring Questions for Technicians
- Vibration Analysis Questions and Answers
- Miniature Circuit Breakers Questions and Answers







thanks for post this questions and answers i really appreciate to you once again thanks you..