Root Cause Analysis (RCA) related to Bucket elevators chains lives too short and teeth wear too rapid – both perennial.
| Article Type: | Root Cause Analysis (RCA) |
| Category: | Mechanical |
| Equipment Type: | Pipelines and Miscellaneous Problems |
| Author: | S. Raghava Chari |
Note: This root cause analysis (RCA) is from real-time scenarios that happened in industries during the tenure of two or three decades ago. These articles will help you to improve your troubleshooting skills and knowledge.
Bucket Elevators Problem
NPK Fertilizers, Urea, and Sand handling Bucket Elevators; < 6 months’ chain lives against the former >3½ years and 10-12 months Shaft & Twin Sprocket Assembly’s’ (STSA) sprocket segments (SS):
Background information
The sprocket assembly came with Sprocket Segments bolted to the body (fig 1), to replace worn teeth segments with new ones during the fortnightly plant cleaning ½ shift shutdowns (SDs).
Crew could not unbolt the rust and corrosion frozen fasteners; hence, they replaced the teeth worn STSA with bought out STSA and reconditioned the removed from service STSA.
Hence, the manufacturer furnished ones let us call them Warehouse Sprocket Segment (WSS) remained unused.
The plant lived with the STSA replacement 2-days shutdown totaling to several days because of 12 elevators population.
Jerky elevator runs, and poor chain lives root cause analysis
The author on becoming maintenance manager root cause analyzed the first paragraph given problems.
The crew leader answer to Root Cause Analysis Query (RQ) when the problem started was 2 years after commissioning, i.e., after shop- reconditioned SSA use and perhaps the locally bought chains use worsens the situation.
The author assigned inspection engineer (IE) certified the local chain material hardness and fit up as good as the short few imported links held in the warehouse i.e., its MOC and workmanship confirm to standards.
Responding to that, the crew leader offered he and the (IE) reviewing the reconditioning procedure and carefully witness each task and get back.
Two days later they reported they could not find any flaw with the reconditioning; perhaps the author should witness a job in progress; he may find what they missed.
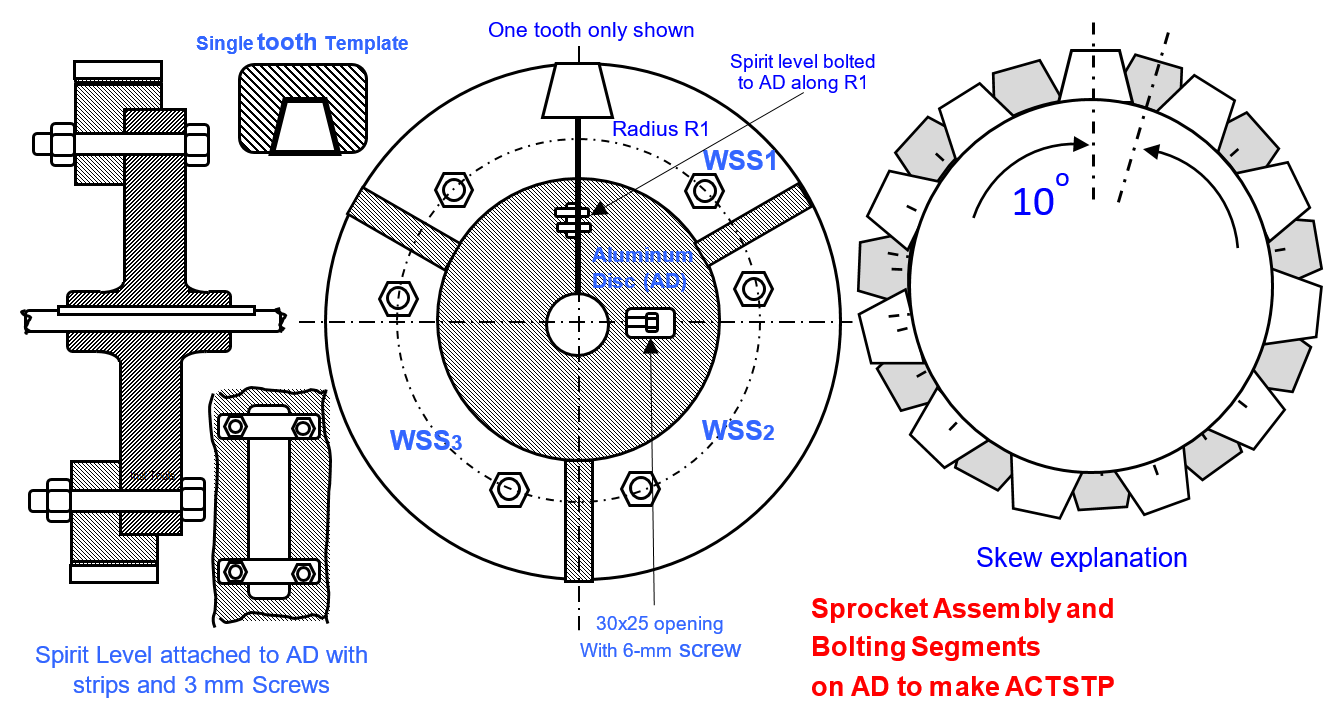
The author found, the technician checking a finish ground tooth with a single tooth template (STP fig 1). This didn’t seem right, but the author couldn’t pinpoint the flaw then.
Few hours later it flashed! STP check ensured correct each tooth profile, but not the teeth pitch; in addition, it missed skew – angular offset between absence between LSA and right RSA.
He asked them to find ways to avoid these errors. He also thought whenever time available and got a method.
After a week he found the crew leader had not got a method.
The author’s method is: make a template to mark all TEETH PROFILEs at correct TEETH PITCH on LSA and RSA skew free.
All correct teeth skew prevent template (ACTSPT)
He named it All correct teeth skew prevent template (ACTSPT, fig 1). Make it thus:
- Machine a 15-20 mm thick Al disc (AD) of outer dia = sprocket OD, and ID slide fitting the sprocket assembly hub.
- Deeply scribe the sprocket segments holding bolts PCD measured from the Rotable. Measure the chord distance between bolt hole centers on the PCD, mark with Centerpunch the centers on AD, drill and tap for 12 mm bolts.
- Centerpunch firm Radiuses R1 and R2 at 90O Clockwise.
- Bolt a sprit level to AD (fig 1) its edge coinciding with R1 – see fig 1 shown bolting details
- Cut a 30 x 25 opening on AD 10 mm away from bore edge along R2 (fig 1); drill, tap and screw in a15 mm long 6 mm bolt
- Pencil mark and firm Radius R3 on borrowed from warehouse sprocket segment WSS1 bisecting a middle tooth arc; bolt it to AD taking care to coincide both peripheries and R1 and R3 coinciding. Use custom washers as WSS1 bolt hole dia is >> 12 mm
- Similarly bolt WSS2 and 3 to AD
- Pencil Mark all tooth profiles, centerpunch firm and cut off the valley portions taking care not to encroach the teeth portions.
- ACTSPT is ready for use.
Correcting the reconditioned STSA
Correct the reconditioned STSA as under:
- Place the STSA shaft in a meter from floor high V-blocks stand taking care near equal LSA and RSA overhang. Level the shaft checking with a spirit level and shimming below a V-block.
- Rotate it till LSA a tooth CL is vertical; eye judgement
- Insert and butt the AD STSA LSA. Lock it to hub with R1 vertical – spirit level shown
- Pencil mark all teeth profiles; remove AD. Rebuild deficient teeth and grind facess flat
- Pencil mark the corrected teeth profiles as above and centerpunch firm
- Remove ACTSPT and grind all teeth valley portions taking care not to encroach on teeth portions
- LSA is near factory accurate
Making the RSA teeth also skew Free
The author guided the crew as follows:
- Butt ACTSPT on STSA RSA and lock with R1 vertical – spirit level indication. This ensures marking RSA teeth skew free to LSA’s
- Pencil mark all teeth profiles; Remove ACTSPT rebuild deficient teeth and grind faces flat
- Insert and adjust ACTPT as in 1, pencil mark all teeth outlines, and centerpunch firm
- Remove ACTSPT and grind all teeth valley portions taking care not to encroach on teeth portions
- RSA is near factory accurate and skew free to LSA; i.e., the reconditioned STSA near factory accurate
Crews rebuilt all STSA’s worn teeth as above.
Benefits from ACTSPT
Benefits from ACTSPT are:
- Thanks to marking all teeth using ACTPT and grinding according to it, STSA is skew free and teeth dimensions and pitch are factory accurate.
- Hence, chain jerks and uneven wear disappeared
- Hence chain life exceeded the former original lives.
- Sprockets reconditioning, too reduced by 50%.
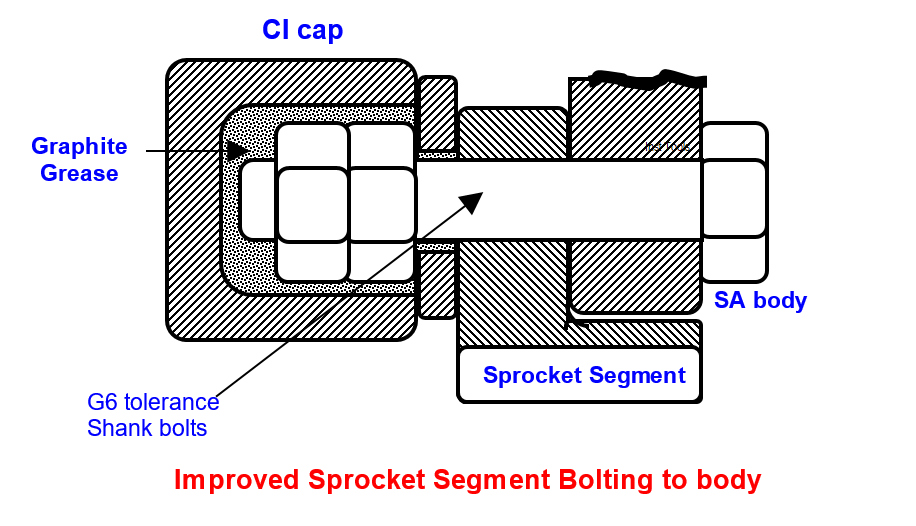
However, the continued 2 days plant shutdown (SD) to change the rotable STSA bothered the author. Hence, he asked the crew to find out a way of segments replacing as the manufacturer intended to eliminate the rotable changes two days outages.
Author found solution
Pondering over the problem, the author arrived at the below given method to achieve the above objectives:
- Buy B7 grade 16 mm g6 tolerance shank fine threaded bolts 32 mm longer than those now bolting TSs to body+2 nuts+ CI cap for each bolt (fig 2)
- Using nut splitter split the nut securing SS1 to the shop held rotable; using thin disc grinder slice off the protruding bolt portion leaving 6 mm protruding. Slice off the bolt head.
- Drill the bolt using 12 mm drill followed by 14. Using pencil grinder slice the left-out bolt in two 180o apart locations. Radially hammer out the bits. Bolt-holes slight local injuries are acceptable. The bolt bit came off with drift hammering
- Graphite grease the bought-out bolt, insert it, tighten graphite greased nut lock nut, and CI cap. Different crews practiced the above steps on the rotable STSA 12 bolts and gained confidence of doing the task in 6-hours the plant cleaning SD time.
- Different crews put as many new graphite greased bolts as possible on STSA SS’s (fig-2) during plant cleaning SDs
- Thus, new greased bolts secured SSs on all STSAS in 3 months
- Thus, crew reverted to in-situ SS changes and the 20-25 days rotable STSA change SDs vanished
Worn TSs’ Shop reconditioning
Recondition worn TSs thus:
- Bolt WSS1-3 to rebuilt and faces ground flat SS 1-3, pencil mark teeth profiles centerpunch firm and grind off valleys without encroaching tooth portions
- Return WSS1-3 to the warehouse
- The reconditioned SSs’ are teeth profile and teeth pitch factory accurate because it is an exact copy of factory-made sprocket segment
RCA Solution Benefits
- Crews changed SSs during fortnightly plant cleaning SDs itself as the graphite greased and ends protected fasteners easily opened forever as crew cleaned the old grease and applied new every time
- Hence, onstream days increased 20 to 25 yearly and production correspondingly production also 9,000 T/Y
- Thanks to near factory accurate STSAs chains and sprocket teeth lasted and lasted contributing 2000 T/ Y additional production
- The former though infrequent surprise catastrophic chain snaps and the enormous time taking, and efforts intensive recoveries and chain purchase costs vanished totally.
Author: S. Raghava Chari
Do you face any similar issues? Share with us through the below comments section.
If you liked this article, then please subscribe to our YouTube Channel for Instrumentation, Electrical, PLC, and SCADA video tutorials.
You can also follow us on Facebook and Twitter to receive daily updates.
Read Next:
- Plug Valves Leaks
- Rupture Discs bursts
- Repeat Safety Valve Popping
- Fan Bearing Change Times cut by 90%
- Boiler Feed Water Shell Flange Leaks