Inst ToolsInst ToolsInst Tools
  • Courses
  • Automation
    • PLC
    • Control System
    • Safety System
    • Communication
    • Fire & Gas System
  • Instrumentation
    • Design
    • Pressure
    • Temperature
    • Flow
    • Level
    • Vibration
    • Analyzer
    • Control Valve
    • Switch
    • Calibration
    • Erection & Commissioning
  • Interview
    • Instrumentation
    • Electrical
    • Electronics
    • Practical
  • Q&A
    • Instrumentation
    • Control System
    • Electrical
    • Electronics
    • Analog Electronics
    • Digital Electronics
    • Power Electronics
    • Microprocessor
  • Request
Search
  • Books
  • Software
  • Projects
  • Process
  • Tools
  • Basics
  • Formula
  • Power Plant
  • Root Cause Analysis
  • Electrical Basics
  • Animation
  • Standards
  • 4-20 mA Course
  • Siemens PLC Course
Reading: How to Configure Analog Inputs and Outputs in Delta PLC?
Share
Notification Show More
Font ResizerAa
Inst ToolsInst Tools
Font ResizerAa
  • Courses
  • Design
  • PLC
  • Interview
  • Control System
Search
  • Courses
  • Automation
    • PLC
    • Control System
    • Safety System
    • Communication
    • Fire & Gas System
  • Instrumentation
    • Design
    • Pressure
    • Temperature
    • Flow
    • Level
    • Vibration
    • Analyzer
    • Control Valve
    • Switch
    • Calibration
    • Erection & Commissioning
  • Interview
    • Instrumentation
    • Electrical
    • Electronics
    • Practical
  • Q&A
    • Instrumentation
    • Control System
    • Electrical
    • Electronics
    • Analog Electronics
    • Digital Electronics
    • Power Electronics
    • Microprocessor
  • Request
Follow US
All rights reserved. Reproduction in whole or in part without written permission is prohibited.
Inst Tools > Blog > PLC Tutorials > How to Configure Analog Inputs and Outputs in Delta PLC?

How to Configure Analog Inputs and Outputs in Delta PLC?

In this post, we will learn how to configure analog inputs and outputs in Delta PLC ISPSoft programming software.

Last updated: November 21, 2022 4:08 pm
Viral Nagda
PLC Tutorials
No Comments
Share
5 Min Read
SHARE

In this post, we will learn how to configure analog inputs and outputs in Delta PLC.

In this post, we will see how to configure analog inputs and outputs in a Delta PLC. Let us have a look at each step one by one. I have taken the DVP12SE CPU for reference.

Delta PLC and HMI Course – Join Now

Configure Analog Inputs in Delta PLC

Configure the module that you have by selecting the Auxiliary design of extension modules option as shown in the figure.

Delta PLC Configure the modules

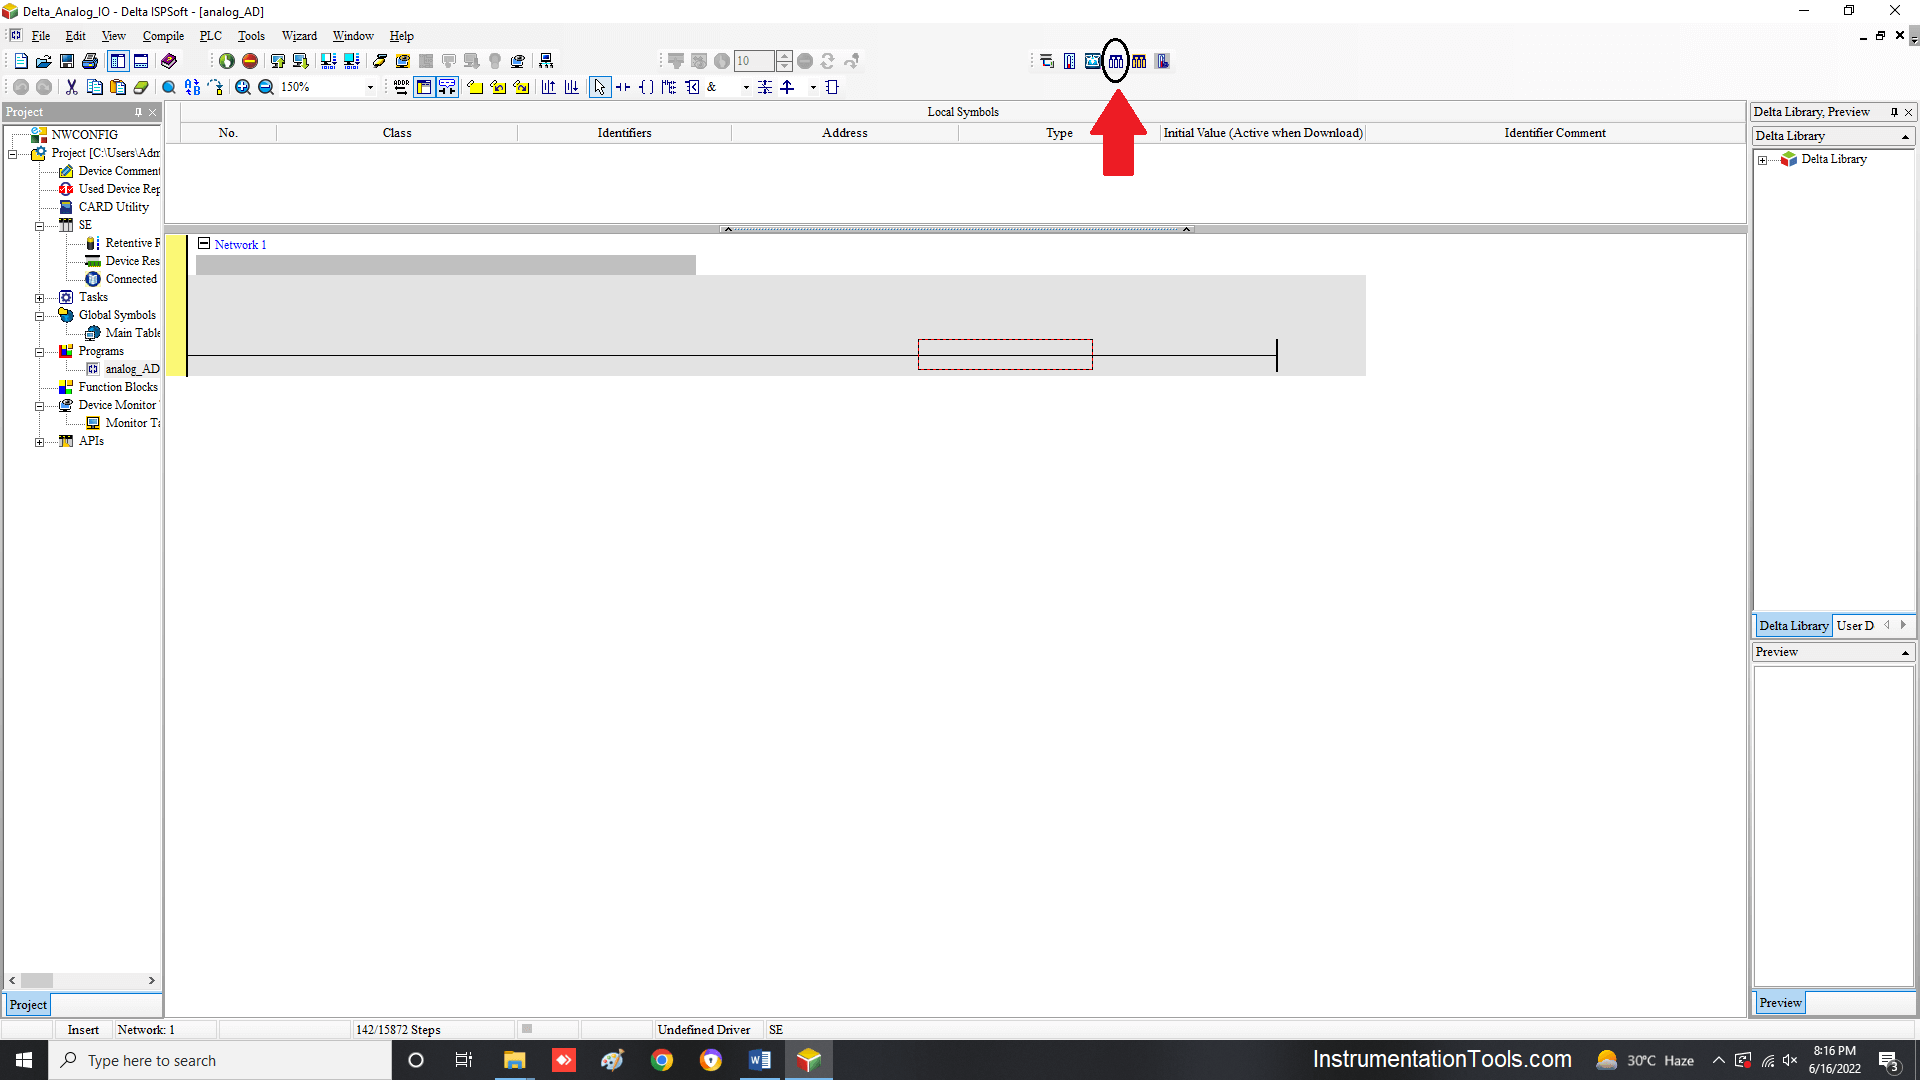
After clicking it, the following dialog window will open where you will be asked to select the model number of the module.

I have selected a 4 channel analog input module in this case.

4 channel analog input module in Delta PLC

After clicking the setup button in the popup, the following window will appear. Here, you have to choose the Input Mode Setting as shown.

Input Mode Setting in PLC

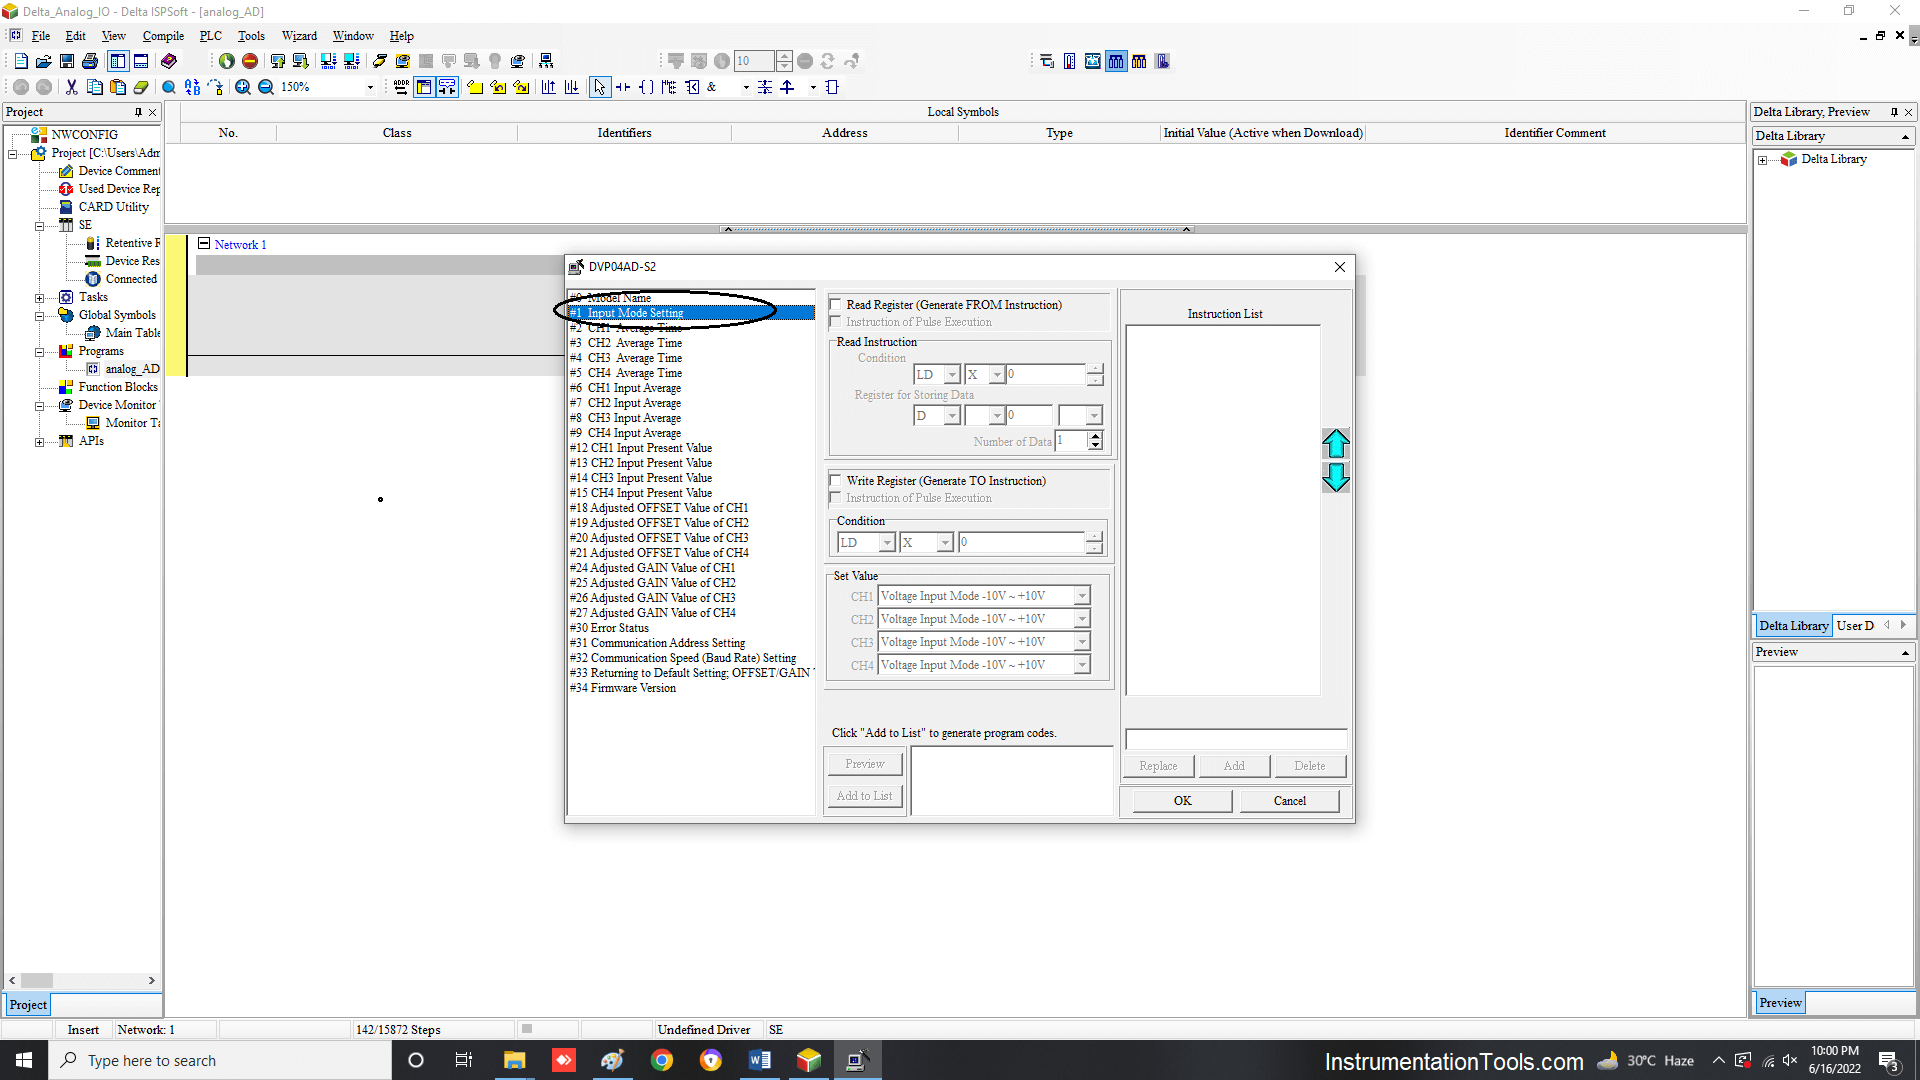
Then, follow the sequence as shown in the figure. First, tick the write register option. Then, select M type data type and put this register value as 1000.

M1000 is a system bit used to denote that the PLC is in a run state. Then, select the type of input you want. In this step, I have selected -20 to 20 mA as the type.

Then, click the preview button. Then, click add to list button. Finally, after everything has been completed.

Click the Ok button to finish the setup. This step will finish configuring your module.

Configure Analog Inputs and Outputs in Delta PLC

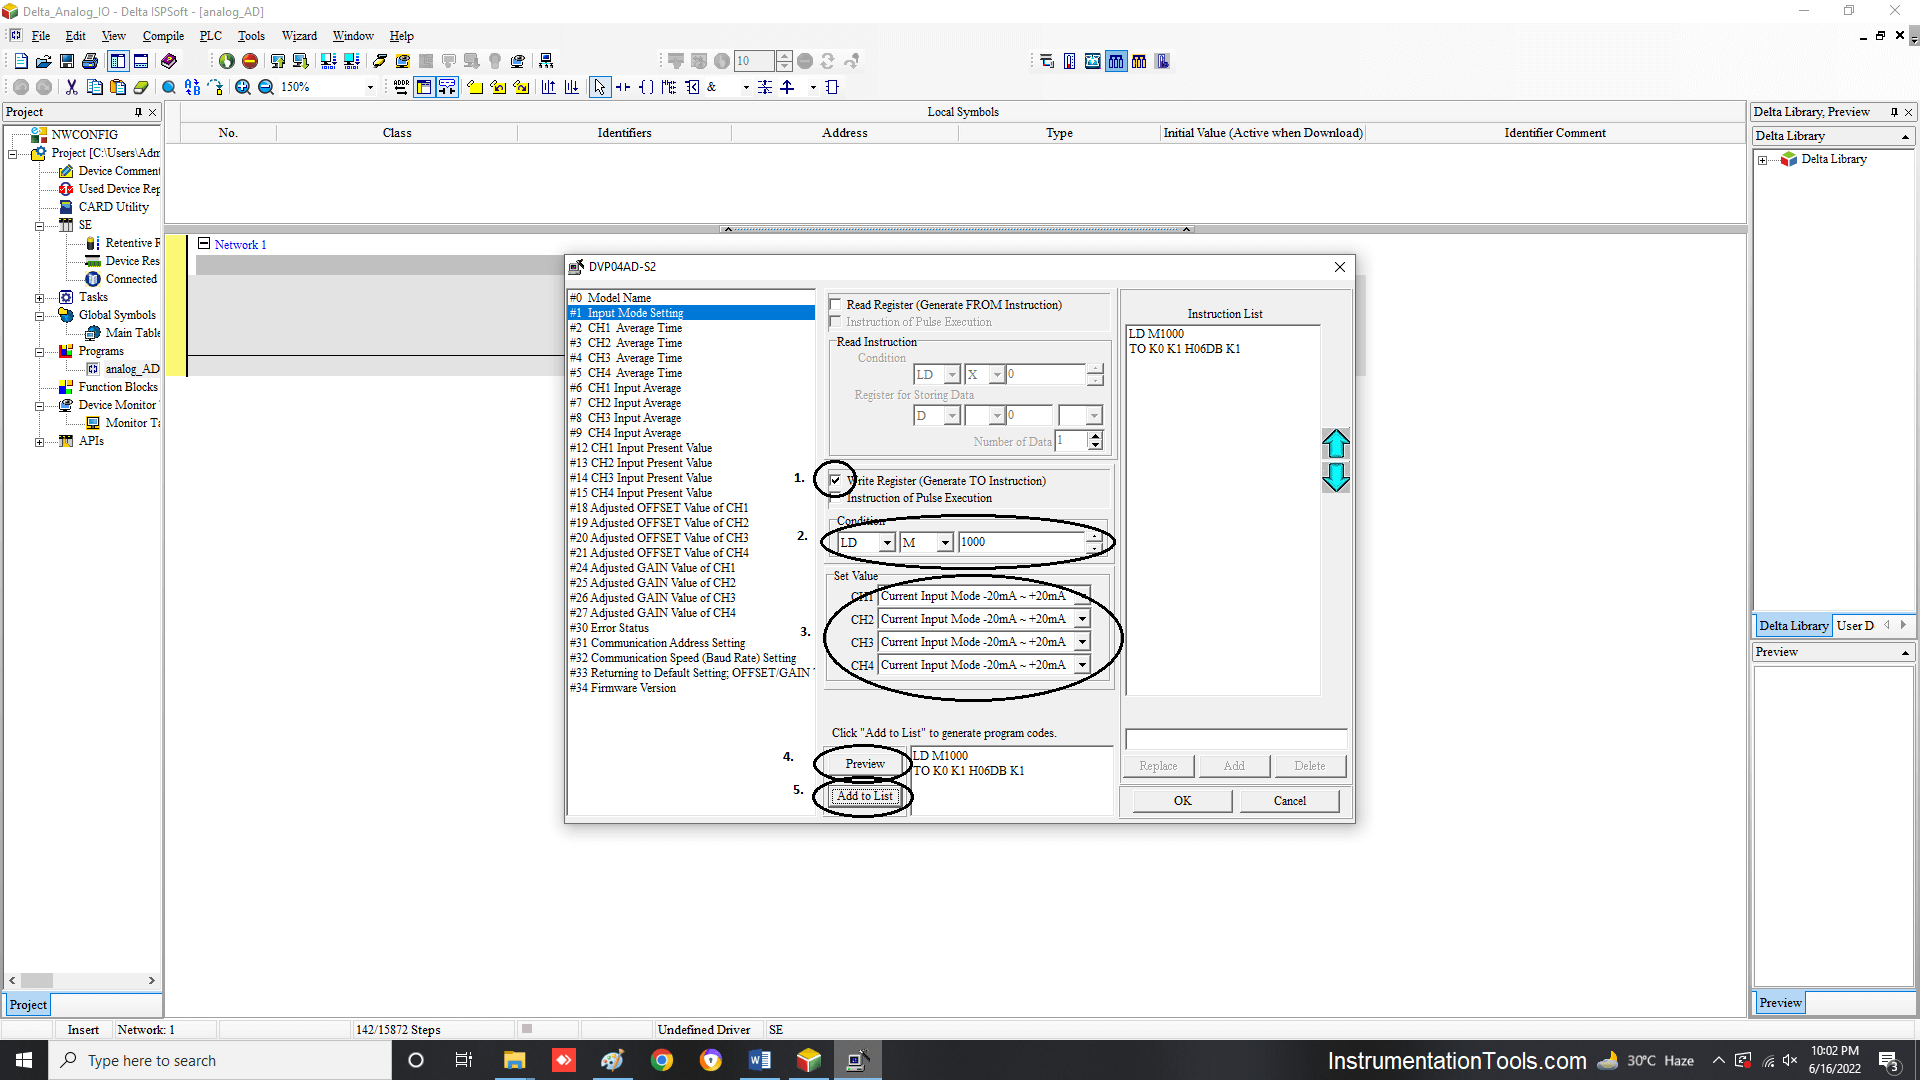
After this, the following block will appear in the ladder rung selected. The hexadecimal code in the S input denotes the code and configuration of the module you have done. It is system generated.

Now, suppose there are 3 modules of the same type in your system. Then too, this block can be used only once. There is no need to add two more rungs of the same type by again setting up the module as discussed before.

Setup is done only when your next module type changes.

PLC Analog Inputs Configuration

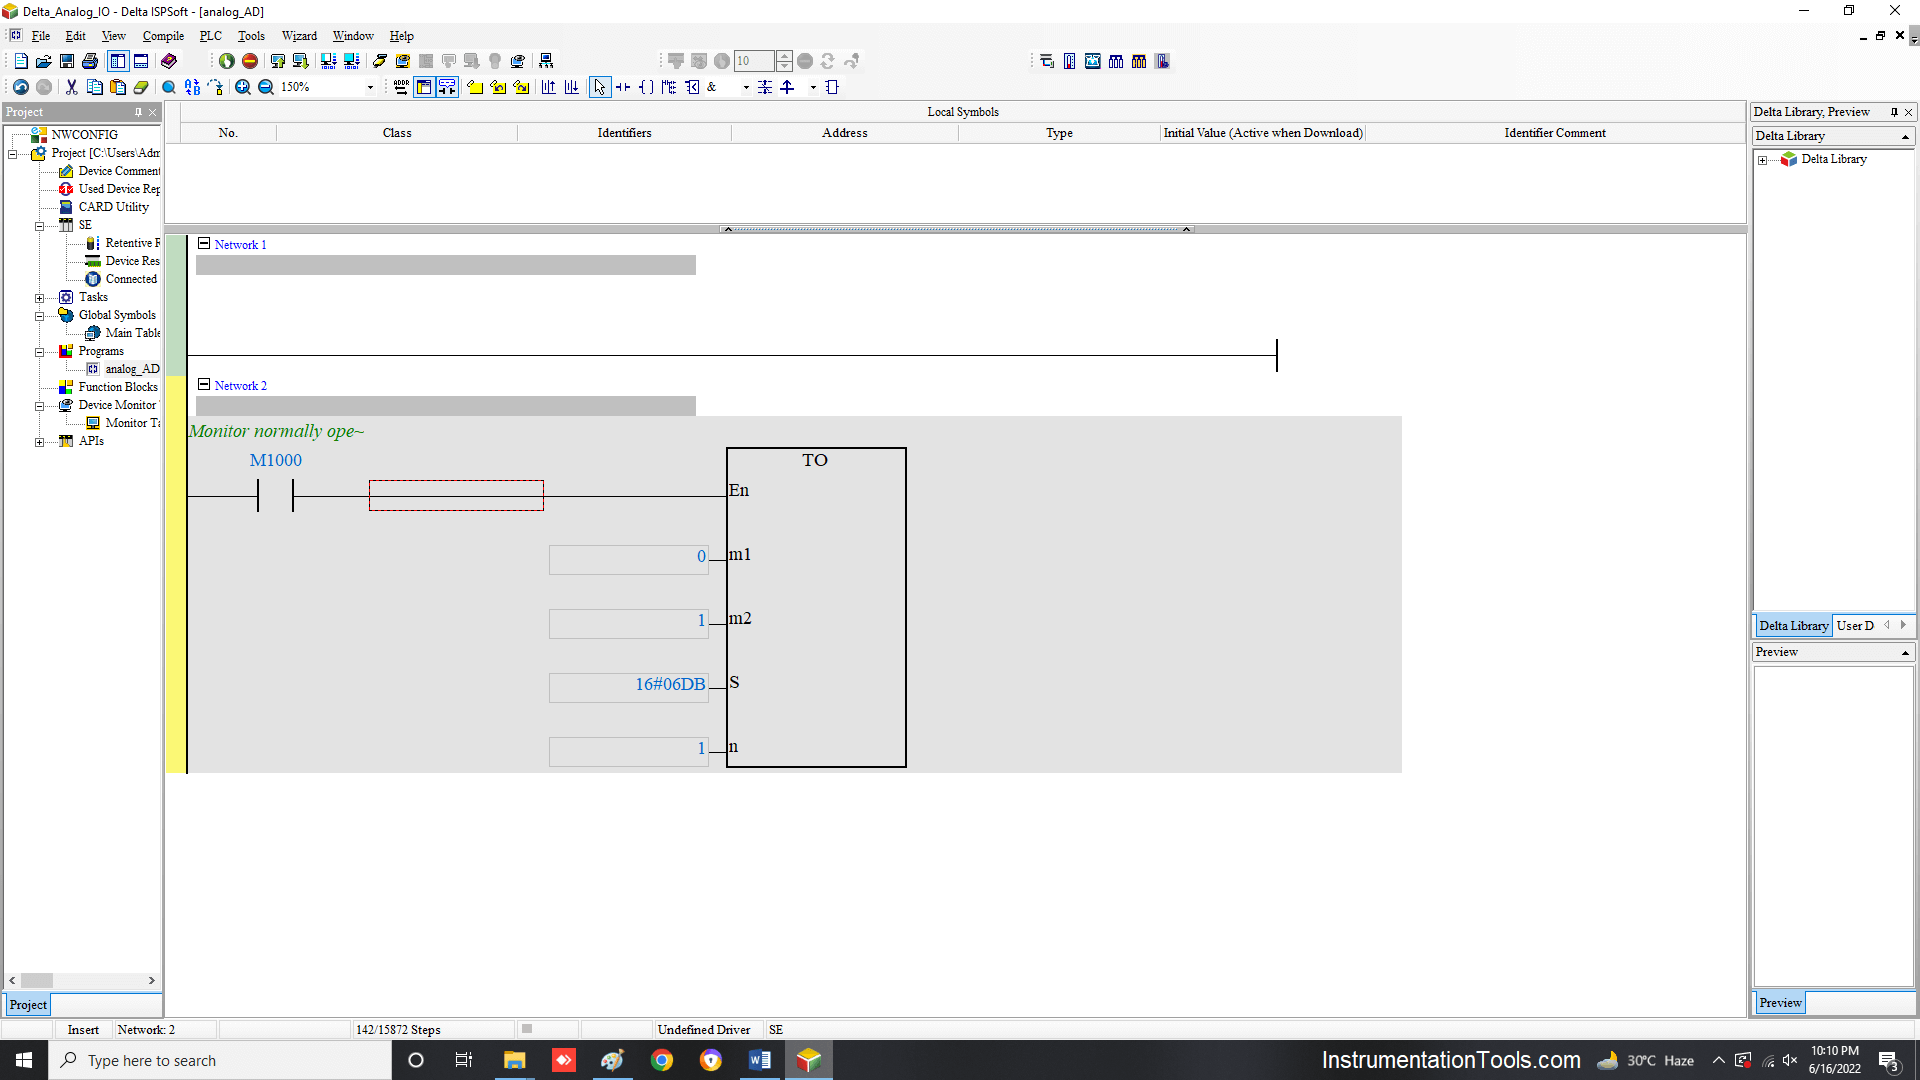
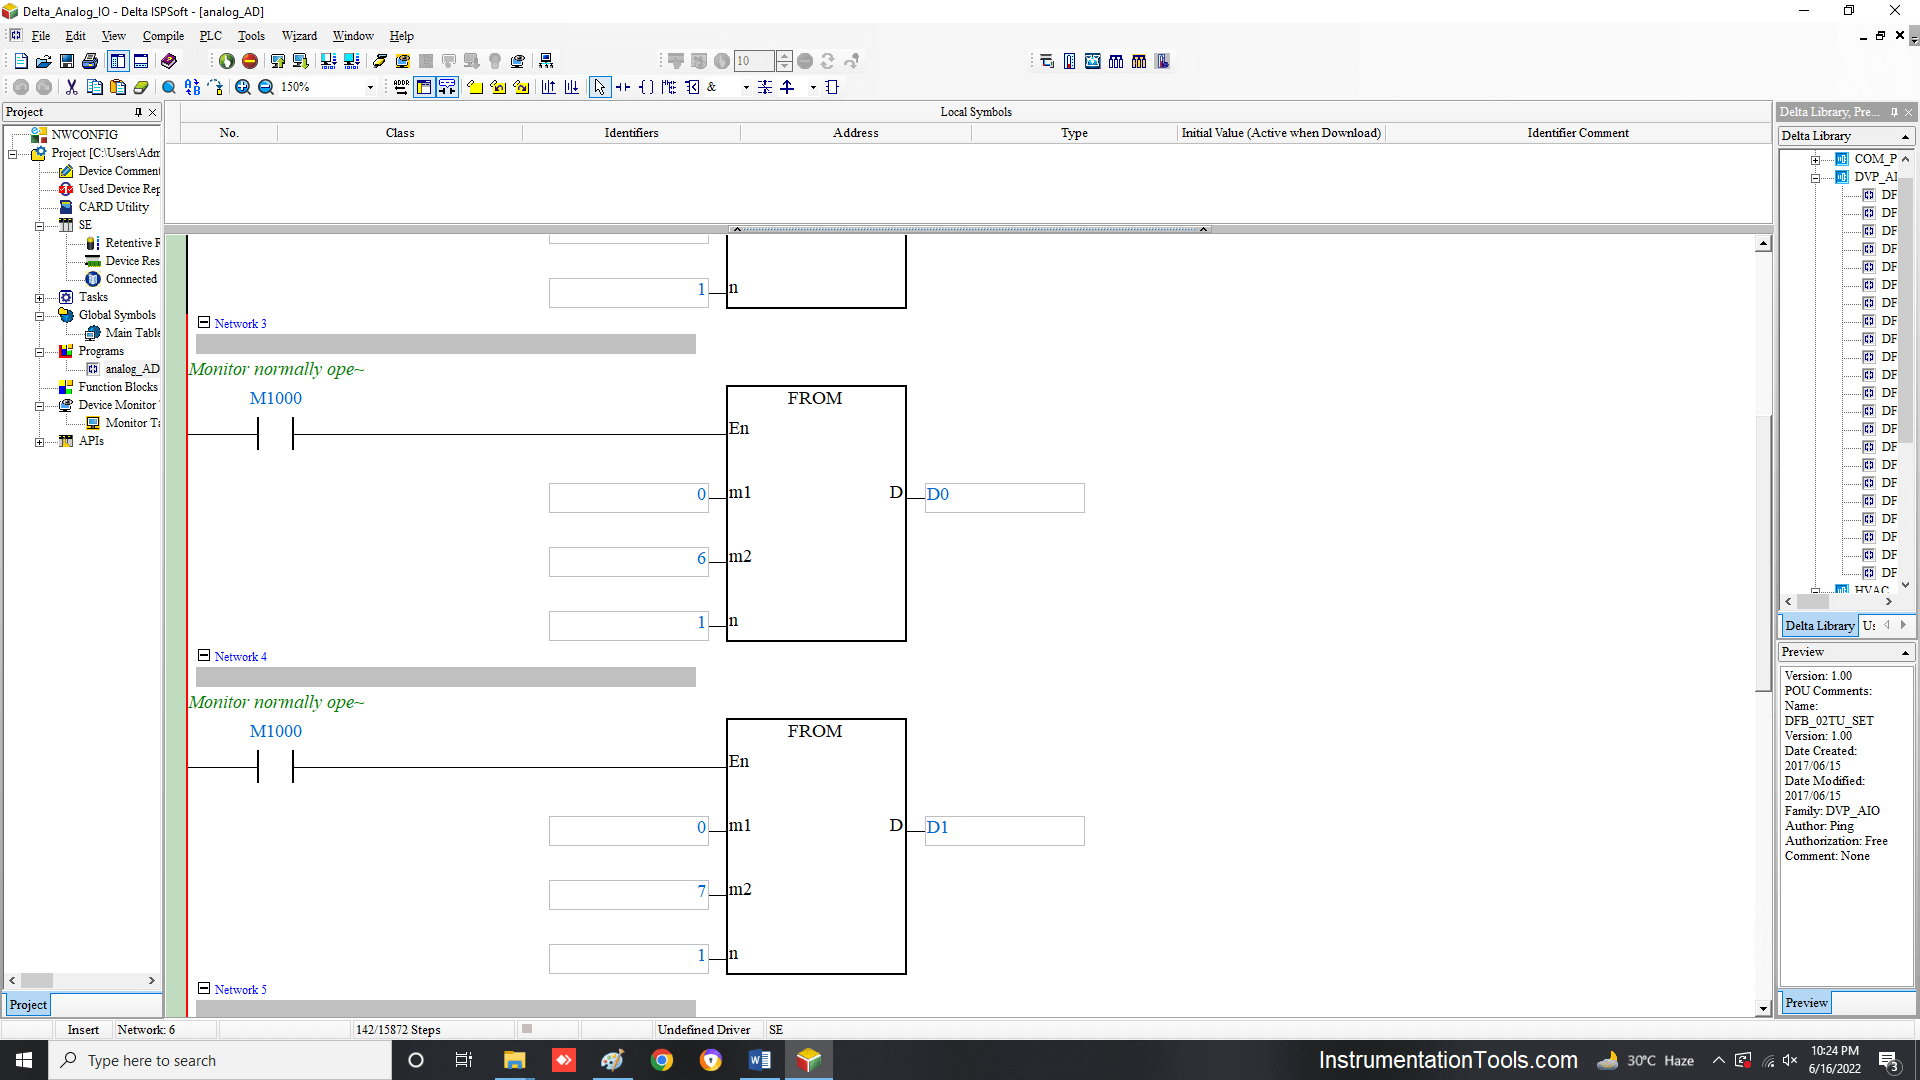
Now, add four rungs after this rung. Four rungs denote four inputs. For example, I have shown two rungs as shown in the below figure. M1 input denotes the slot number of the module you have connected. In this example, 0 means the module is connected in the first slot.

So, if you are connecting the module at the second slot, the number will come as 1. M2 input denotes the channel number in the module. 6 means first input; so in the next rung, I have taken 7 as the input (denoting the second channel).

Other parameters will remain the same. Then, D0 represents the register in the PLC where these analog input counts will be stored.

So, in the next rung, I have used the next available register as D1. Then, adding the remaining two rungs will complete your final setup of the analog input module.

Delta PLC analog input module

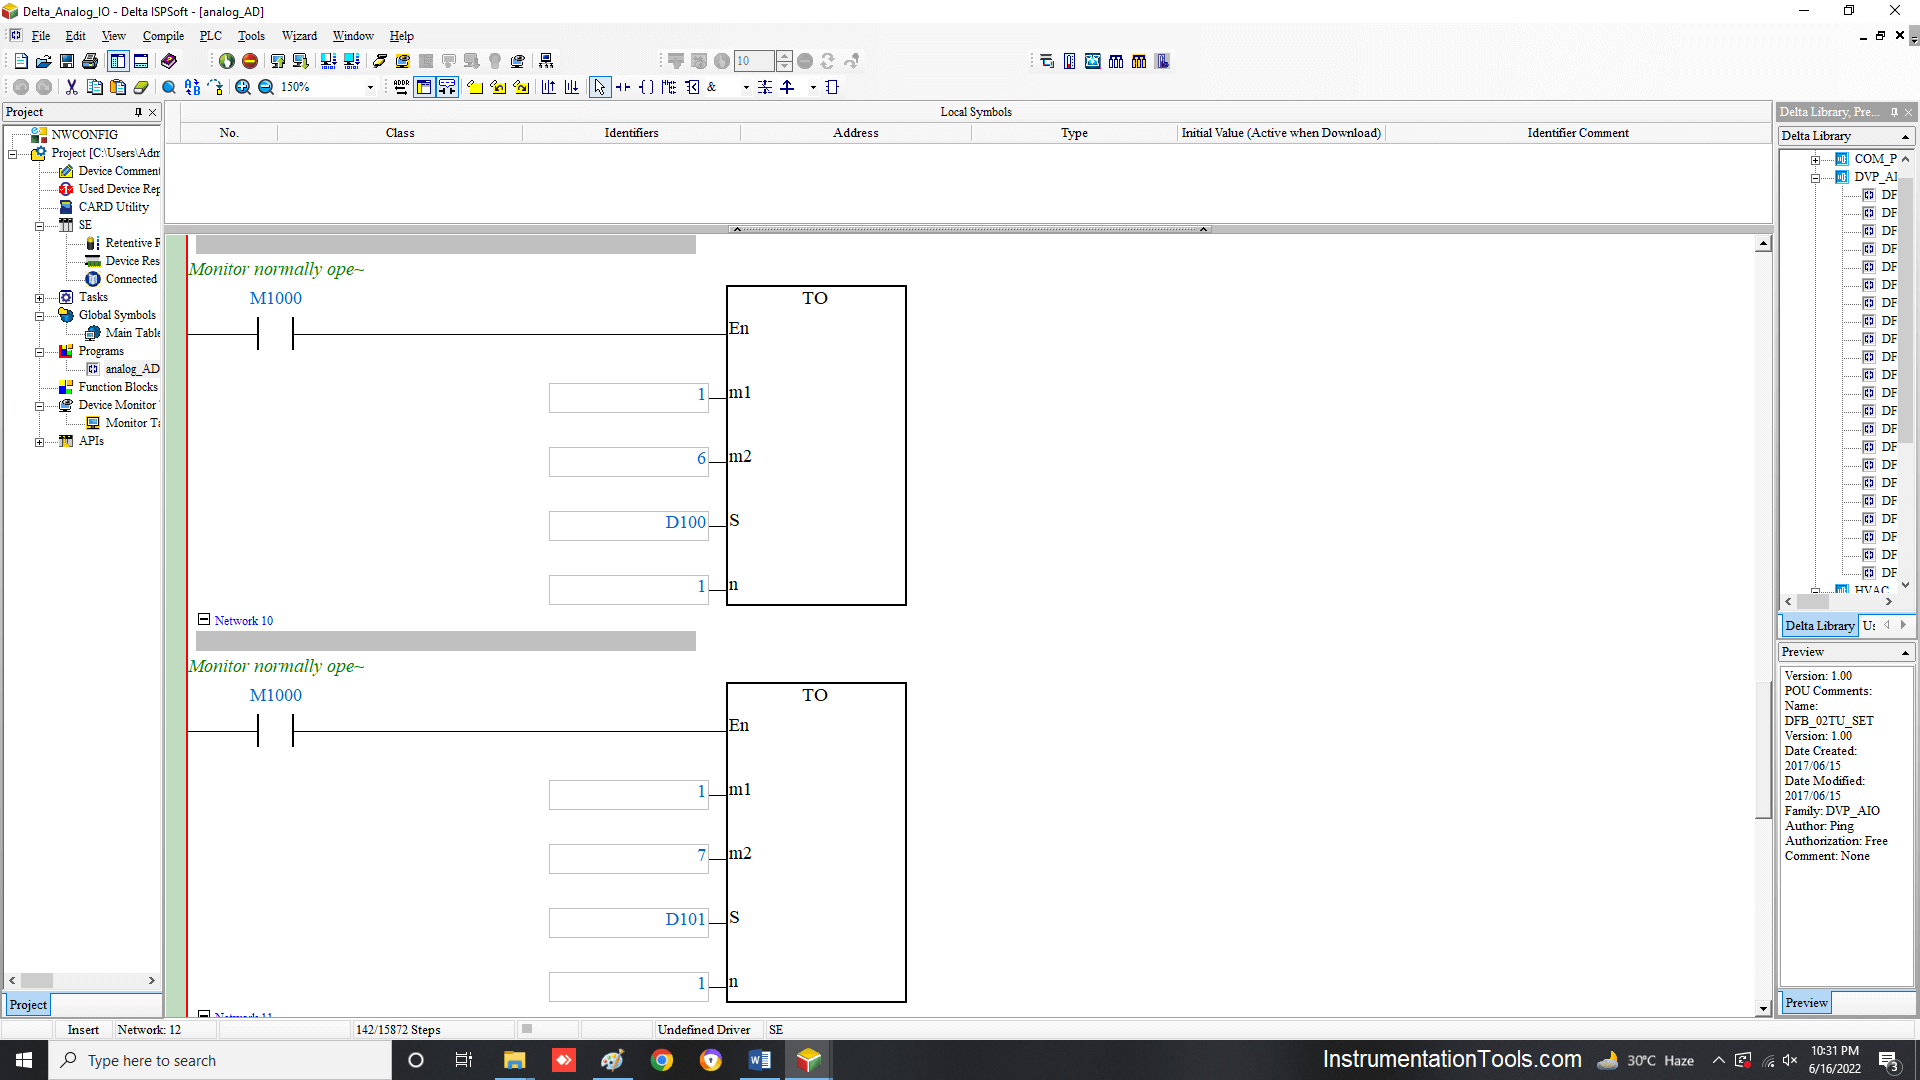
The analog output module configuration will be the same as discussed. The only difference is that instead of four FROM blocks, four TO blocks will come for a 4-channel analog output module. Refer to the following figure.

Here, everything is the same except for the addition of S input. Here, the register which will write the counts to analog output is used (D100). Then, in the next rung, D101 is used.

Delta PLC Analog Signals

Alternatively, if do not want to write four rungs, then just input the number 4 in the n input. Write only one rung.

Then, the PLC will automatically assign the next three consecutive addresses for the action. But, remember that the next three registers available must be free and not used anywhere else in the program.

In this way, we understand how to configure analog modules in Delta PLC.

If you liked this article, then please subscribe to our YouTube Channel for Instrumentation, Electrical, PLC, and SCADA video tutorials.

You can also follow us on Facebook and Twitter to receive daily updates.

Read Next:

  • Redundancy in Siemens PLC
  • Allen Bradley PLC Hardware
  • Motor Classic Control Circuits
  • Control System Cyber Security
  • Features of Scada in IoT System
Don't Miss Our Updates
Be the first to get exclusive content straight to your email.
We promise not to spam you. You can unsubscribe at any time.
Invalid email address
You've successfully subscribed !

Continue Reading

PLC Ladder Logic Design: Control 3 Motors with Toggle Switch
#6 PLC Best Practices – Validate Timers and Counters
Advanced PLC Course with Programming and Simulation
What is Hot Standby in PLC?
Siemens PLC Tia Portal – OB100 Start-up Organization Block
Difference Between Microcontroller and PLC
Share This Article
Facebook Whatsapp Whatsapp LinkedIn Copy Link
Share
Leave a Comment

Leave a Reply Cancel reply

Your email address will not be published. Required fields are marked *

Stay Connected

128.3kFollowersLike
69.1kFollowersFollow
210kSubscribersSubscribe
38kFollowersFollow

Categories

Explore More

Distributed Control System Interview Questions
Use of Regions in SCL Language
PLC Program for Motor Starter
PLC Programmer Salary and Future Career Scope
PLC Logic GATE Program
CODESYS HMI Interface
Readings Mismatch between Field & Control Room ? Why
Free Download Programmable Logic Controller (PLC) Book

Keep Learning

Relay Parts

Difference Between NO and NC Contacts

Functional Block Diagram in PLC for Oil and Water Process

Functional Block Diagram in PLC for Oil and Water Process

Network Switch

Network Switch Port Allocation Details

PLC Program to Drain Same Products from Two Tanks

PLC Program to Drain Same Products from Two Tanks

PLC Program Example - Signal Lamp Task

PLC Program Examples

PLC Program to Control Gas Pressure using Closed-Loop

PLC Program to Control Gas Pressure using Closed-Loop

On Delay Timer using PLC

ON Delay Timer using PLC

Claw Machine PLC Programming

Doll Claw Machine using Omron PLC Programming

Learn More

Infrared Flue Gas Analyser

What is Infrared Flue Gas Analyzer? – Working Principle

optical fibers terminations

Fiber Optic Data Communication

Retentive Timer (RTO)

Timer in Studio 5000 – TON, TOF, RTO

How to Prevent Conveyor Problems

Common Conveyor Problems and How to Prevent Them

circuit breaker principle

What is a circuit breaker ?

Gas detection system Interview Questions

Interview Questions on Gas detection System

Absorber in absorption chiller

What is an Absorption Chiller? – Working Principle

Orifice Plate

Orifice Plate Questions and Answers

Menu

  • About
  • Privacy Policy
  • Copyright

Quick Links

  • Learn PLC
  • Helping Hand
  • Part Time Job

YouTube Subscribe

Follow US
All rights reserved. Reproduction in whole or in part without written permission is prohibited.
Welcome Back!

Sign in to your account

Username or Email Address
Password

Lost your password?