Example of a PLC Program Controlling a Water Pump with 3 different power sources using Interlock function in CX-Programmer and CX-Designer.
Controlling a Water Pump with 3 Power Sources
This article discusses the PLC application of “Latching” and “Interlock” concepts which can be used as a learning medium for students or beginner PLC programmers.
How The PLC Program Works?
The PLC program uses 4 buttons, the START_SYSTEM (0.00) button is used to Turn ON the system, STOP_SYSTEM (0.01) button is used to Turn OFF the system.
The START_SOURCE1 (0.02) button is used to Turn ON the Water Pump using Source 1, START_SOURCE2 (0.03) button is used to Turn ON the Water Pump using Source 2, START_SOURCE3 (0.04) button is used to Turn ON the Water Pump using Source 3.
The system will Run when START_SYSTEM (0.00) button is Pressed and results in the memory bit SYSTEM_ON (W0.03) being ON. Because it uses Latching, the memory bit SYSTEM_ON (W0.03) remains ON even though the START_SYSTEM (0.00) button has been released. The memory bit SYSTEM_ON (W0.03) will be OFF if STOP_SYSTEM (0.01) button is Pressed.
This system uses the concept of “Latching” and “Interlock”, so that the memory bits SOURCE1 (W0.00), SOURCE2 (W0.01), and SOURCE3 (W0.02) cannot be ON at the same time, they can only be ON alternately. When one of the memory bits SOURCE1 (W0.00), SOURCE2 (W0.01), and SOURCE3 (W0.02) is Active then the WATER_PUMP (100.00) Output becomes ON.
I/O List
Addressing Input, Output, TIM, Bit Memory, and Word Memory details are as follows.
| Comment | Input (I) | Output(Q) | Memory Bits |
| START_SYSTEM | 0.00 | ||
| STOP_SYSTEM | 0.01 | ||
| START_SOURCE1 | 0.02 | ||
| START_SOURCE2 | 0.03 | ||
| START_SOURCE3 | 0.04 | ||
| WATER_PUMP | 100.00 | ||
| SOURCE1 | W0.00 | ||
| SOURCE2 | W0.01 | ||
| SOURCE3 | W0.02 | ||
| SYSTEM_ON | W0.03 |
PLC Program for Controlling a Water Pump
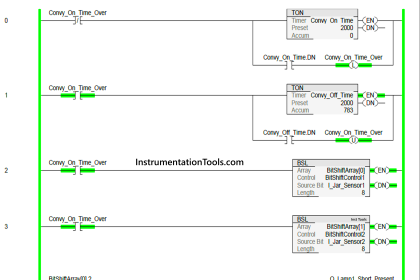
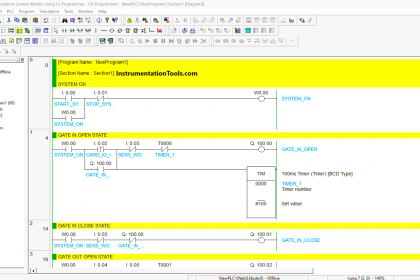
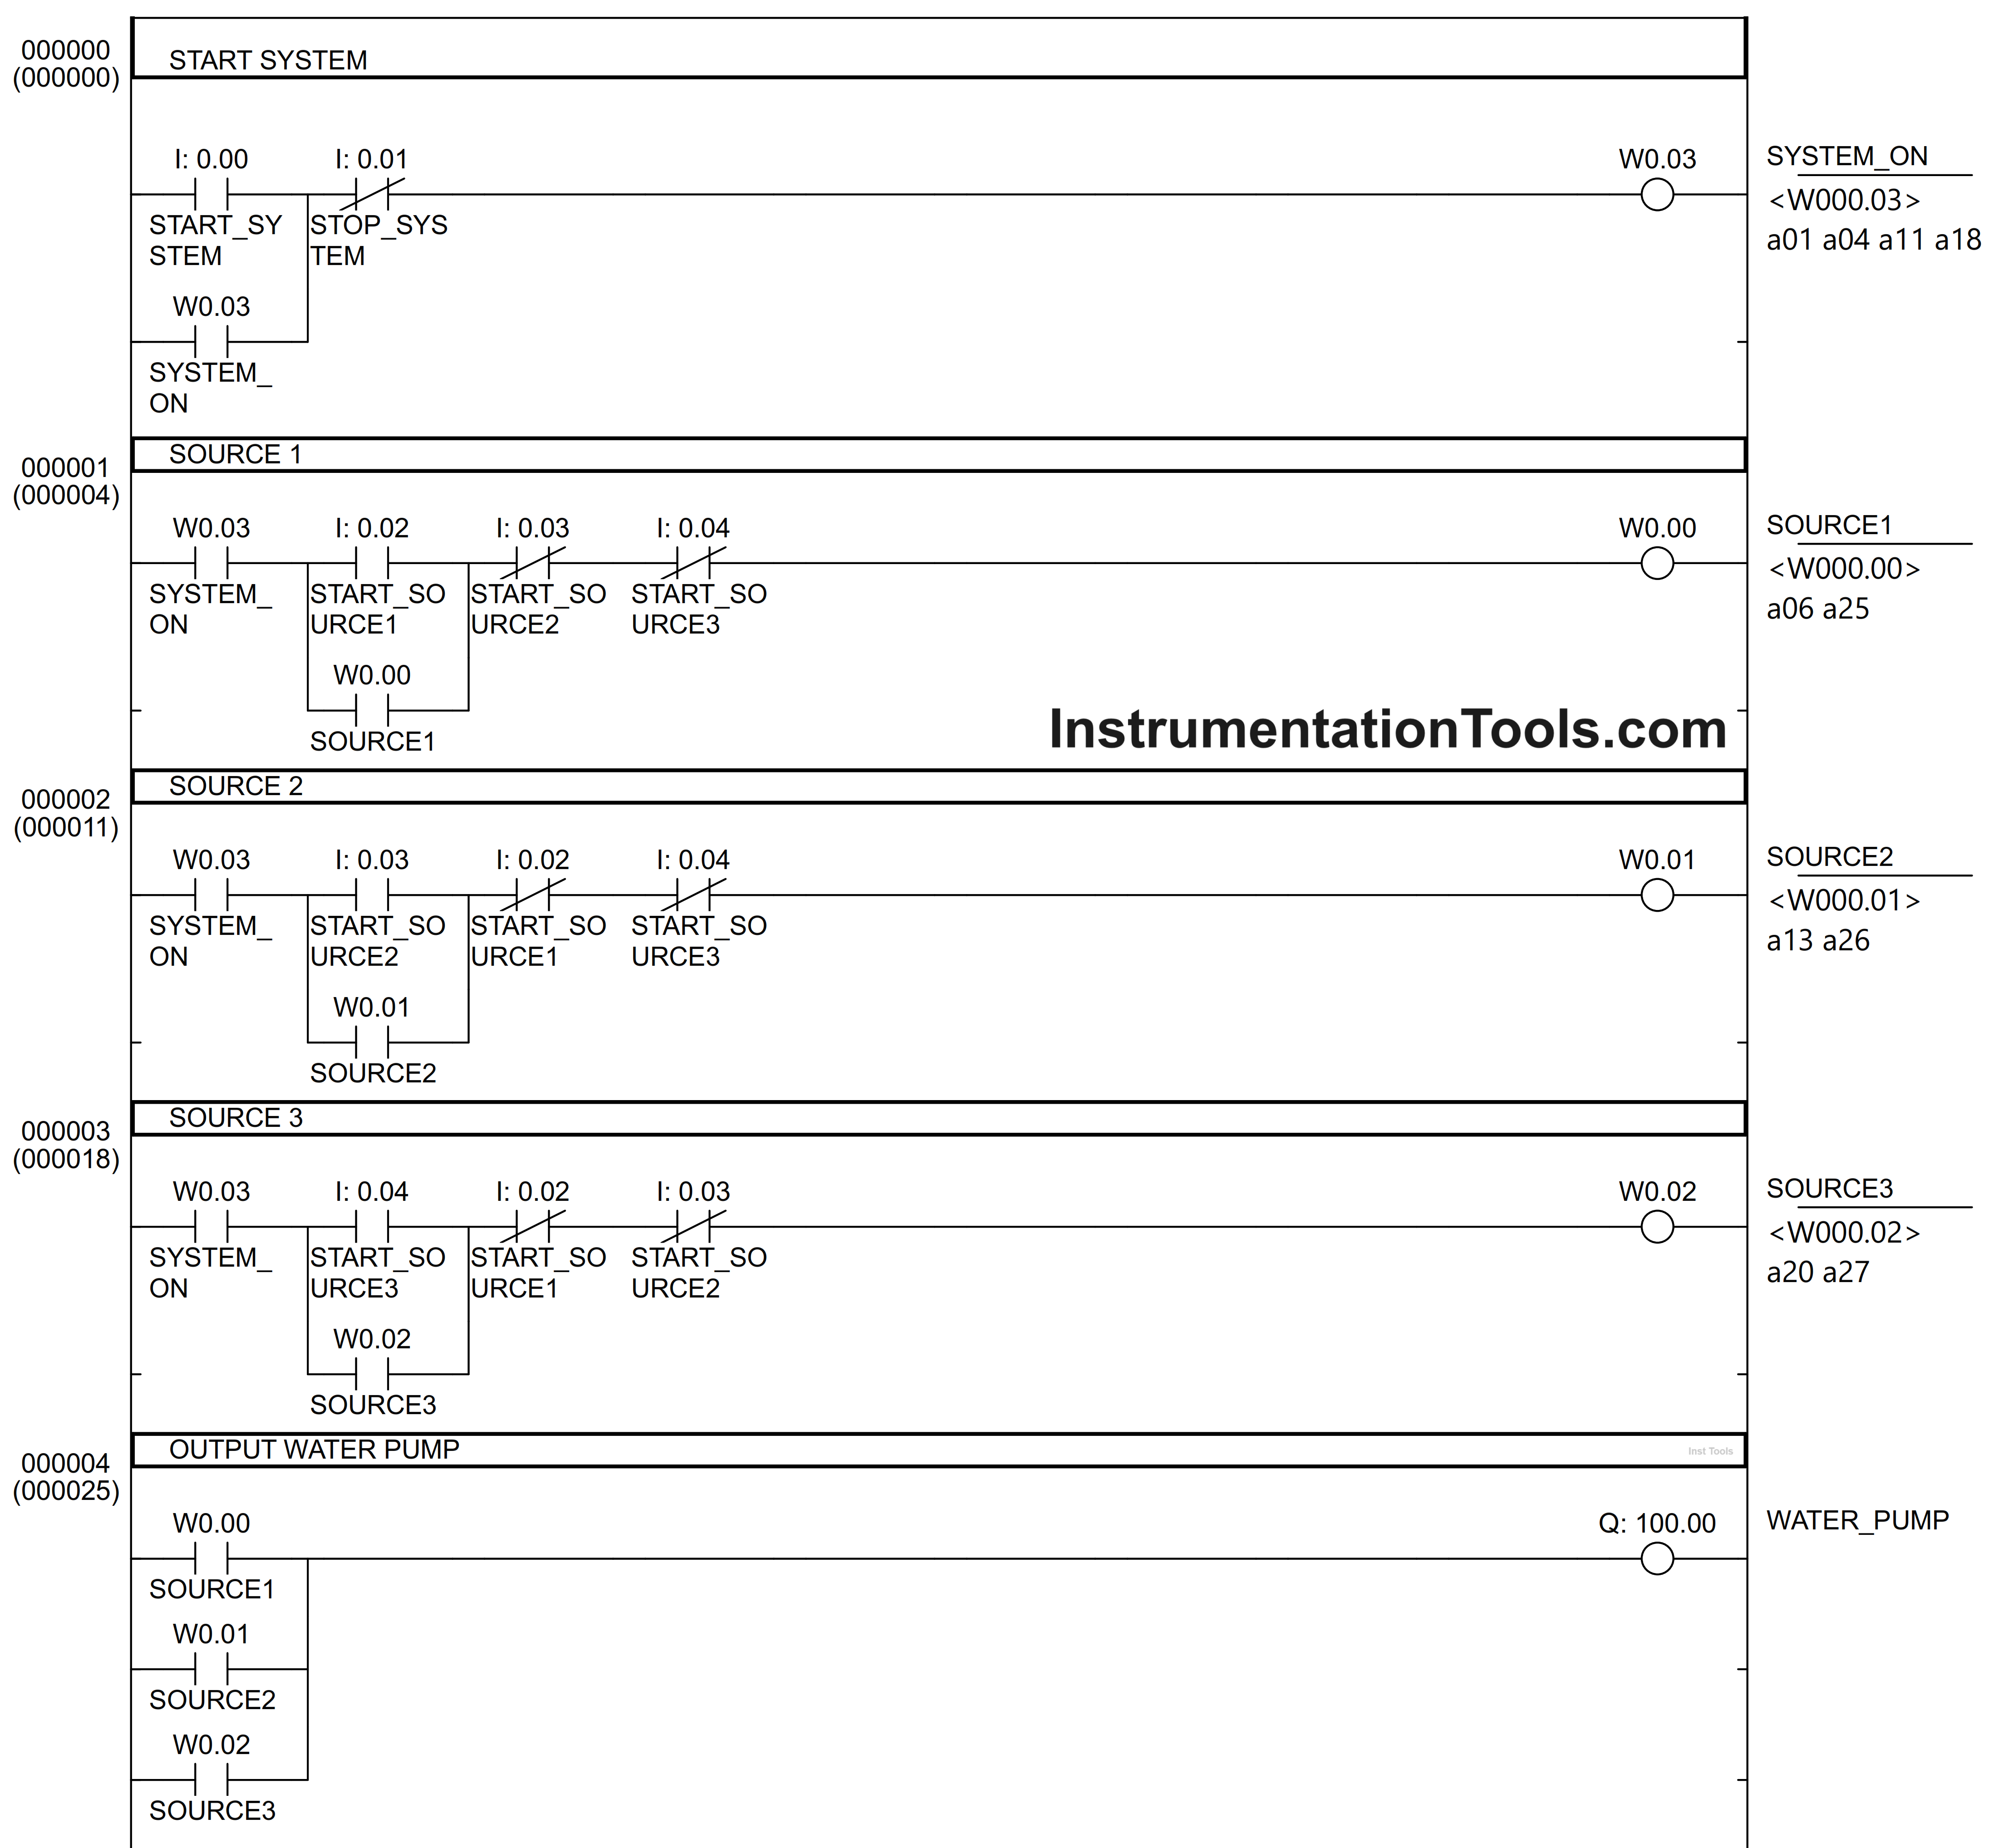
RUNG 0 (START SYSTEM)
In this Rung, when START_SYSTEM (0.00) button is pressed, the memory bit SYSTEM_ON (W0.03) changes to the ON state. Because it uses latching, the memory bit SYSTEM_ON (W0.03) remains ON even though the START_SYSTEM (0.00) button has been Released.
The memory bit SYSTEM_ON (W0.03) will be OFF if the STOP_SYSTEM (0.01) button is Pressed.
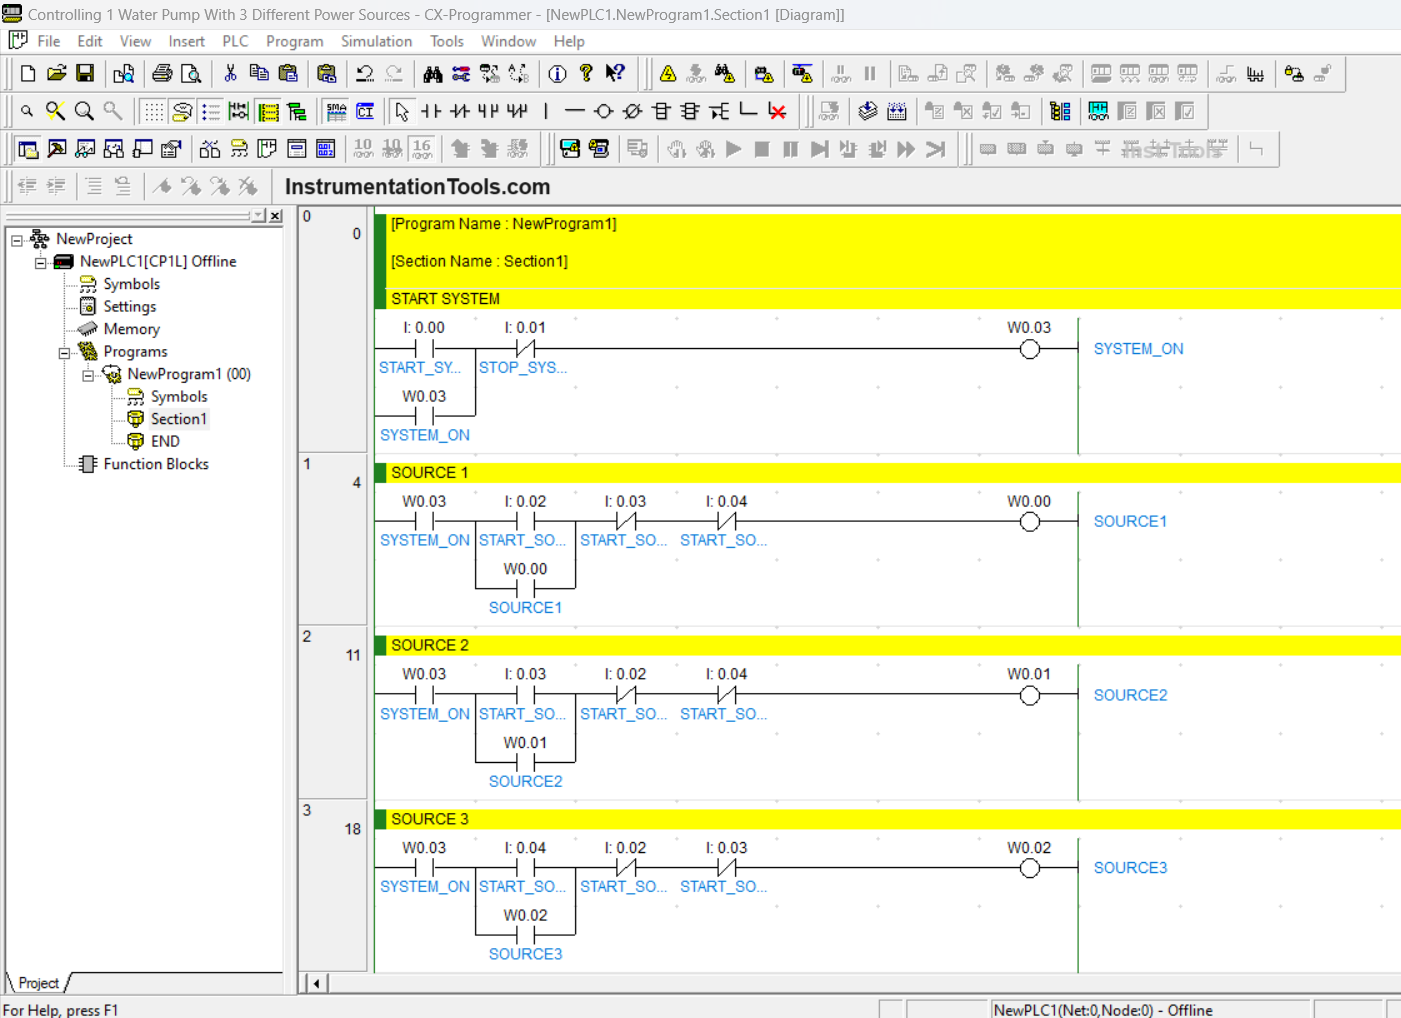
RUNG 1 (SOURCE 1)
When Normally Open contact of the memory bit SYSTEM_ON (W0.03) is in the HIGH state and START_SOURCE1 (0.02) button is pressed, then the memory bit SOURCE1 (W0.00) changes to the ON state.
Because it uses latching, the memory bit SOURCE1 (W0.00) remains ON even though the START_SOURCE1 (0.02) button has been Released. The memory bit SOURCE1 (W0.00) will be OFF when the Normally Close contact of START_SOURCE2 (0.03) button or START_SOURCE3 (0.04) button is Pressed.
RUNG 2 (SOURCE 2)
When Normally Open contact of the memory bit SYSTEM_ON (W0.03) is in the HIGH state and START_SOURCE2 (0.03) button is pressed, then the memory bit SOURCE2 (W0.01) changes to the ON state.
Because it uses latching, the memory bit SOURCE2 (W0.01) remains ON even though the START_SOURCE2 (0.03) button has been Released. The memory bit SOURCE2 (W0.01) will be OFF when the Normally Close contact of START_SOURCE1 (0.02) button or START_SOURCE3 (0.04) button is Pressed.
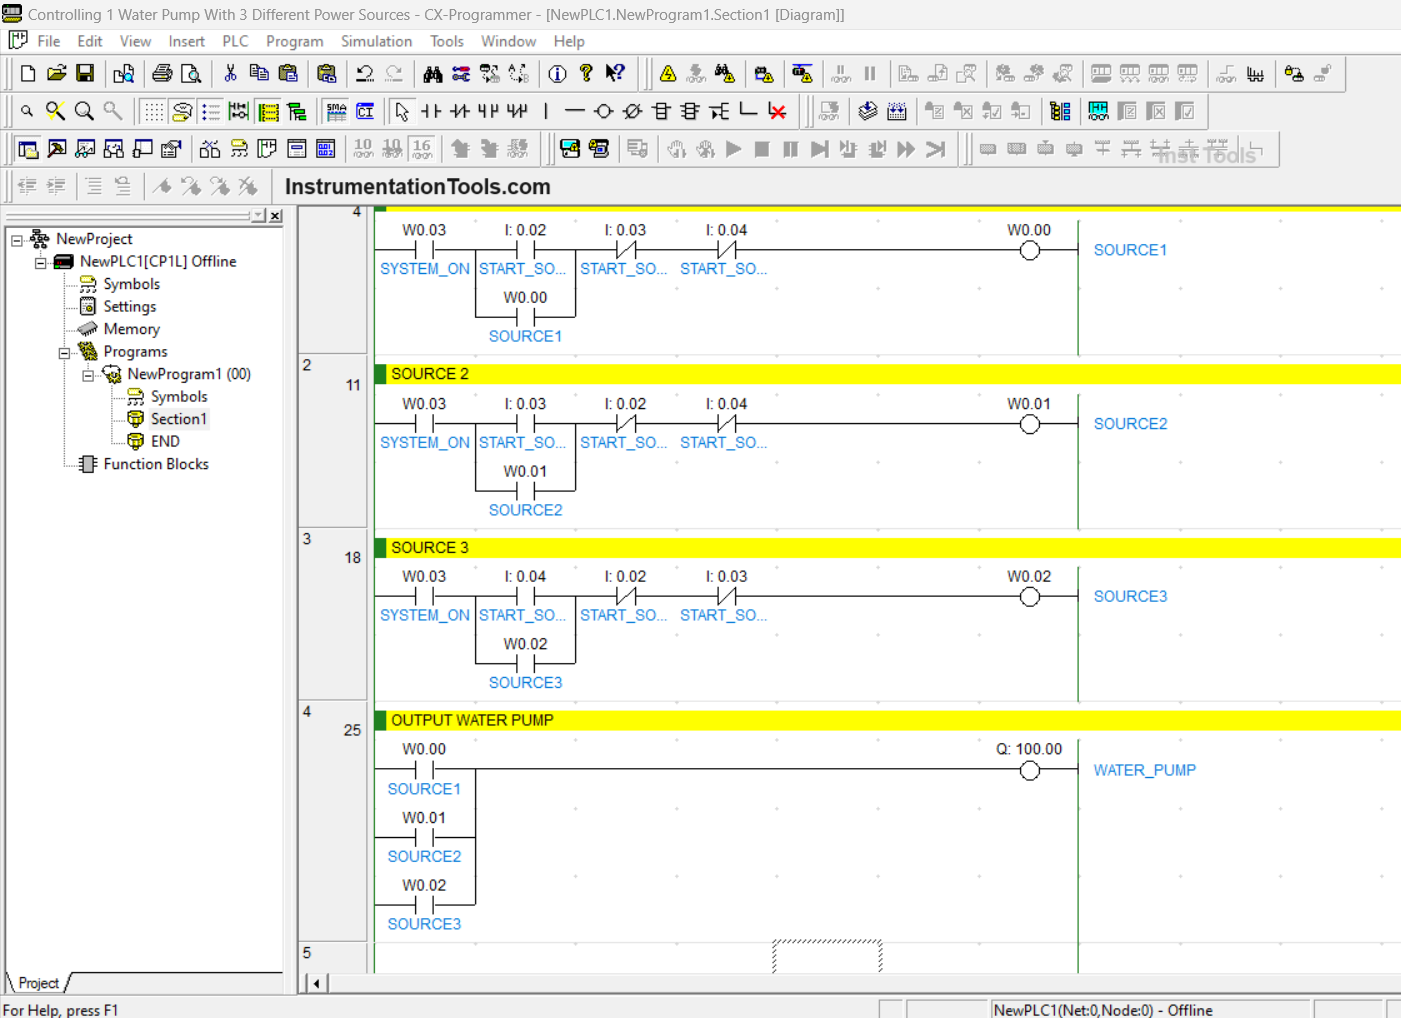
RUNG 3 (SOURCE 3)
When Normally Open contact of the memory bit SYSTEM_ON (W0.03) is in the HIGH state and the START_SOURCE3 (0.04) button is pressed, then the memory bit SOURCE3 (W0.02) changes to the ON state.
Because it uses latching, the memory bit SOURCE3 (W0.02) remains ON even though the START_SOURCE3 (0.04) button has been Released. The memory bit SOURCE3 (W0.02) will be OFF when the Normally Close contact of START_SOURCE1 (0.02) button or START_SOURCE2 (0.03) button is Pressed.
RUNG 3 (WATER PUMP OUTPUT)
In this Rung, when one of the Normally Open contacts of the memory bits SOURCE1 (W0.00), SOURCE2 (W0.01), and SOURCE3 (W0.02) in the HIGH state then the Output WATER_PUMP(100.00) becomes ON.
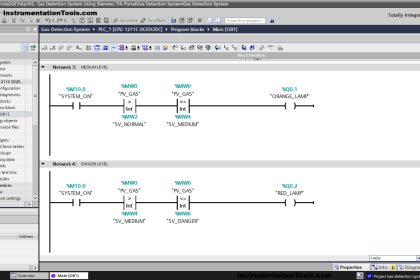
Simulation of the PLC Program
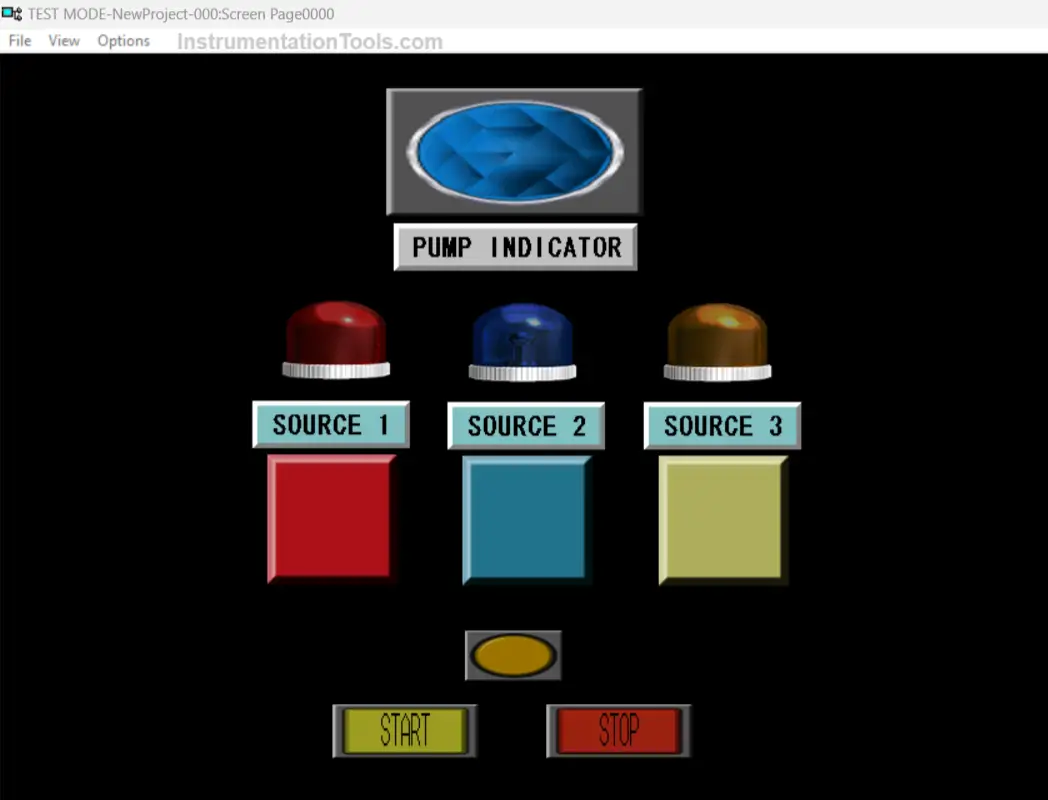
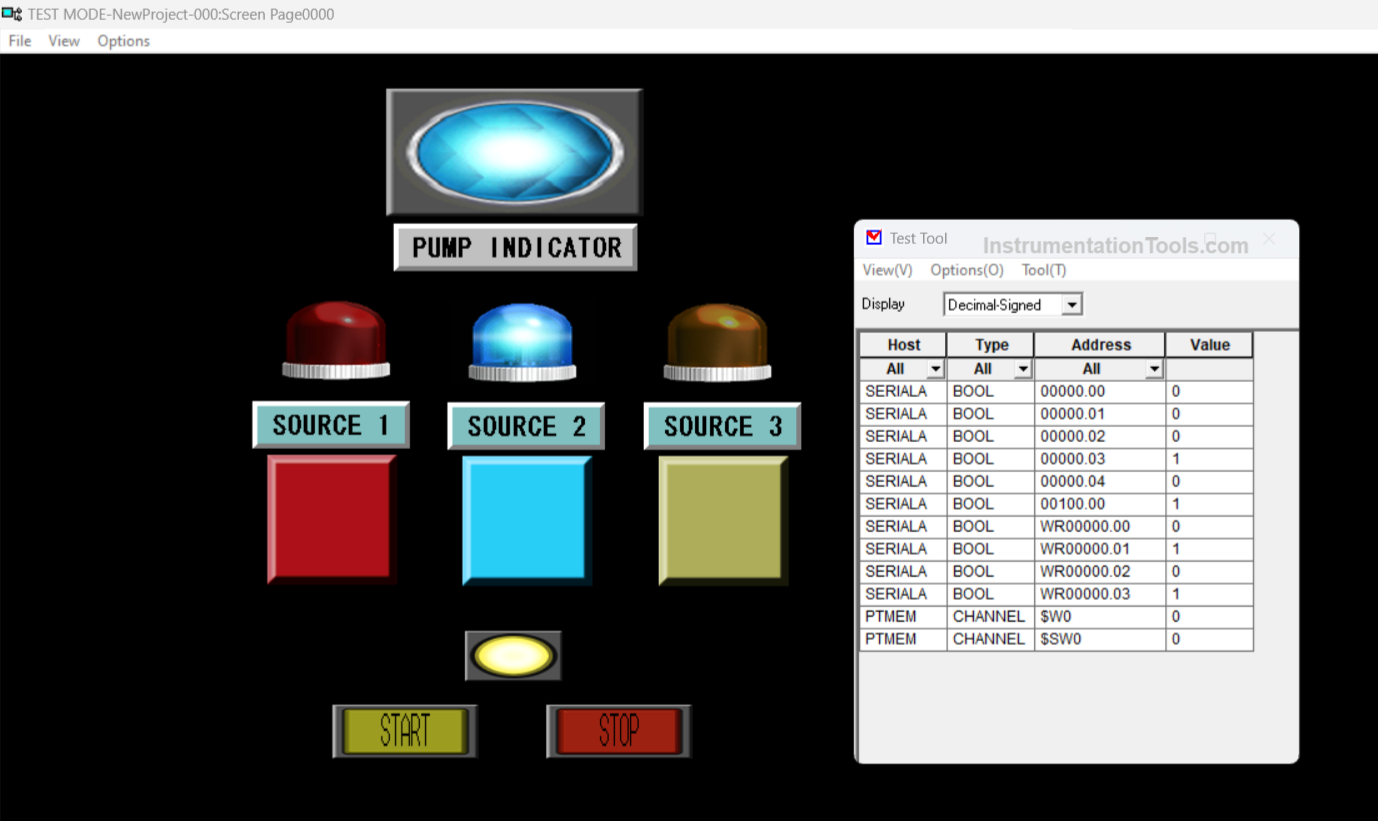
The above image is the HMI (Human Machine Interface) design of the “PLC Program Controlling 1 Water Pump With 3 Different Power Sources using the Interlock Function”.
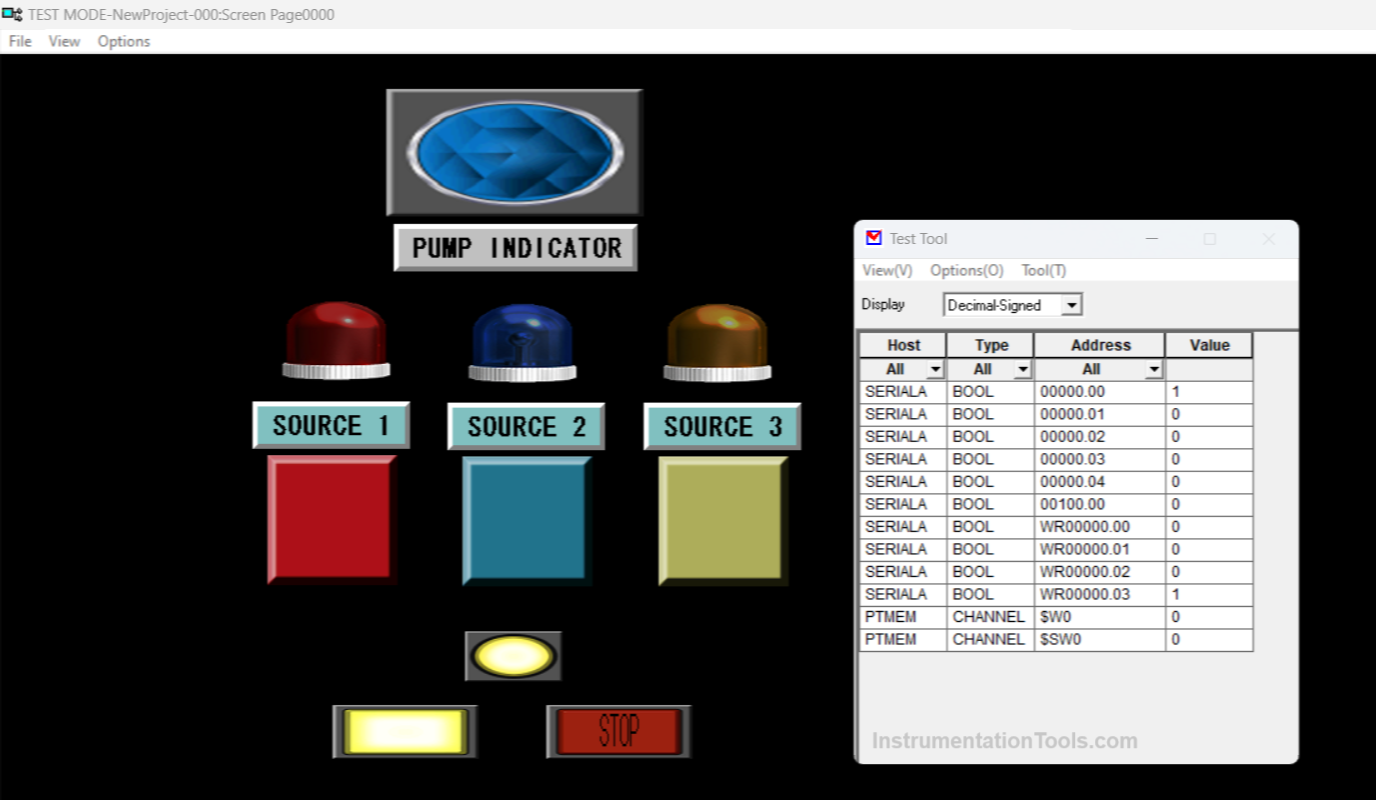
The image above shows, that when START_SYSTEM (0.00) button is pressed, then the SYSTEM_ON (W0.03) indicator light turns on.
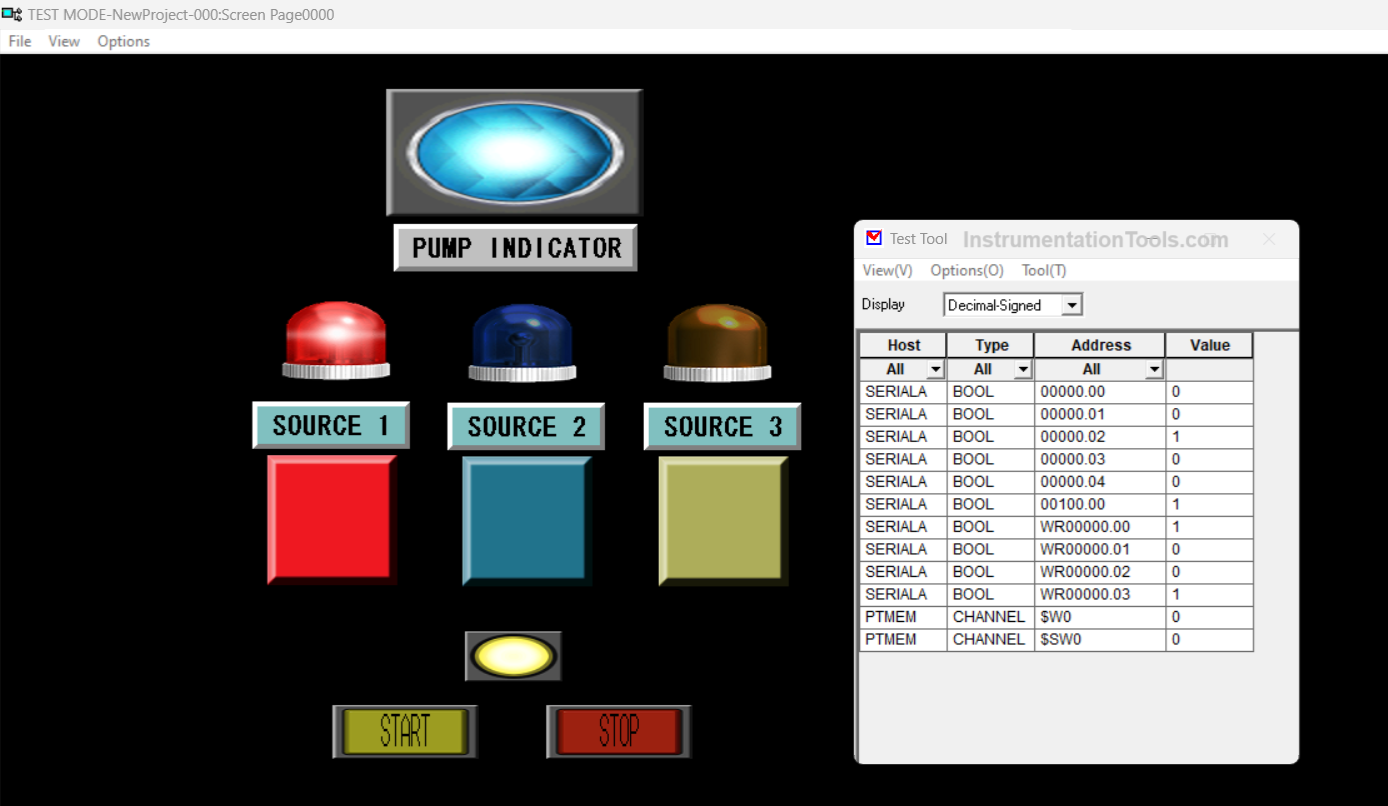
It can be seen in the picture above when the START_SOURCE1 (0.02) button is pressed, then the SOURCE1 (W0.00) and WATER_PUMP (100.00) indicator lights Turn ON.
It can be seen in the picture above when the START_SOURCE2 (0.03) button is pressed, then the SOURCE2 (W0.01) and WATER_PUMP (100.00) indicator lights are turned on.
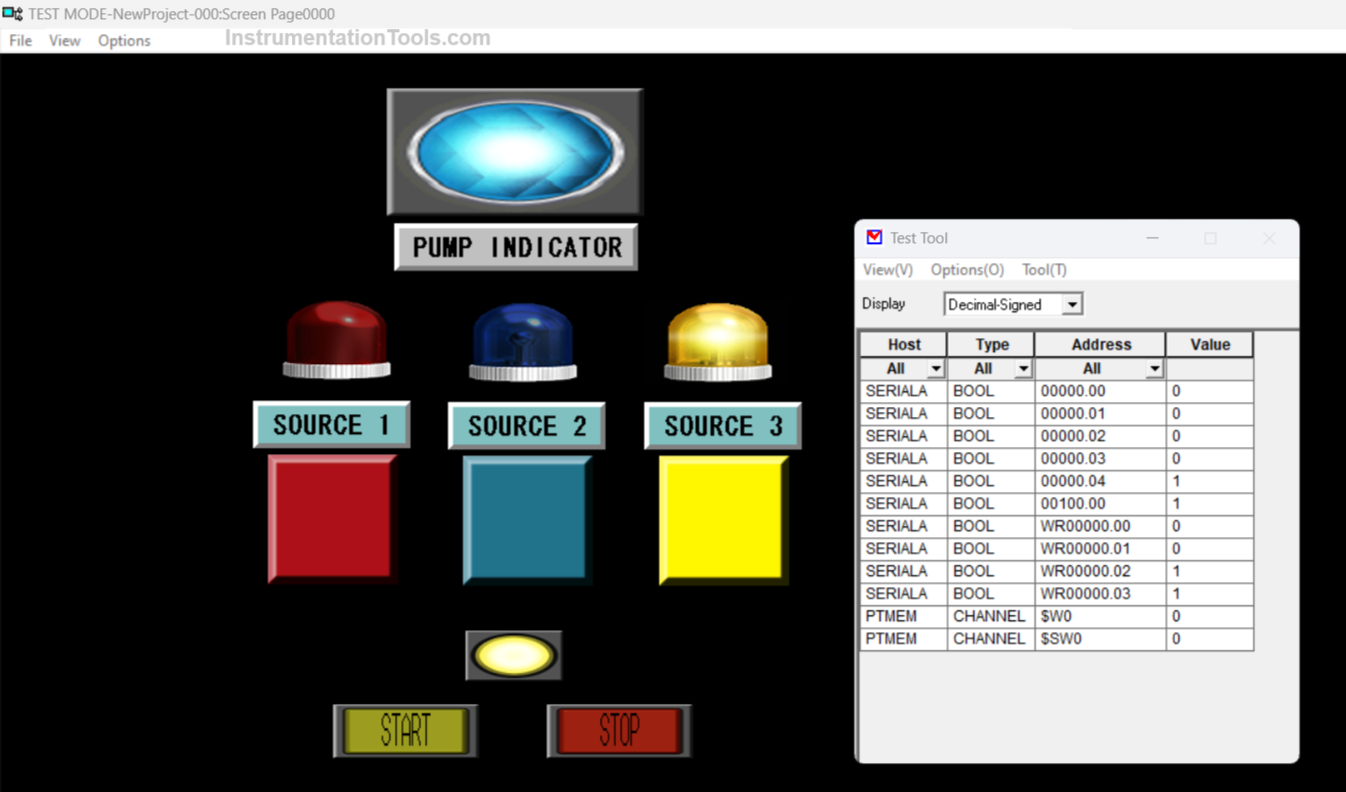
It can be seen in the picture above when the START_SOURCE3 (0.04) button is pressed, then the SOURCE3 (W0.02) and WATER_PUMP (100.00) indicator lights are turned ON.
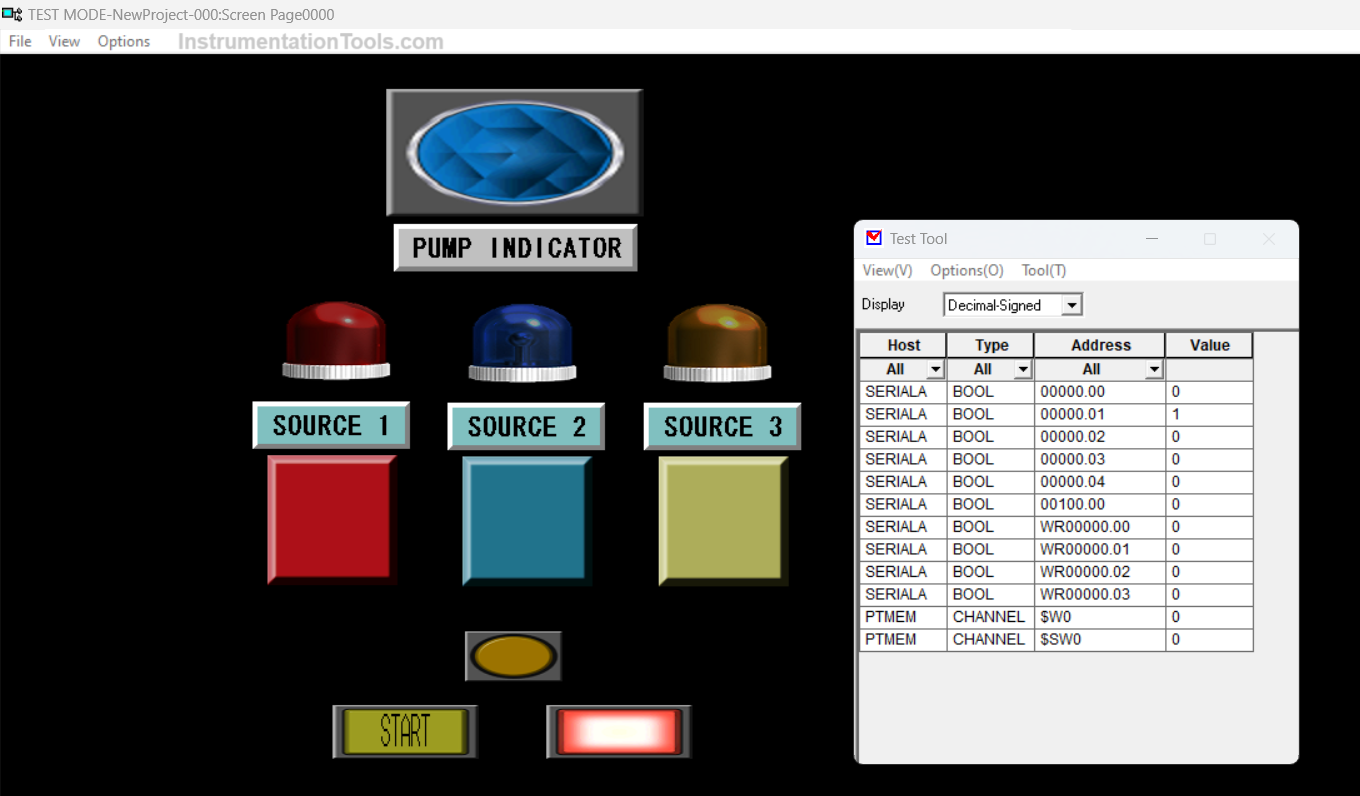
The image above shows, when the STOP_SYTEM (0.01) button is pressed and the system turns off.
If you liked this article, please subscribe to our YouTube Channel for PLC and SCADA video tutorials.
You can also follow us on Facebook and Twitter to receive daily updates.
Read Next:
- PLC Programming for Level Control of Two Tanks
- Controlling the PLC Output using Push Buttons
- Light ON OFF Control using PLC Programming
- PLC Sequence of Conveyors with Interlock Function
- Increment & Decrement Instructions in OMRON PLC