Differential Pressure Transmitter Calibration Procedure
Calibration Procedure :
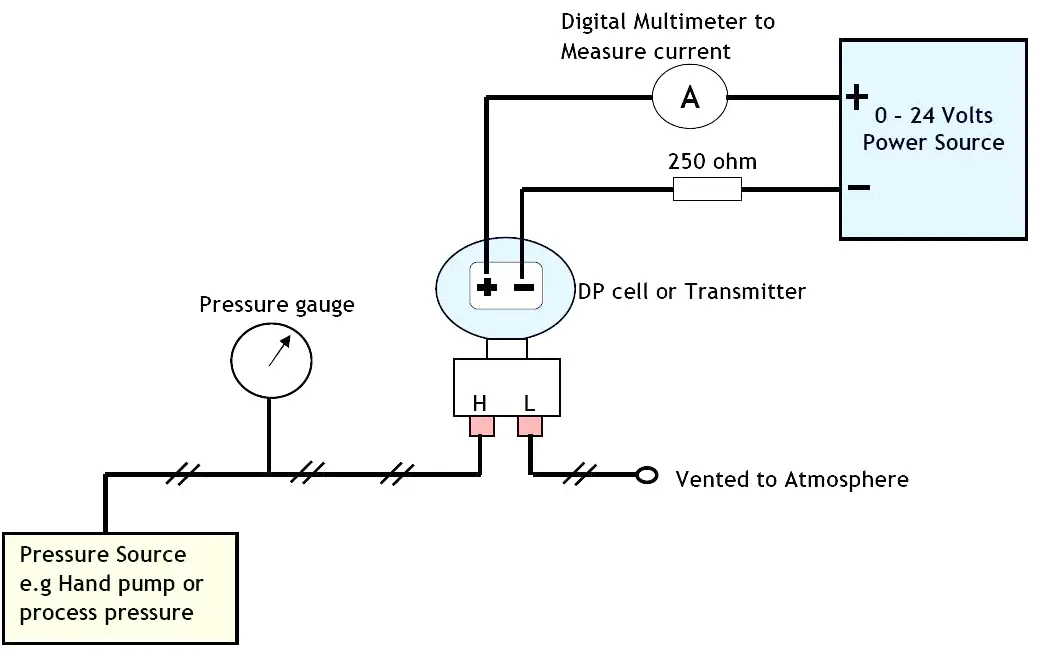
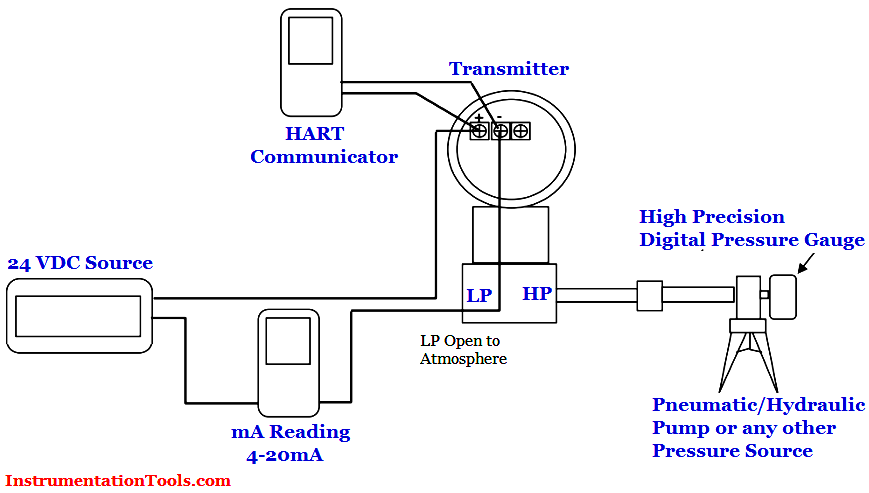
- Set up the differential pressure transmitter, HART communicator, power supply, hand pump, and the multimeter as below (see below calibration setup Diagram).
- Make sure the equalizing valve manifold is closed.
- Apply a pressure to the transmitter equal to a lower range pressure (usually it correspond to 4 mA in the transmitter output). For example we have 0 to 100 mBar calibrated range, then the lower range pressure is 0, or let’s say we have -2 psig to 5 psig then we have lower range pressure equal to -2 psig.
- Read the pressure in the transmitter LCD (or in the HART communicator). Adjust (if any) through the HART communicator so that the output of the transmitter (on LCD) is the same with the applied pressure.
- Read the mA output of the transmitter by using a multimeter. Adjust (if any) through the HART communicator so that the output of the transmitter (on multimeter) is 4 mA.
- Apply a pressure to the transmitter equal to an upper range pressure (usually it correspond to 20 mA in the transmitter output).
- Read the pressure in the transmitter LCD (or in the HART communicator). Adjust (if any) through the HART communicator so that the output of the transmitter (on LCD) is the same with the applied pressure.
- Read the mA output of the transmitter by using a multimeter. Adjust (if any) through the HART communicator so that the output of the transmitter (on multimeter) is 20 mA.
Typical tools required:
- 24 VDC power supply
- Multimeter digital
- Pneumatic hand pump (up to 600 psig)
- Hydraulic hand pump (up to 10.000 psig)
- Low pressure hand pump
- High precision digital test gauge
- HART communicator
- Screwdriver toolkit
Note: point number 1, 2, 7, and 6 of the typical tools above can be replaced by a single multi-function calibrator available in the market.
Why you have used 250 ohms resister there is it necessary to use when we have connected transmitter to PLC module.
we do not need 250 ohms resistance when we use plc module,however in the diagram it is clear they are using only a power source so for transmitter communication we need a resistor.
Because HART not used from without 250 oms
Thanks! good information, fantastic…..
Thanks for your contribution.
Thanks for the knowledge sharing
Why do we open the low side to atmosphere
How to do DPT Flow transmitter Field Calibration?