Calibration – The Definition
Calibration is the comparsion of measurement device or an instrument(device under test, DUT) against a known with equal or better standard. The standard in a measurement is considered to be more correct of the two and one would calibrate the device under test to know far it deviates from the standard.
Usual calibration usually done by commercial calibration laboratories uses a manufacturer’s calibration procedure and is performed with a reference standard multiple times more accurate typically at four times with accuracy of the DUT.
So, Why Do We Need to Calibrate?
Having instruments that are calibrated insures quality output products. Out of tolerance (OOT) instruments tend to give wrong readings resulting in unnecessary back jobs and process failures. Bad or low quality products would pass as good ones resulting in warranty costs, and good products as non-conformance to quality ones, resulting to unnecessary reworks. So basically, calibration is all about producing high quality which is equals to money.
Calibration Terms
Common calibration terms
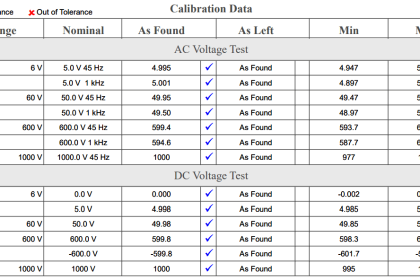
Out of Tolerance Conditions: If the results are outside of the instrument’s performance specifications it is considered an OOT (Out of Tolerance) condition and will result in the need to adjust the instrument back into specification.
Optimization: Adjusting a measuring instrument to make it more accurate is NOT part of a “Typical” calibration and is frequently referred to as “Optimizing” or “Nominalizing” an instrument. (this is a common misconception) Only reputable and experienced calibration providers should be trusted to make adjustments on critical test equipment.
As Found Data: The reading of the instrument before it is adjusted.
delays.
As Left Data: The reading of the instrument after adjustment or “Same As Found” if no adjustment was made.
Without Data: Most calibration labs charge more to provide the certificate with data and will offer a “No-Data” option. In any case “As-Found” data must be provided for any OOT condition.
Limited Calibration: Sometimes certain functions of an instrument may not be needed by the user. It may be more cost effective to have a limited calibration performed (This can even include a reduced accuracy calibration).
TUR – Test Uncertainty Ratio: The ratio of the accuracy of the instrument under test compared to the accuracy of the reference standard.
ISO 9000 Calibration
ISO 9000 calibrations are crucial for many industries. The following is required for ISO 9000 Compliant Calibrations.
An Accredited Calibration Lab Performing the Work: The calibration laboratory employed to perform the calibration must be an ISO 9001:2000 accredited lab or be the original equipment manufacture.
Documented Calibration Procedures: It is critical that a valid calibration procedure be used based on the manufacture’s recommendations and covering all aspects of the instrument under test.
Trained Technicians: Proper Training must be documented for each discipline involved in performing the calibration.
Traceable Assets: The calibration provider must be able to demonstrate an unbroken chain of traceability back to NIST.
Proper Documentation: All critical aspects of the calibration must be properly documented for the certificate to be recognized by an ISO auditor.
A Comprehensive Equipment List: For any manufacture to pass an ISO audit regarding calibration they must demonstrate that they have a comprehensive equipment list with controls in place for additions, subtractions and custodianship of equipment.
Calibrated and NCR Items Properly Identified: The equipment list must identify any units that do not require calibration and controls must be in place to ensure that these units are not used in an application that will require calibration.
A Proper Recall System: A procedure should be established with time frames for recall notification, an escalation procedure, and provisions for due-date extension.
Equipment Custodianship: responsibilities for ensuring the equipment is returned to the cal lab should be assigned and delegated.
An OOT Investigation Log: Any instrument found out of tolerance requires that an investigation be performed to determine the impact on manufacturing. Records and reports need to be maintained.
ISO/IEC 17025 Calibration
ISO/IEC 17025 Calibration: As a general rule 17025 calibrations are required by anyone supplying the automotive industry and it has also been voluntarily adopted by numerous companies in FDA regulated industries.
ISO/IEC 17025 is an international standard that assesses the technical competency of calibration laboratories. ISO/IEC 17025 covers every aspect of laboratory management, ranging from testing proficiency to record keeping and reports. It goes several steps beyond a ISO 9001:2000 certification.
A “17025” calibration is a premium option that provides additional information about the quality of each measurement made during the calibration process by individually stating the uncertainty calculation of each test point.
When Do We Need To Calibrate?
How Calibration Intervals are Determined
Calibration intervals are to be determined by the instrument “owner” based on manufacture recommendations. Commercial calibration laboratories can suggest intervals but in most cases they are not familiar with the details of the instrument’s application.
The OEM intervals are typically based on parameters like mean drift rates for the various components within the instrument. However, when determining calibration intervals as an instrument “owner” several other factors should be taken into consideration such as: the required accuracy vs. the instrument’s accuracy, the impact an OOT will have on the process, and the performance history of the particular instrument in your application.
How to Implement or Improve a Calibration Program
Any successful calibration program must begin with an accurate recall list of your test, measurement and diagnostic equipment.
The recall list should contain a unique identifier which can be used to track the instrument, the location, and the instrument’s custodian (Often asset management software, bar-coding systems, and physical inventories are used to help establish accurate recall lists).
It is important when assembling a recall list that modules, plug-ins, and small handheld tools are not overlooked. Also, you may have several “home-made” measuring devices (e.g. Test Fixtures) which will also need to be captured on your equipment list for a reliable calibration program.
The next step is to identify all of the instruments on your recall list which may not require calibration due to redundancies in your testing process (A commercial calibration laboratory should be able to aid you in identifying these instruments).
After creating an accurate recall list procedures must be established for adding new instruments, removing old or disposed instruments, or making changes in instrument custodianship. Recall reports should be run with sufficient time for both the end user and the service provider to have the unit calibrated with a minimal impact on production.
A late report identifying any units about to expire or already expired will ensure 100% conformity. A full service calibration laboratory will supply these recall reports and will provide special escalation reporting when equipment is not returned for service.
(Some calibration labs offer the choice of web-based equipment management systems that allow their customer to perform recall reports, late reports and keep electronic versions of their calibration certificates.)
Avoiding Production Delays
Obtain timely equipment calibrations without shutting down a line for days.
Look for a calibration service provider that can perform onsite (or in-place) calibrations at your facility. Often when your volume is more than 20 calibrations, scheduling onsite calibration saves time and lowers cost.
Make sure you find a “one-source” calibration provider that has sufficient capabilities to calibrate nearly all of your equipment during the onsite, reducing the delays and the expense of using an additional subcontractor.
Other options for reducing downtime include mobile Calibration lab services, scheduled depot calibrations, calibrations during shutdowns, scheduled pick-up and delivery, and weekend or nightshift calibrations.
Should We Calibrate Ourselves?
Most companies discover they cannot effectively perform their own calibrations for many reasons. The most frequent issues with internal calibrations are:
Cost of standards: Often, the cost of the assets with the required accuracy to perform the calibration is prohibitive (It could take years of calibrations to pay for one standard).
Developing Procedures: Many manufacture’s procedures are not readily available. Sometimes they require research and development. This can cost hundreds of hours of labor.
Productivity of Technicians: Often a non-commercial calibration laboratory’s productivity per employee is only a fraction of what can be obtained through an external commercial calibration laboratory who specializes in automation, efficient procedures and experienced management.
Cost of Management: Managing the employees, assets, maintenance and processes of a calibration lab can be burdensome on existing management staff.
Not a core competency: The overall management burden of the operation distracts from the core competency of the company.
Also Read : What is Calibration ?



Thanks
I want to know how each measuring instrument is calibrated in am enjoying the studies
Thank you for this.