Inst ToolsInst ToolsInst Tools
  • Courses
  • Automation
    • PLC
    • Control System
    • Safety System
    • Communication
    • Fire & Gas System
  • Instrumentation
    • Design
    • Pressure
    • Temperature
    • Flow
    • Level
    • Vibration
    • Analyzer
    • Control Valve
    • Switch
    • Calibration
    • Erection & Commissioning
  • Interview
    • Instrumentation
    • Electrical
    • Electronics
    • Practical
  • Q&A
    • Instrumentation
    • Control System
    • Electrical
    • Electronics
    • Analog Electronics
    • Digital Electronics
    • Power Electronics
    • Microprocessor
  • Request
Search
  • Books
  • Software
  • Projects
  • Process
  • Tools
  • Basics
  • Formula
  • Power Plant
  • Root Cause Analysis
  • Electrical Basics
  • Animation
  • Standards
  • 4-20 mA Course
  • Siemens PLC Course
Reading: Calibration Procedure of Weighing Balance and Common Mistakes
Share
Notification Show More
Font ResizerAa
Inst ToolsInst Tools
Font ResizerAa
  • Courses
  • Design
  • PLC
  • Interview
  • Control System
Search
  • Courses
  • Automation
    • PLC
    • Control System
    • Safety System
    • Communication
    • Fire & Gas System
  • Instrumentation
    • Design
    • Pressure
    • Temperature
    • Flow
    • Level
    • Vibration
    • Analyzer
    • Control Valve
    • Switch
    • Calibration
    • Erection & Commissioning
  • Interview
    • Instrumentation
    • Electrical
    • Electronics
    • Practical
  • Q&A
    • Instrumentation
    • Control System
    • Electrical
    • Electronics
    • Analog Electronics
    • Digital Electronics
    • Power Electronics
    • Microprocessor
  • Request
Follow US
All rights reserved. Reproduction in whole or in part without written permission is prohibited.
Inst Tools > Blog > Calibration > Calibration Procedure of Weighing Balance and Common Mistakes

Calibration Procedure of Weighing Balance and Common Mistakes

In this article, you will learn the calibration procedure of weighing balance and the common mistakes during the calibration.

Last updated: September 28, 2022 3:24 pm
Saurabh Vaidya
Calibration
No Comments
Share
5 Min Read
SHARE

There are 3 main parts of Calibration of weighing Balance

Contents
Procedure for Calibration of Weighing BalanceRepeatabilityLinearityEccentricityCommon Mistakes while Calibration of Weighing Balance
  1. Repeatability
  2. Linearity
  3. Eccentricity

Repeatability is further divided into Full Load Repeatability and Half Load Repeatability.

Perform Weighing Balance Calibration at the place where Balance is being used. As readings changes as a change in g value (gravitational acceleration)

Before calibration, Level the balance properly and perform internal Calibration of balance. The procedure of Internal Calibration is given in the manual balance.

Keep the Weighing balance on as per the warm-up time mentioned in the manual. Keep Weights in the same environmental conditions as per weighing balance for thermal stabilization of weights.

Specific Accuracy of weights are required to calibrate the specific accuracy of weighing balance.

Accordingly, choose the correct accuracy of weight for weighing balance calibration.

Procedure for Calibration of Weighing Balance
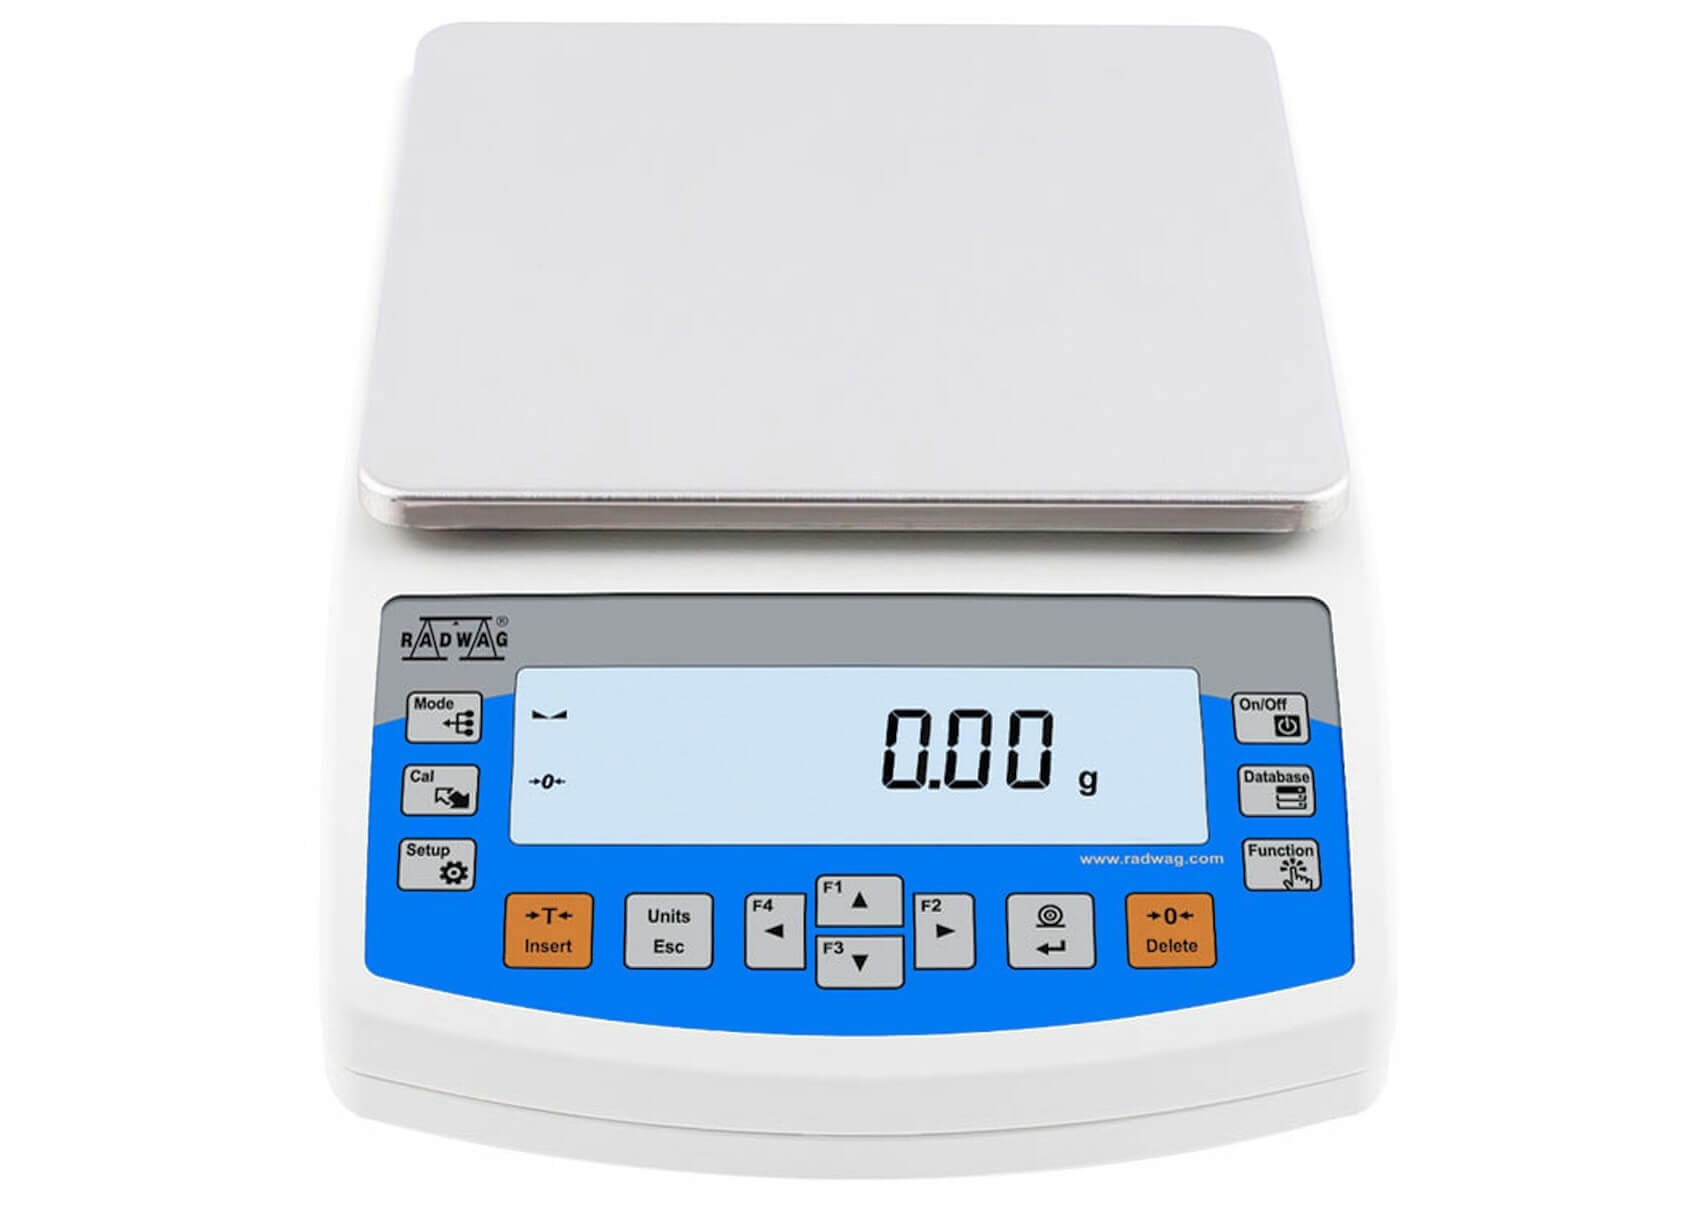
Weighing Balance Calibration

The weighing balance calibration procedure is mentioned below.

Repeatability

Repeatability is a quantitative measurement of the variation of multiple measurements taken in the same environmental conditions of weighing Balance.

This test is carried out for Full Load and Half Load of Balance

For example, for 200 g balance, the Half load is 100 g, and the Full Load in 200 g

  1. Press the Zero button on the Balance
  2. Keep weight (Half load of full load accordingly) on weighing Balance. Note down the reading
  3. Remove weight. Don’t zero the balance.
  4. Again, put weight on the weighing balance.

Repeat this step 10 times. Find Standard Deviation.

Linearity

Linearity is a deviation from the nominal value of weight.

For eg- the standard reading of a weight of 1 g is 1.00054 g and the weighing balance indicates 1.012 g. Linearity error is weighing balance is

1.00054 – 1.012= – 0.01146 g

Ideally, it should be a straight line graph between standard weight and Indicated reading.  A difference is called a linearity error.

Usually, a minimum of 10 such readings of different weights are taken including No Load and the Full Load.

  1. Press the Zero button on the Balance
  2. Placed the minimum weight on the weighing Balance, and note down the reading.
  3.  Place next weight on weighing Balance, note down the reading. (Do not zero the balance, If Zero reading is not zero, Corrected reading= Indicated Reading – Zero Reading)
  4. Repeat steps of Increasing order of weights and decreasing order of weights. Repeat this step two times.

Increasing Order, Decreasing Order, Increasing Order, Decreasing Order

  • Take the average of each weight reading.
  • Linearity=Standard Reading – Weighing Balance (UUC) Reading

(UUC is Unit Under Calibration)

Eccentricity

Ideally, the weighing Object should be exactly placed at the center of the weighing pan.  But every time it is not possible to keep the object at the center. Error due to placing an object off center (away from the center) is called eccentricity.

Recommended load for eccentricity is between or equal to one-third (1/3) and a half (1/2) of the maximum capacity of the balance.

The weight used in the Eccentricity test should be single weight.

The position of Weighing on the weighing pan should be ½ to ¾ of the total distance.
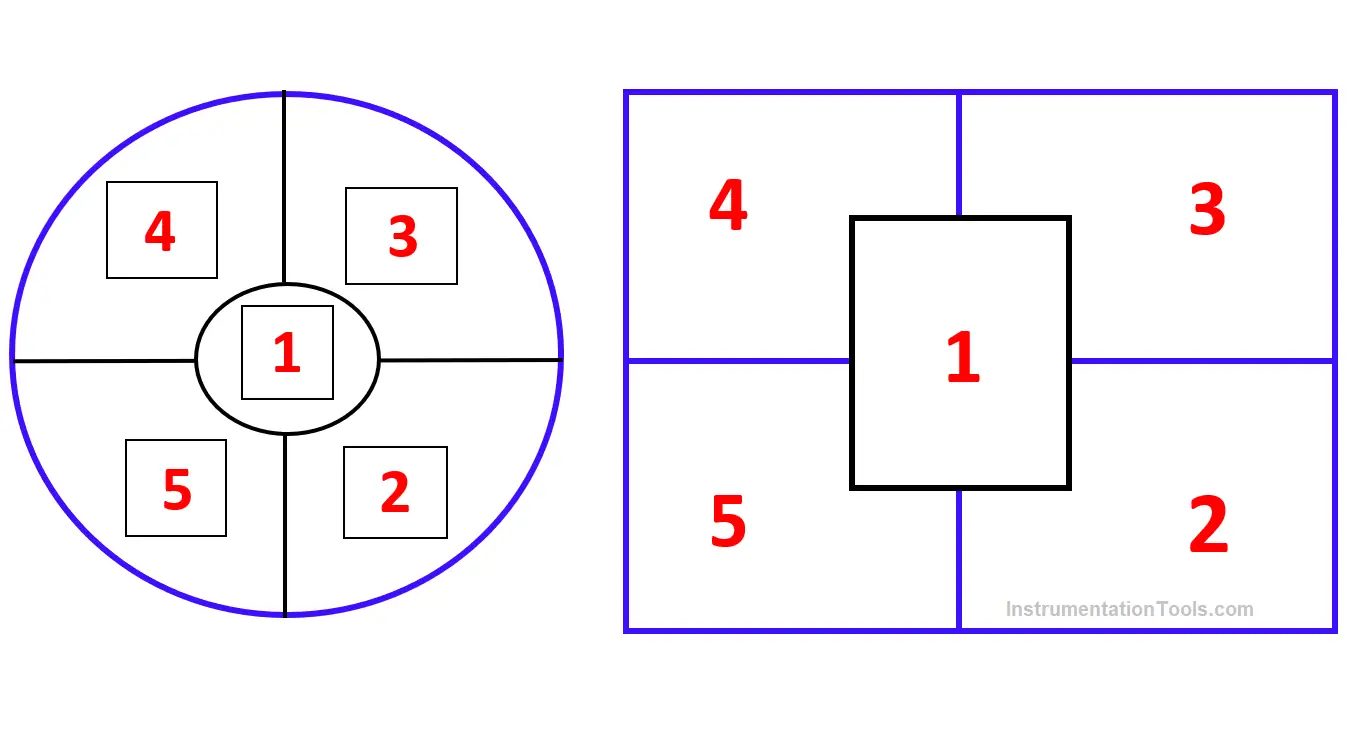
Calibration of Weighing Balance
  1. Choose the weight between 1/2 to 1/3 of full load and place it at the center (Position 1) and note down the reading.
  2. Placed the weight at positions 2,3,4,5 respectively and note down the readings.
  3. Subtract these readings from the center reading respectively. (2-1, 3-1, 4-1,5-1)
  4. The maximum difference is Eccentricity.

Alternate Method:

  1. Tare the reading of weighing balance at position 1 of weight.
  2. Placed the weight at positions 2,3,4,5 respectively and note down the readings
  3. The maximum reading is Eccentricity

Common Mistakes while Calibration of Weighing Balance

In Linearity Test, Readings of a single weight are taken four times continuously. And then next weight readings are taken. This Way, Repeatability is the check of balance instead of linearity.

The correct way is to take readings in increasing order of Minimum to Maximum load possible and then in decreasing order from maximum load to minimum load possible. Repeat this cycle two times and find the average.

In the Eccentricity test, Weight is not chosen properly between 1/2 to 1/3 of the maximum range. The single weight is not chosen.

The correct way is to choose a single weight between 1/2 to 1/3 of the maximum range.

Don't Miss Our Updates
Be the first to get exclusive content straight to your email.
We promise not to spam you. You can unsubscribe at any time.
Invalid email address
You've successfully subscribed !

Continue Reading

Dissolved oxygen probe calibration procedure
DeadWeight Tester Questions
RTD Calibration
Pressure Transmitter Calibration at the bench
Transmitter Calibration Procedure
How to Test a Pressure Switch ?
Share This Article
Facebook Whatsapp Whatsapp LinkedIn Copy Link
Share
Leave a Comment

Leave a Reply Cancel reply

Your email address will not be published. Required fields are marked *

Stay Connected

128.3kFollowersLike
69.1kFollowersFollow
210kSubscribersSubscribe
38kFollowersFollow

Categories

Explore More

Magnetostrictive Level Transmitter Calibration Procedure
Open Tank DP Level Transmitter Calibration
DP Level Transmitter with Zero Suppression Calibration
Turbidity Sensor Calibration Procedure
Pressure Gauge Calibration according to Standard DKD-R-6-1
Sand Probe Functional Testing
Pressure Gauge Calibration Procedure
Calibration of Gas Detectors

Keep Learning

differential-pressure-transmitter-calibration-procedure

Differential Pressure Transmitter Calibration Procedure

Importance of Unit Measurement

Importance of Unit Measurement

Calibration MCQ - Terminology and Glossary Questions

Calibration MCQ – Terminology and Glossary Questions

Vibration Probe Field Setting Procedure

How to do calibration checks of vibration Probe, extension cable and vibration monitor

Capacitance Level measurement principle

Capacitance Level Sensor Principle, Limitations, Installation & Calibration

Instrument Calibration Lab Exercise

Instrument Calibration Lab Exercise

DP type Flow Transmitter Calibration

DP type Flow Transmitter Preventive Maintenance and Calibration

Types of Calibration

Types of Calibration

Learn More

Simple Pressure Repeater

Simple Pressure Repeater

Electrical Engineers Basics

Basic Electrical Engineering Questions & Answers

Transmitter Calibration Range of a Vessel Level

Transmitter Calibration Range of a Vessel Level

Nonlinear Control Systems

Stability of Nonlinear System – II

Standard Colors in PLC Automation Systems

Standard Colors in PLC Automation Systems

Synchronous Motor Working Principle

RF and RTJ Flange Installed Gasket

Flange Joint Errors shutdowns root cause analyzed and eliminated

Derivation-of-Ohms-Law

Basics of Ohm’s Law

Menu

  • About
  • Privacy Policy
  • Copyright

Quick Links

  • Learn PLC
  • Helping Hand
  • Part Time Job

YouTube Subscribe

Follow US
All rights reserved. Reproduction in whole or in part without written permission is prohibited.
Welcome Back!

Sign in to your account

Username or Email Address
Password

Lost your password?