In previous articles we started to discuss the different ways of communicating between two or more PLCs, so far we talked about the I-device feature as well as the PUT and GET commands which were methods exclusively for Siemens PLCs.
Communicating Between Siemens PLC and Other PLC
In this article we will discuss another way of connecting two PLCs together, this way has more advantages than the PUT and GET commands we discussed before, because opposite to the PUT/GET commands that were exclusive to the S7 family. This new method is an open user communication meaning we can use it to communicate between an SIEMENS PLC and any other brand of PLC, it doesn’t even need to be two PLCs, this method can communicate between PLC and any other device that can understand TCP network protocol such as PCs, servers, printers, etc.
In this article, we will show how to setup a communication between two PLCs using the TCON and TDISCON blocks and in the next article, we will show how to move data between the PLCs after setting up the connection.
Open user communication blocks TCON and TDISCON
We use the TCON block to set up and establish a communication connection between two PLCs. Once the connection has been set up and established, it is automatically maintained by the PLC.
Both communication partners call the TCON instruction to set up and establish the communication connection. That means I have to call the TCON block in both PLCs and we have to configure the block in both PLCs as we will see in the sample project.
During block configuration, we will specify which partner is the active communication end point and which is the passive one. That means which PLC will try to connect and which one will open a communication port and be waiting for the other one.
An existing connection is terminated and the connection set up is removed when the TDISCON block is executed or when the CPU changes to STOP mode. To set up and establish the connection again, you will need to execute TCON again.
Sample PLC Project using TCON
As we explained before in previous articles, to setup a communication between two PLCs we have to establish two things:
- Communication between the PLCs.
- Data transfer between the two PLCs.
In this article, we will set up an open user communication with TCP protocol between two PLCs using the TCON block. In the next article, we will show how to move data after the connection is done.
First, let’s create a new project and add our two PLCs. We will add the CPU1516-3PN/DP PLC and we will name them PLC_1 and PLC_2, and the objective is to set up a connection between them. See picture 1.
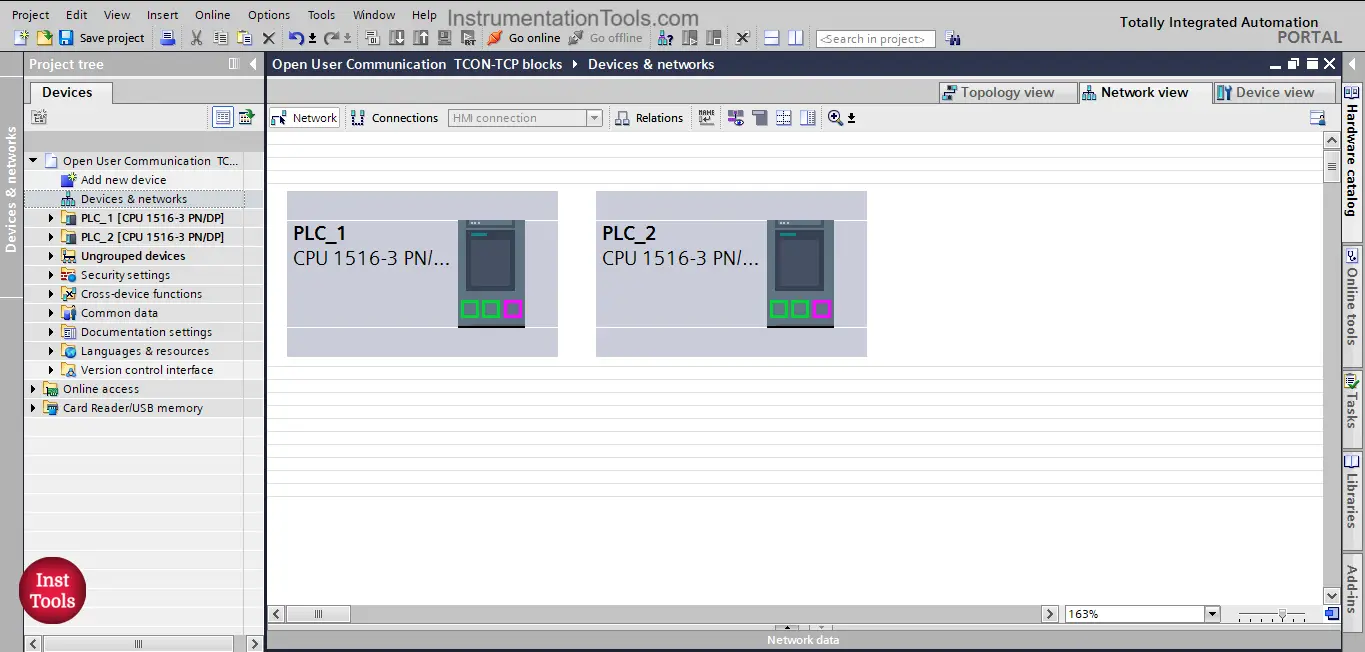
picture 1. Add PLC_1 and PLC_2.
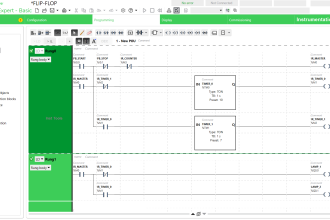
Now, we will simply just add the TCON block into our PLC logic, as we mentioned before we need to call the TCON for both PLCs, let’s start with PLC_1.
Simply drag and drop the TCON block which you will find in the open user communication folder. See picture 2.
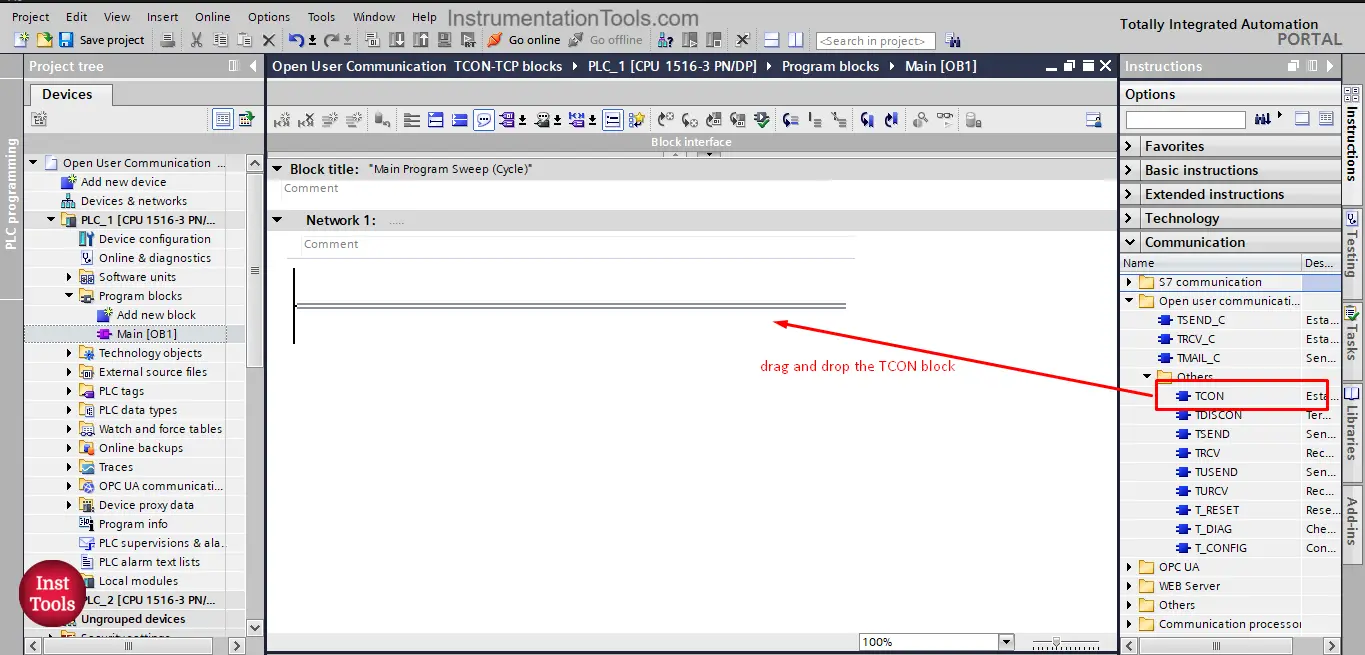
picture 2. Drag and drop the TCON instruction
The TCON block is essentially a function block, so when adding it to my main OB1, we will be asked to create a data block instance to that block.
Create the data instance and give it a proper name. See picture 3.
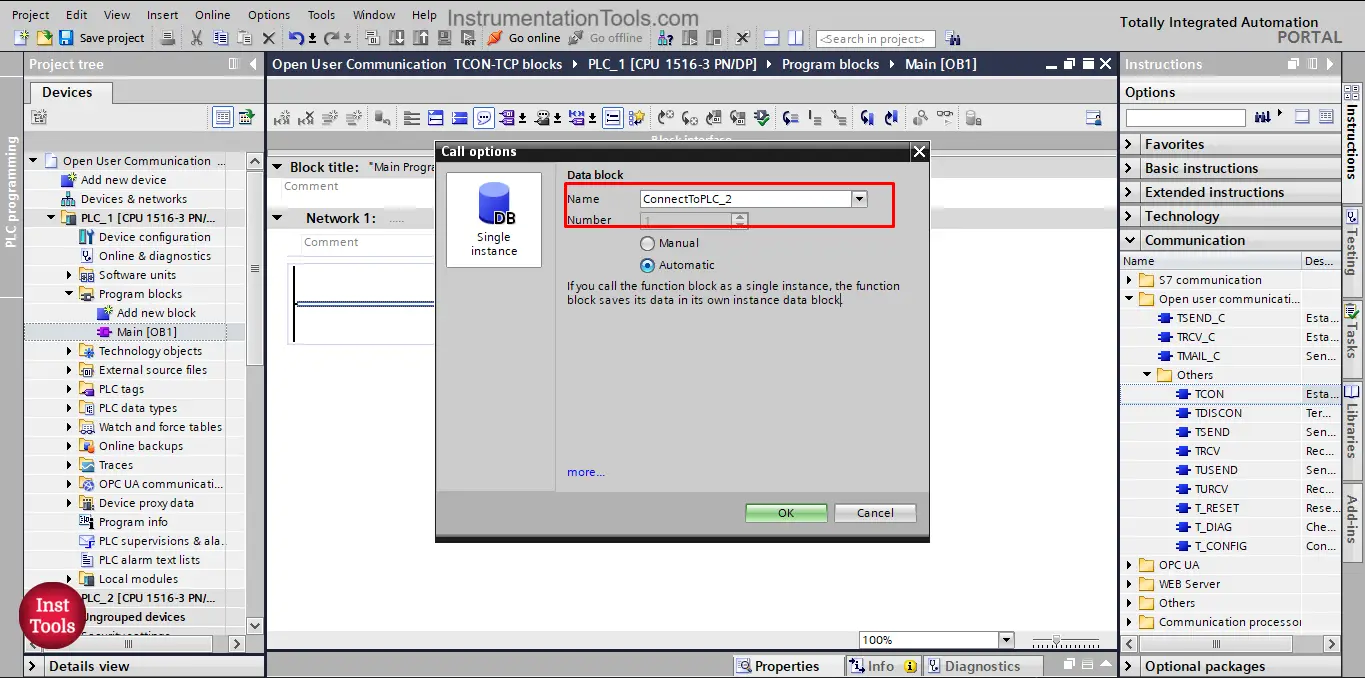
picture 3. Create data instance.
Now, the TCON block is added to your logic, we need to configure the connection parameter for the block.
Just press on the small blue configuration icon above the block. See picture 4.

picture 4. Open configuration view
When you press the blue icon you will open the configuration view for the TCON block where we can set up the connection parameter.
You will find it pretty much just like the connection parameter of the PUT and GET commands. See picture 5.
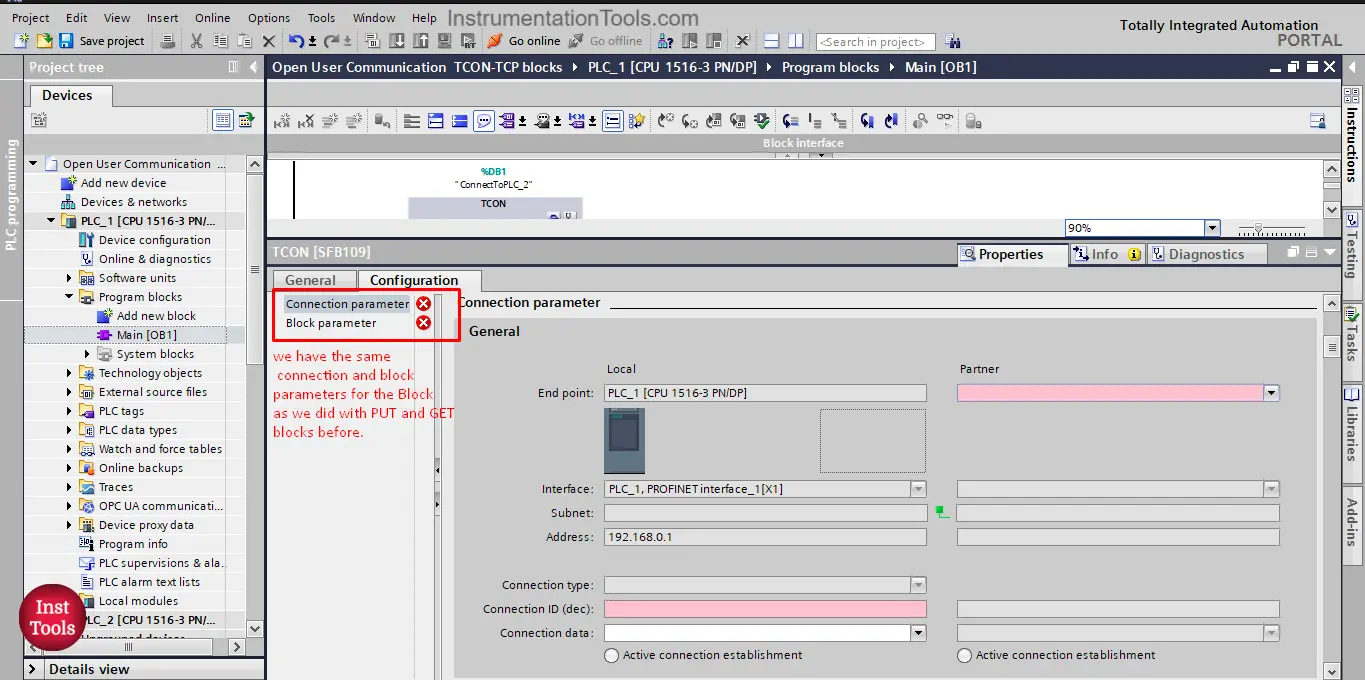
picture 5. Connection parameter of TCON.
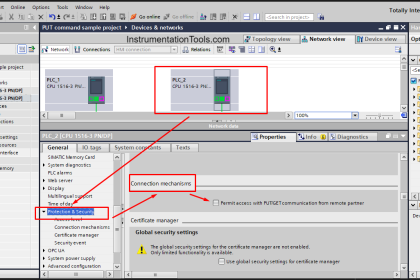
The Partner PLC options in the TCON block have more options than that of the PUT/GET commands as we are using open user communication. See picture 6.
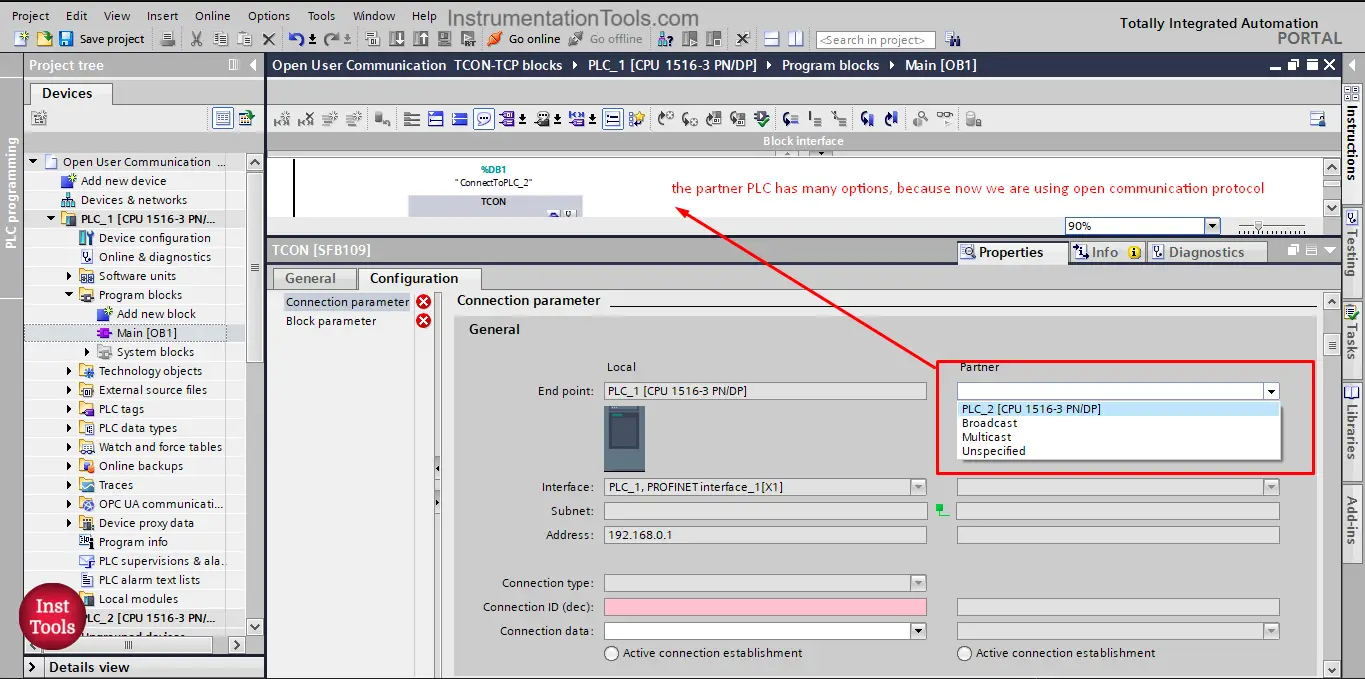
picture 6. Partner PLC options
As you can see from the picture, we have 4 different options, and they are:
- PLC_2: in case both PLCs are in the same project, the PLC_2 will be shown here
- Broadcast: this will make the connection available to any device on the network
- Multicast: this will make the connection with selected devices, more than one device but not all of them
- Unspecified: if the PLC is in another TIA Portal project.
When choosing the unspecified option, we will be asked to add the IP address of the PLC and also we need to add new connection data. See picture 7.
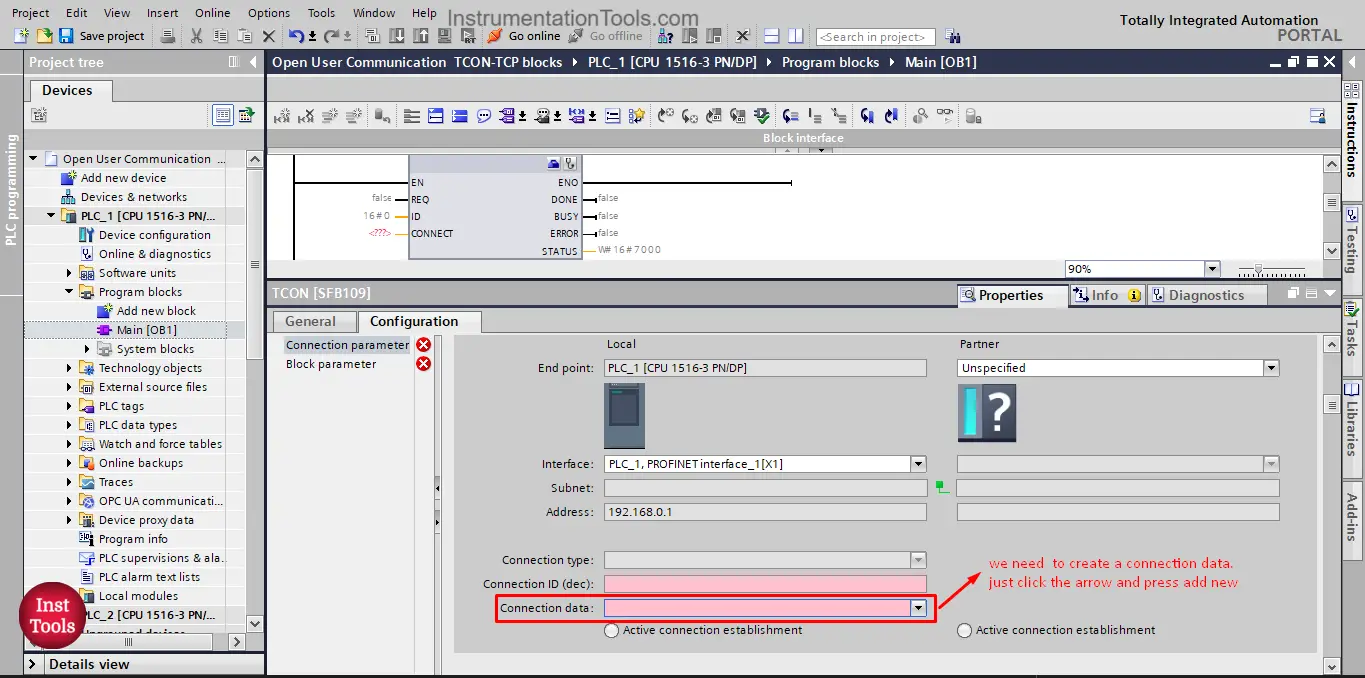
picture 7. Add new connection data
As you can see in the picture, to create a new connection data, just click the drop-down arrow and press new. This will create a new connection data block and it will automatically be assigned to the TCON block, see picture 8.
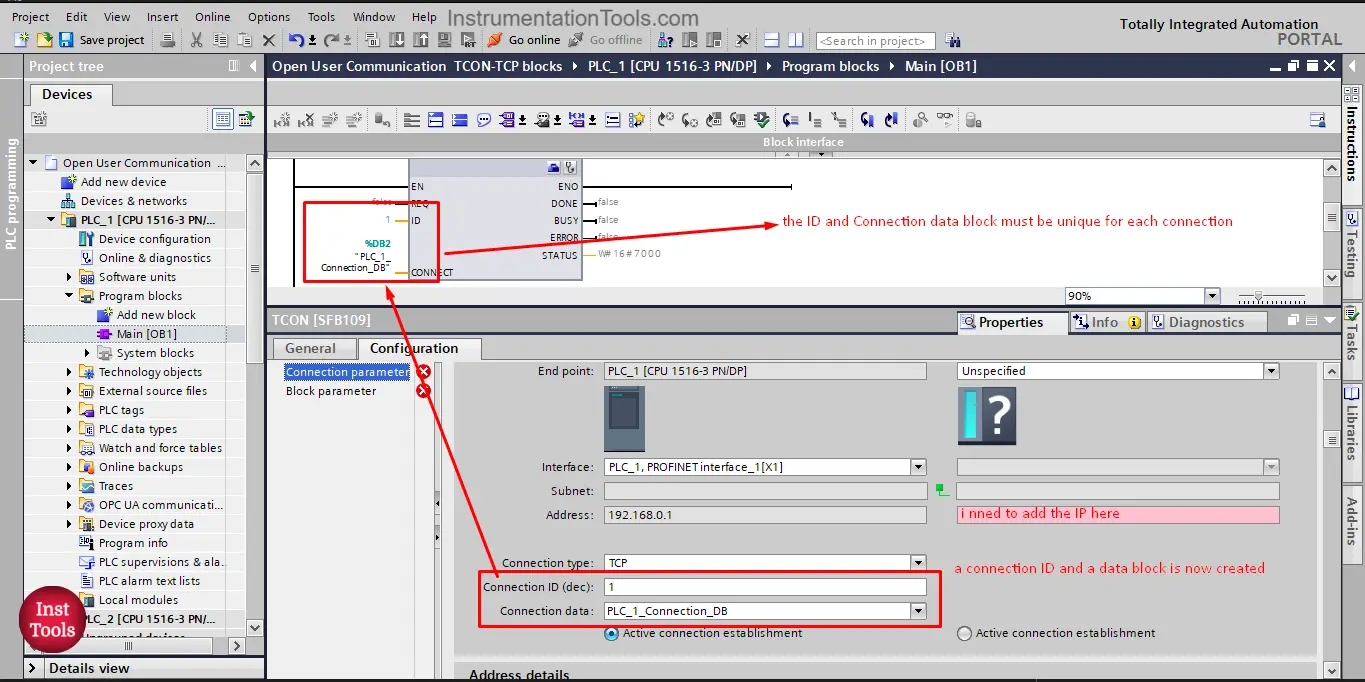
picture 8. Connection data block is created.
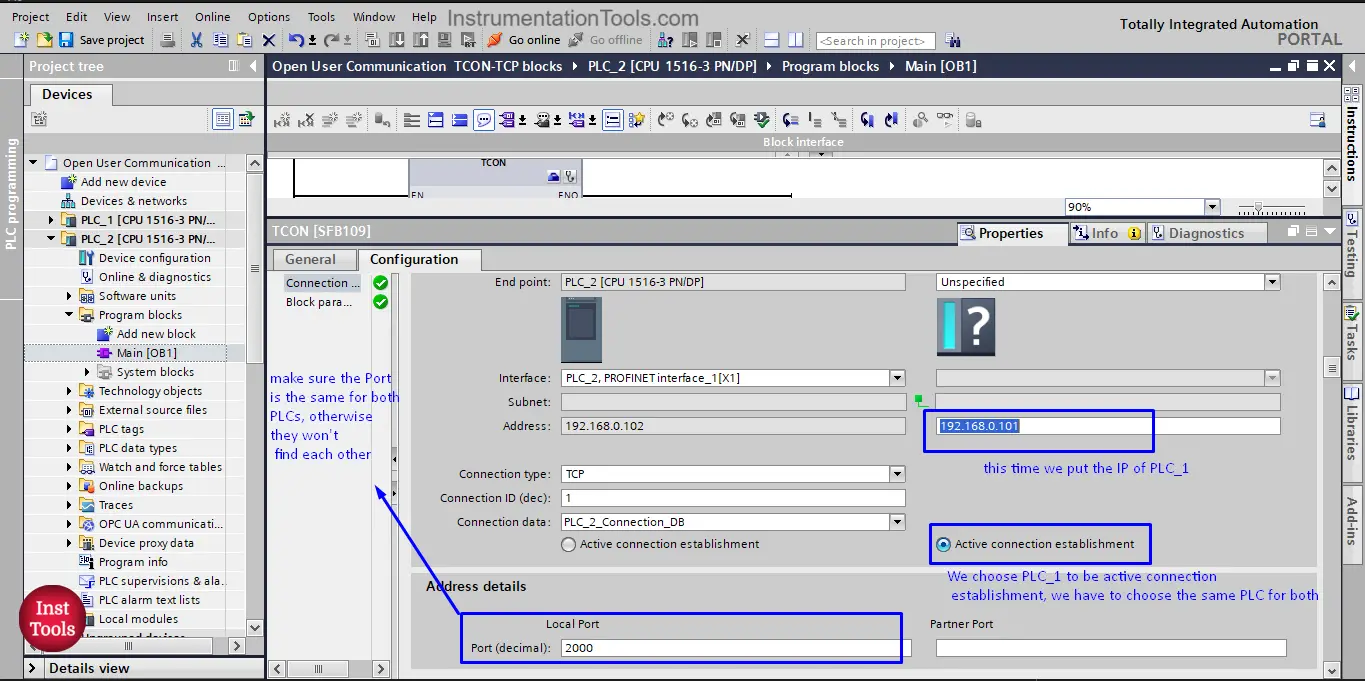
As you can see a connection data block was created, now I need to add the IP address of the Partner PLC.
Another thing we need to do is to choose which PLC will be the active connection establishment. This will decide which PLC will be responsible for establishing the connection while the other one in that case will be only responsible for opening a connection port. See picture 9.
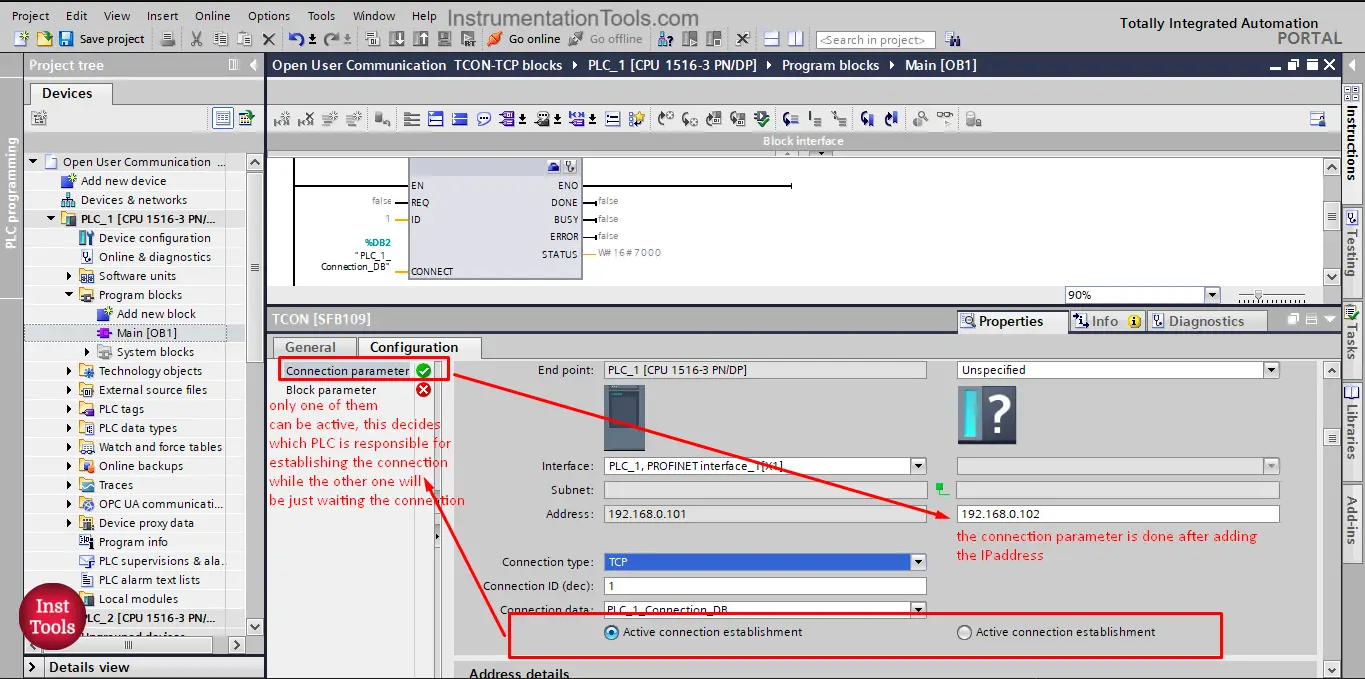
picture 9. Assign PLC_1 as active connection establishment.
As we choose the PLC_1 to be the active connection establishment, then PLC_2 will be responsible for opening a connection port, and I have to choose a value for that port. It can be any value, but it is automatically assigned in TIA Portal as 2000 so we will keep as it is. See picture 10.
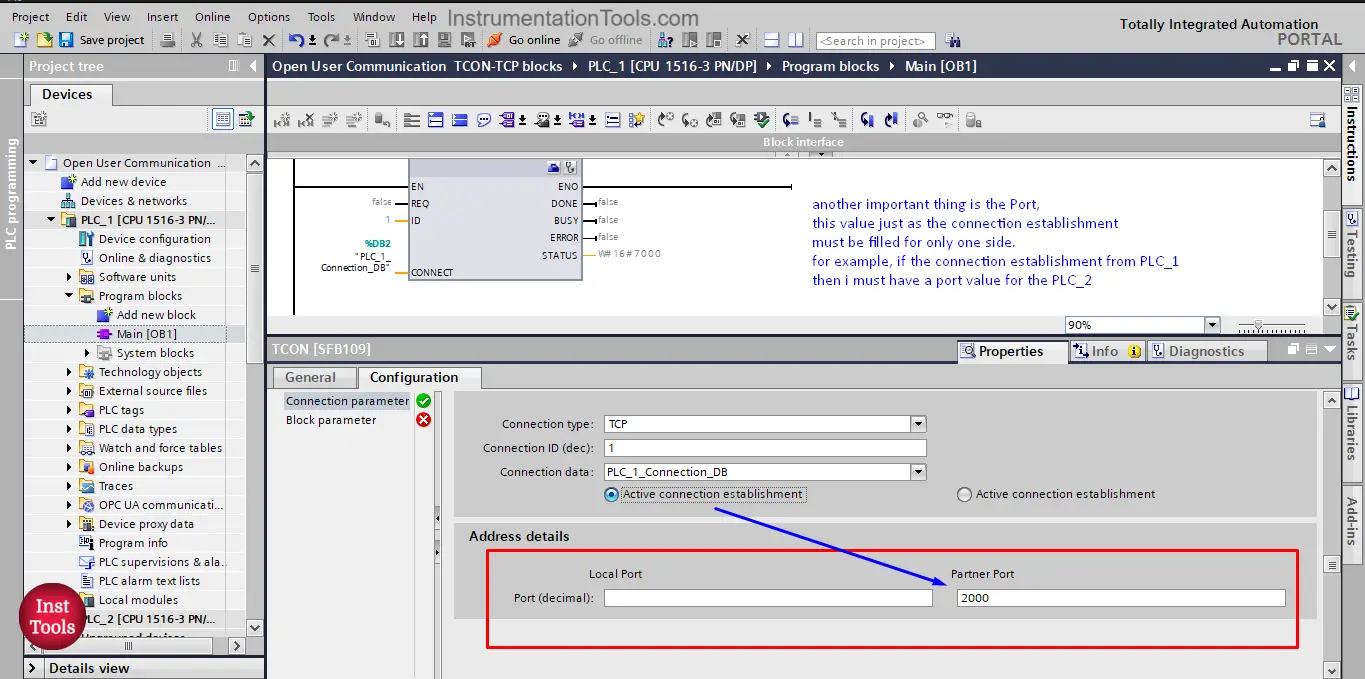
Picture 10. Partner port.
You can see in the previous picture that the connection parameter has turned green, indicating that all configurations are done and accepted.
When using TCON to establish a connection between two PLCs, both PLCs must call the TCON instruction to establish the connection, so we need now to do the same with the other PLC_2. Add the TCON block into the main OB1 of PLC_2, see picture 11.
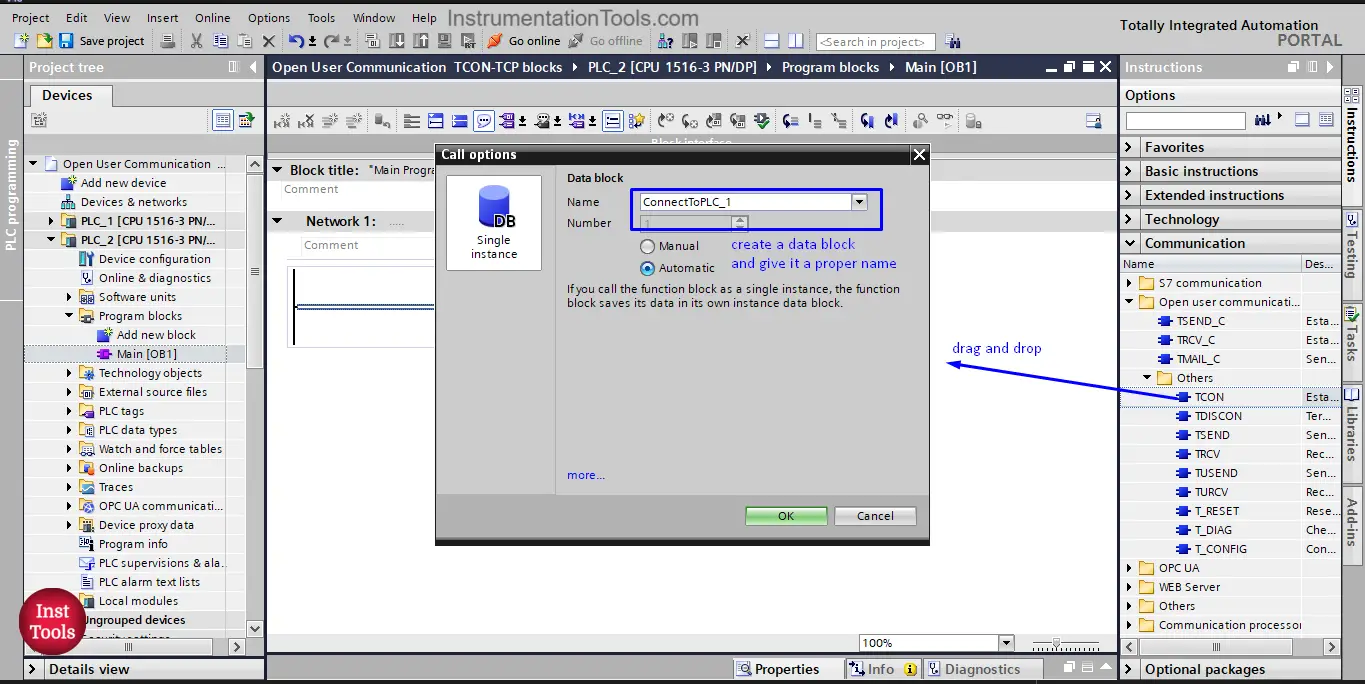
picture 11. Call TCON in PLC_2.
After adding the TCON block, we need to configure the connection parameter as we did with PLC_1. See picture 12.
Picture 12. Connection parameter of PLC_2
You can see from the picture that we still choose the PLC_1 as the active connection establishment, and we still kept the port of the PLC_2 to be 2000.
The active connection establishment and the port must be the same for both PLCs configuration or the connection will fail. Now, the connection configuration for both PLCs is done, see picture 13.
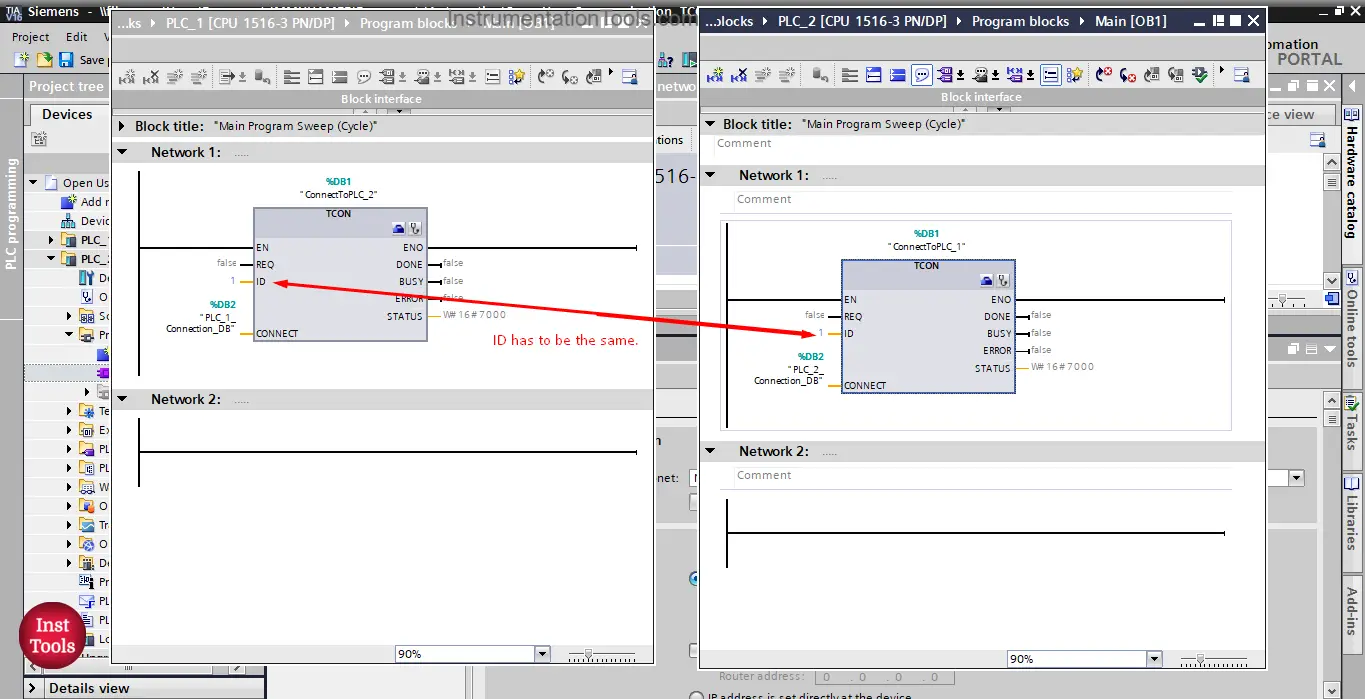
picture 13. TCON block in both PLCs.
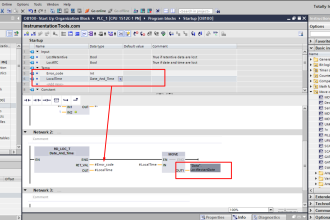
As we see from the picture, we need one more thing, which is to define the REQ for both PLCs.
We created AllowConnection for PLC_2 and StartConnection for PLC_1. See picture 14.
picture 14. Define the REQ signals.
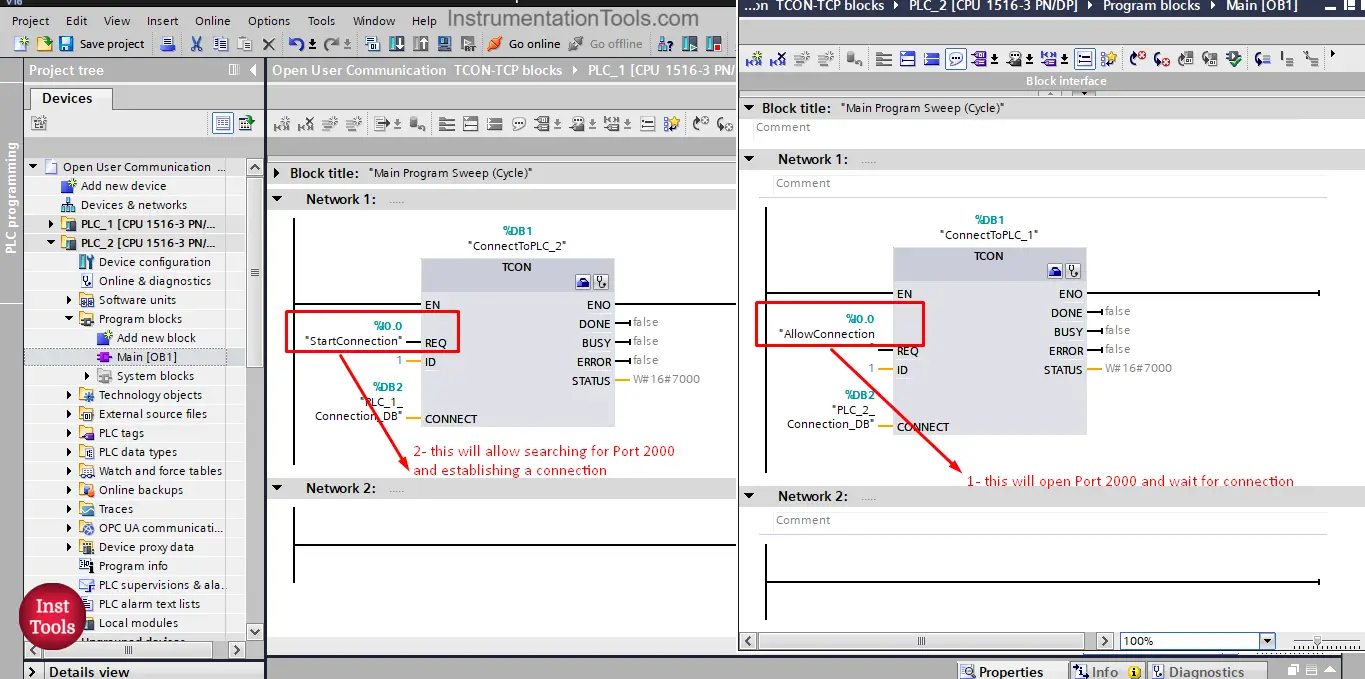
The connection between two PLCs is now done, and it goes as follows:
PLC_1 will try to establish a connection with PLC_2 when the REQ signal is active, but it can’t do that until PLC_2 enable the connection capability and that will be done when the TCON block of PLC_1 receive a signal at REQ.
- A REQ signal is active for TCON of PLC_2 to enable the connection ( this means PLC_2 will open Port 2000 waiting for connection)
- A REQ signal active for TCON of PLC_1 to start connection (this will allow PLC_1 to establish a connection with PLC_2 through port 2000)
PROJECT SIMULATION
Let’s compile our project and start a simulation to see how the connection will be established.
To see the connection of any PLC and also between the PLCs, can open the network view and open the connections tab to see all active and established connections. See picture 15.
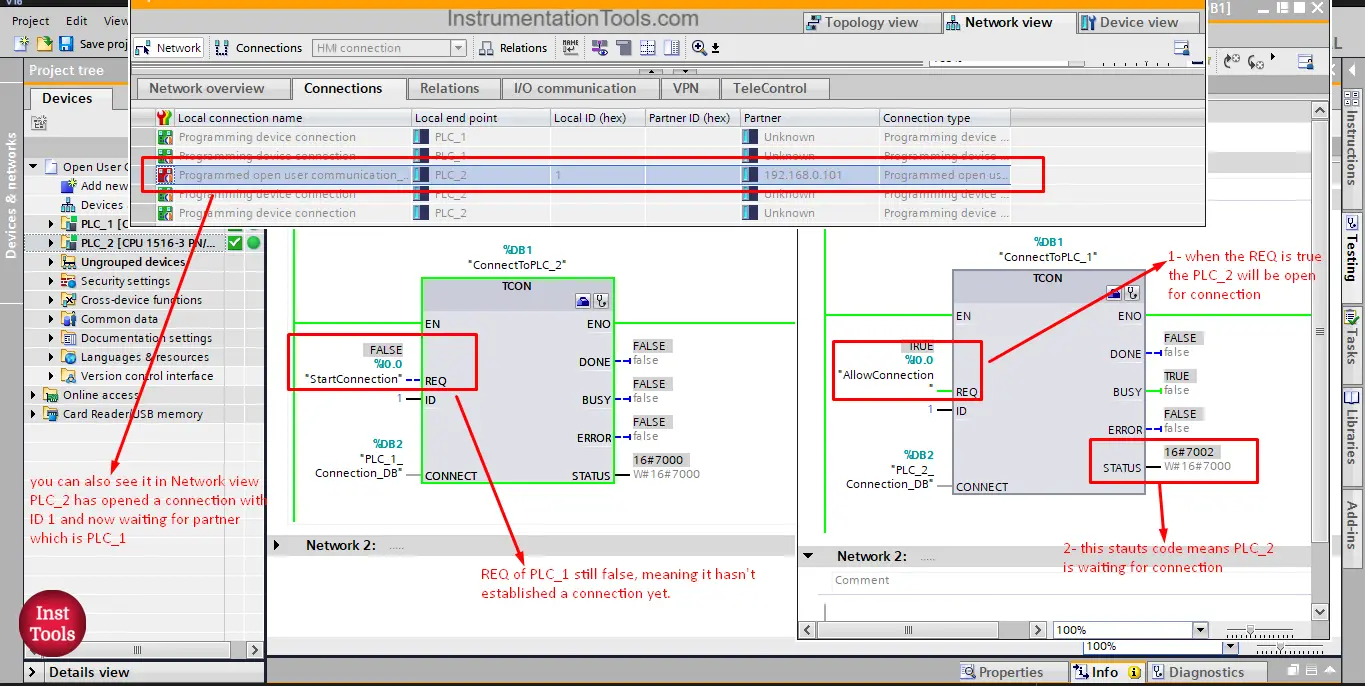
picture 15. PLC_2 is waiting for connection.
When the REQ is True, PLC_2 will be open for connection, you can see the STATUS value is 7002 _ if you check the help of the TCON block the status 7002 means waiting for connection_. You can also see in the picture from the network view that PLC_2 is waiting for a connection.
When the REQ of PLC_1 TCON block is true, PLC_1 will try to establish a connection with PLC_2, and because PLC_2 is already open and waiting for connection, the PLC_1 will be able to find and establish a connection with PLC_2. See picture 16.
Picture 16. PLC_1 establishing a connection.
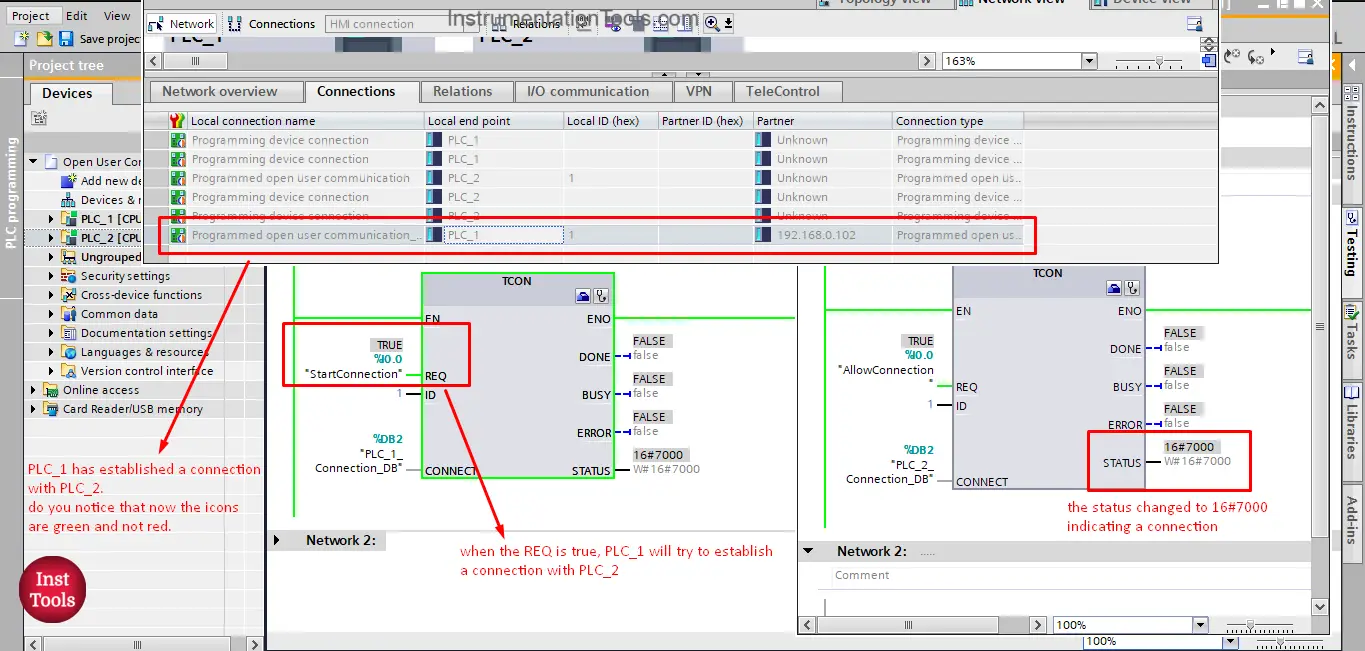
Notice, that all connection in the network view are now green, indicating healthy and ongoing connection between PLC_1 and PLC_2.
As we mentioned before once the connection has been set up and established, it is automatically maintained. So, even when the REQ signals turn false the connection between the two PLC will remain. See picture 17.
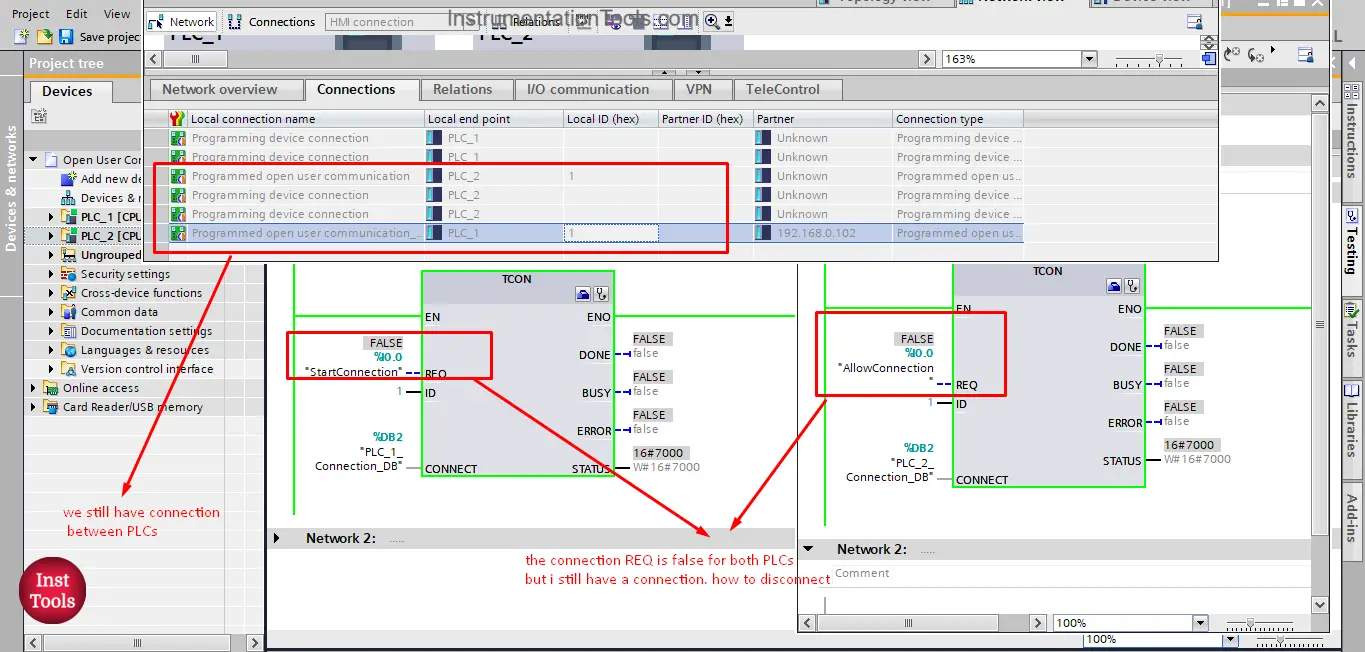
Picture 17. Connection still ongoing.
But, if turning the REQ signals doesn’t disconnect the connection, how can I disconnect if I want to?
Disconnection block TDISCON
To disconnect the connection between the two PLCs, we can put the PLC into STOP mode which is not practical during running the process. And we also can use the disconnection block or TDISCON.
To add a TDISCON block, just drag and drop it into your logic, see picture 18.
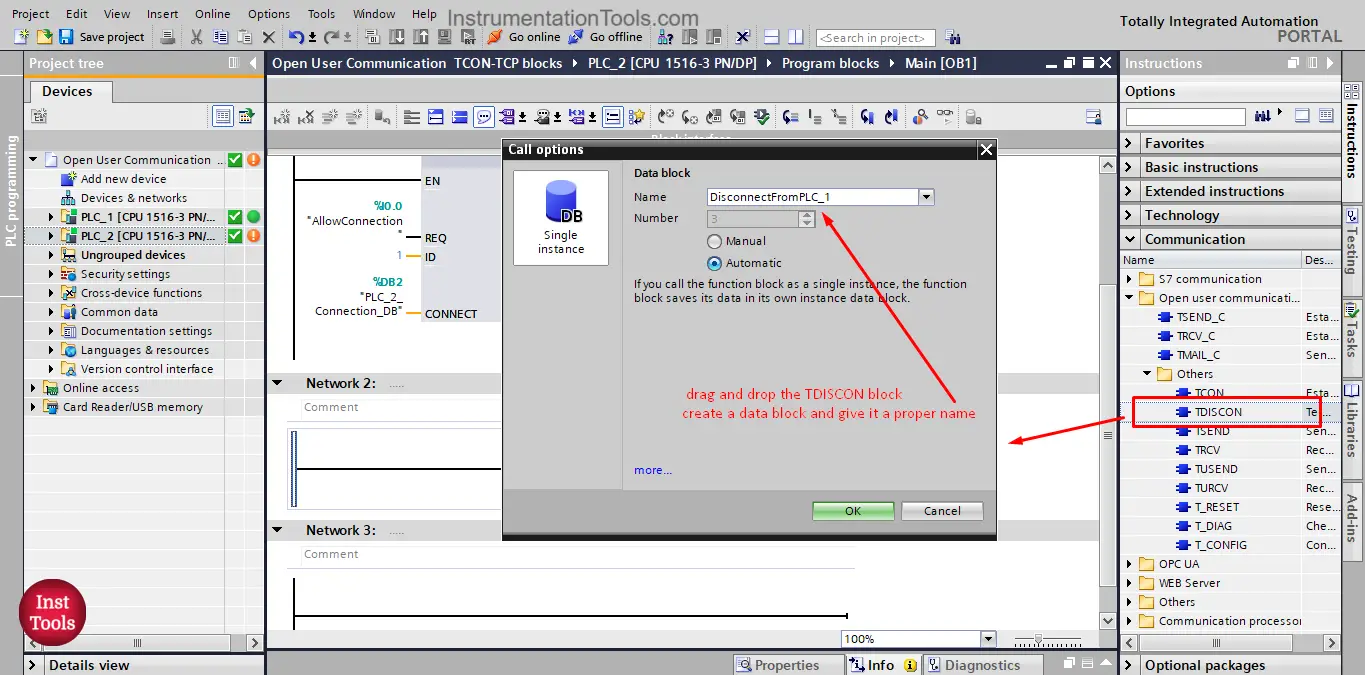
picture 18. Add TDISCON block
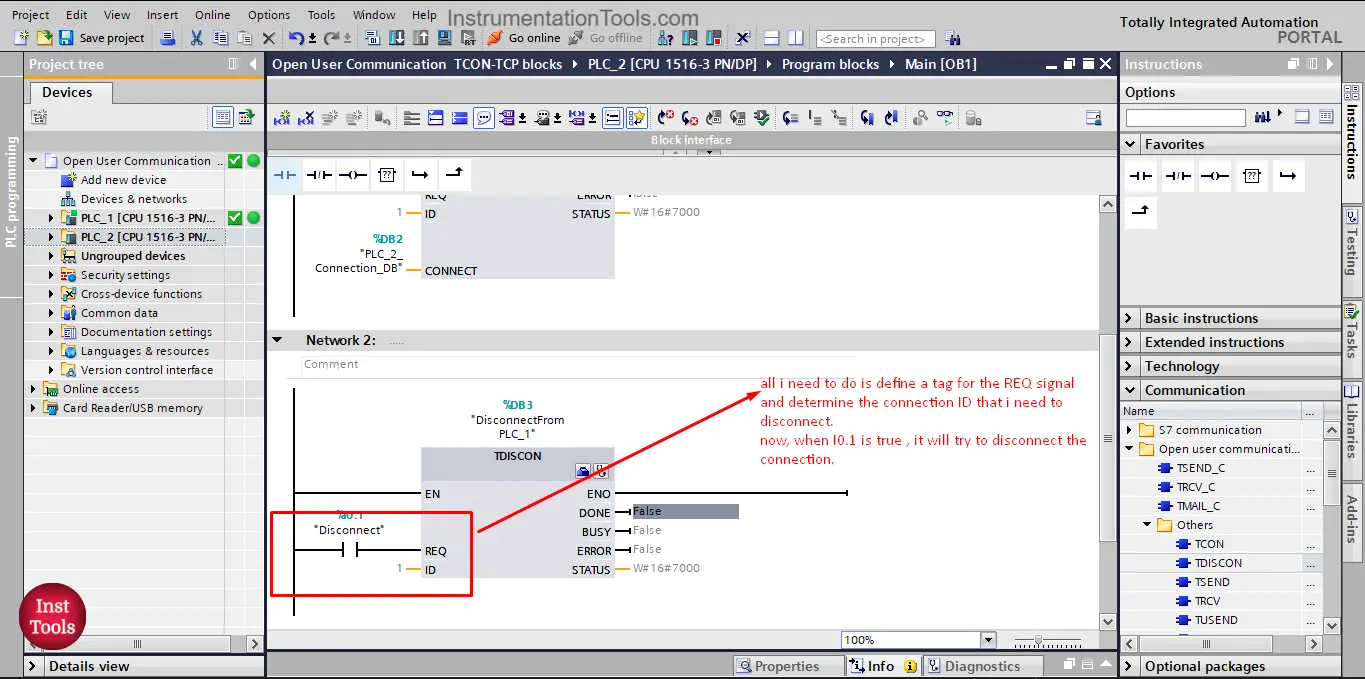
as you can see adding TDISCON block will need a data block instance, once the block is added into your logic, all you need to do is to assign the Connection ID that you need to disconnect and also you need to assign an REQ signal to will start the connection termination. See picture 19.
picture 19. TDISCON block.
NOW, let’s add a TDISCON block in the other PLC, so we would have the ability of disconnecting the connection. See picture 20. For TDISCON block of PLC_1.
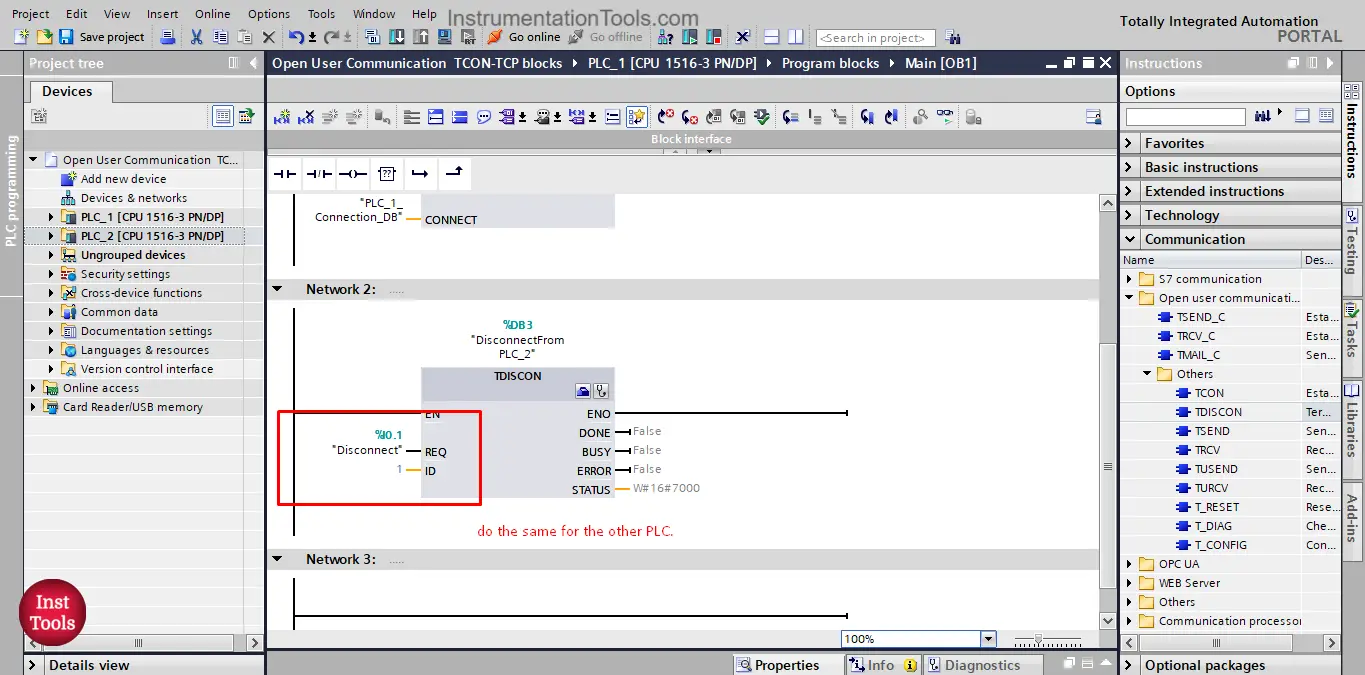
Picture 20. TDISCON in PLC_1
Let’s go back to the simulation and see how to use TDISCON blocks, see picture 21.
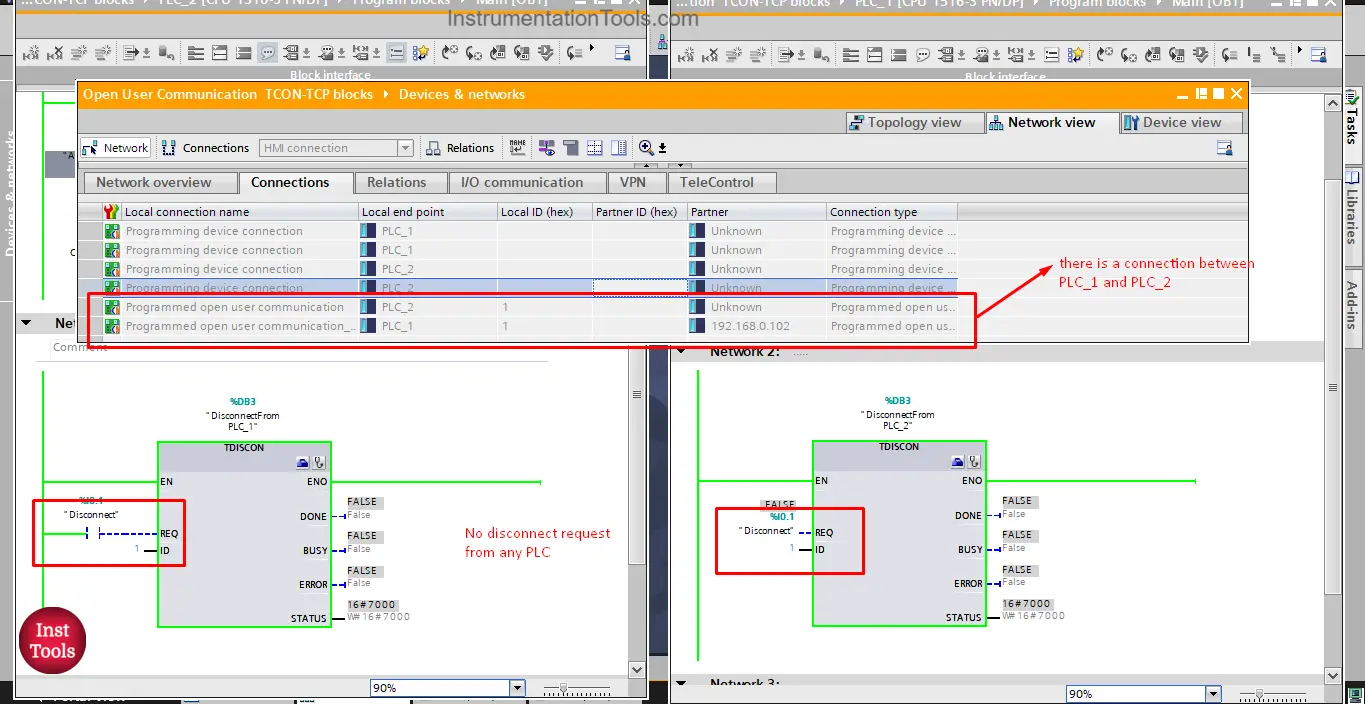
picture 21. Connection still active.
As you can see from the picture, the connection between the PLCs are still active with the REQ signals of the TDISCON still false.
If the REQ of PLC_1 turn TRUE, the connection will be terminated, but you will notice that PLC_2 still waiting for connection, see picture 22.
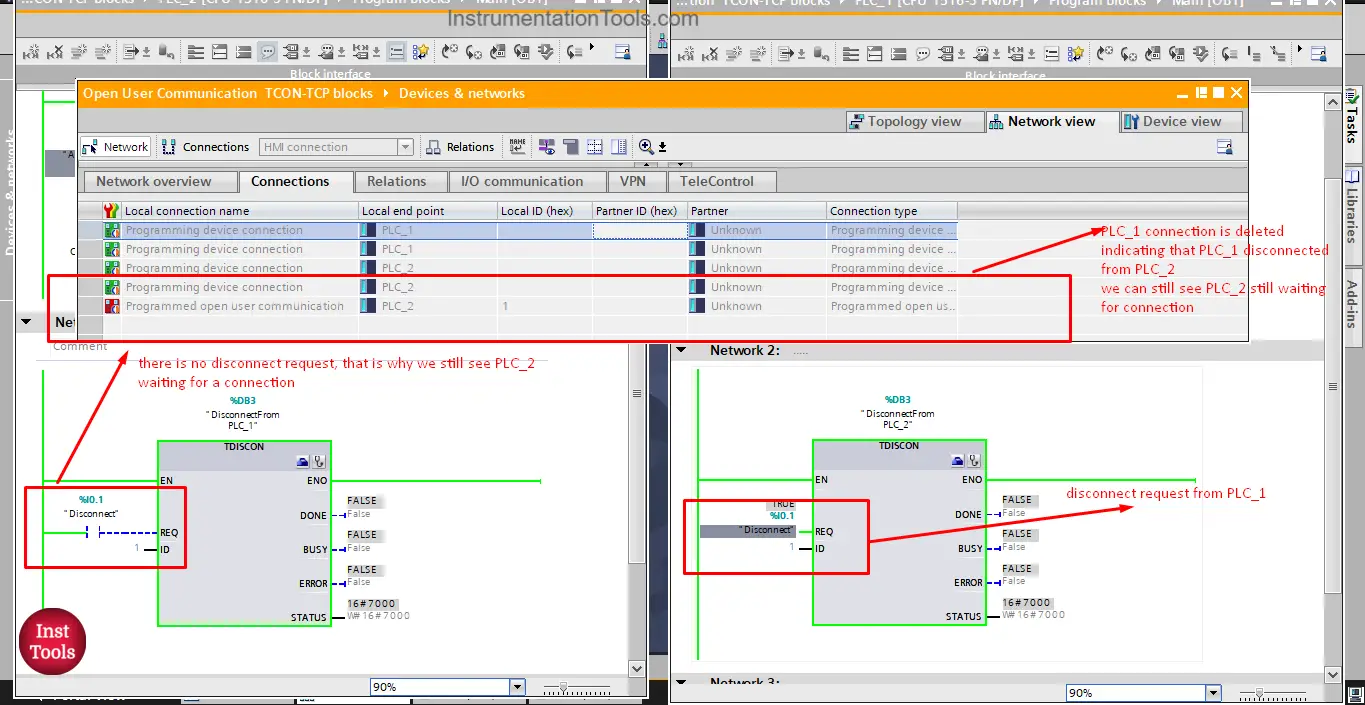
picture 22. REQ of PLC_1 is true.
When the REQ for PLC_2 TDISCON block is true, PLC_2 will no longer be waiting for connection. See picture 23.
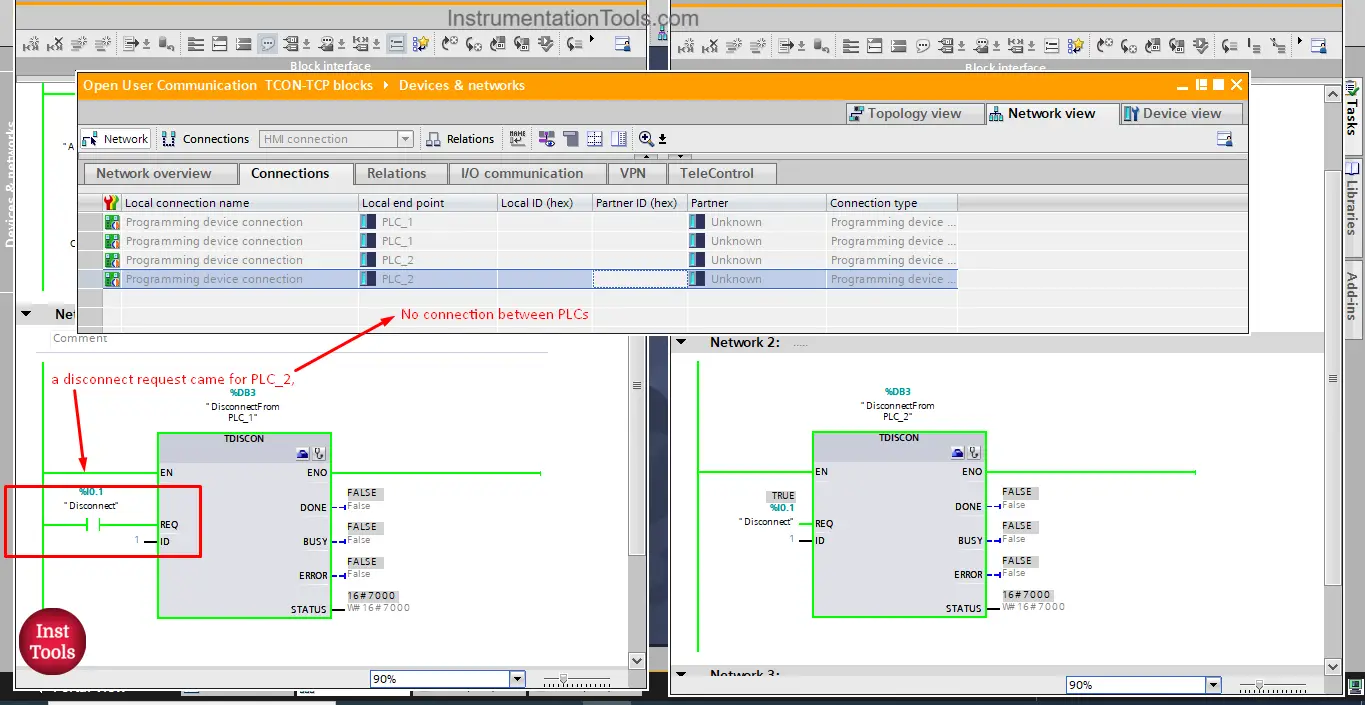
picture 23. Connection is terminated.
We showed in this article how to establish a connection between two PLCs using the TCON and TDISCON blocks.
In the next article, we will show how to use this connection to actually start moving data between the two PLCs.
Download the project files.
If you liked this article, then please subscribe to our YouTube Channel for Instrumentation, Electrical, PLC, and SCADA video tutorials.
You can also follow us on Facebook and Twitter to receive daily updates.
Read Next:
- Free Schneider PLC Training
- Artificial Intelligence Projects
- How to Choose a PLC for a Project?
- What is Multi-touch Technology?
- 555 Timer Projects for Students