Inst ToolsInst ToolsInst Tools
  • Courses
  • Automation
    • PLC
    • Control System
    • Safety System
    • Communication
    • Fire & Gas System
  • Instrumentation
    • Design
    • Pressure
    • Temperature
    • Flow
    • Level
    • Vibration
    • Analyzer
    • Control Valve
    • Switch
    • Calibration
    • Erection & Commissioning
  • Interview
    • Instrumentation
    • Electrical
    • Electronics
    • Practical
  • Q&A
    • Instrumentation
    • Control System
    • Electrical
    • Electronics
    • Analog Electronics
    • Digital Electronics
    • Power Electronics
    • Microprocessor
  • Request
Search
  • Books
  • Software
  • Projects
  • Process
  • Tools
  • Basics
  • Formula
  • Power Plant
  • Root Cause Analysis
  • Electrical Basics
  • Animation
  • Standards
  • 4-20 mA Course
  • Siemens PLC Course
Reading: PID in Studio 5000
Share
Font ResizerAa
Inst ToolsInst Tools
Font ResizerAa
  • Courses
  • Design
  • PLC
  • Interview
  • Control System
Search
  • Courses
  • Automation
    • PLC
    • Control System
    • Safety System
    • Communication
    • Fire & Gas System
  • Instrumentation
    • Design
    • Pressure
    • Temperature
    • Flow
    • Level
    • Vibration
    • Analyzer
    • Control Valve
    • Switch
    • Calibration
    • Erection & Commissioning
  • Interview
    • Instrumentation
    • Electrical
    • Electronics
    • Practical
  • Q&A
    • Instrumentation
    • Control System
    • Electrical
    • Electronics
    • Analog Electronics
    • Digital Electronics
    • Power Electronics
    • Microprocessor
  • Request
Follow US
All rights reserved. Reproduction in whole or in part without written permission is prohibited.
Inst Tools > Blog > PLC Tutorials > PID in Studio 5000

PID in Studio 5000

Learn how to implement PID in Studio 5000 for precise process control in PLC programming using function blocks for automation.

Last updated: March 16, 2025 6:20 pm
Viral Nagda
PLC Tutorials
No Comments
Share
6 Min Read
SHARE

PID is a very important function in PLC programming. Not only PLC, but PID is an algorithm that is used in many control devices like embedded controllers too. PID is a function which helps to keep the process variable steady around the setpoint. Due to this, the processes which require a precise process variable for working in their function, use PID blocks in their programming. One of the most widely used automation software in the market is Studio 5000 of Rockwell Automation. In this post, we will see how to use the PID block in Studio 5000.

Contents
PID Function BlocksPID in Studio 5000

PID Function Blocks

Studio 5000 has two types of PID function blocks – basic and enhanced. The enhanced version or PIDE is available only in functional block diagram language, whereas the basic version or PID is available only in ladder logic. For our study, we will see a basic version for simple understanding.

PID in Studio 5000

Let us write the logic step by step:

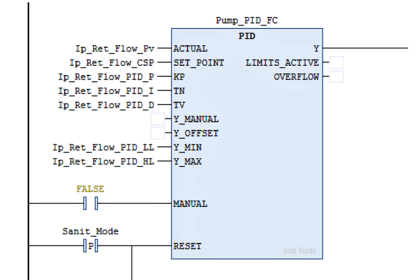
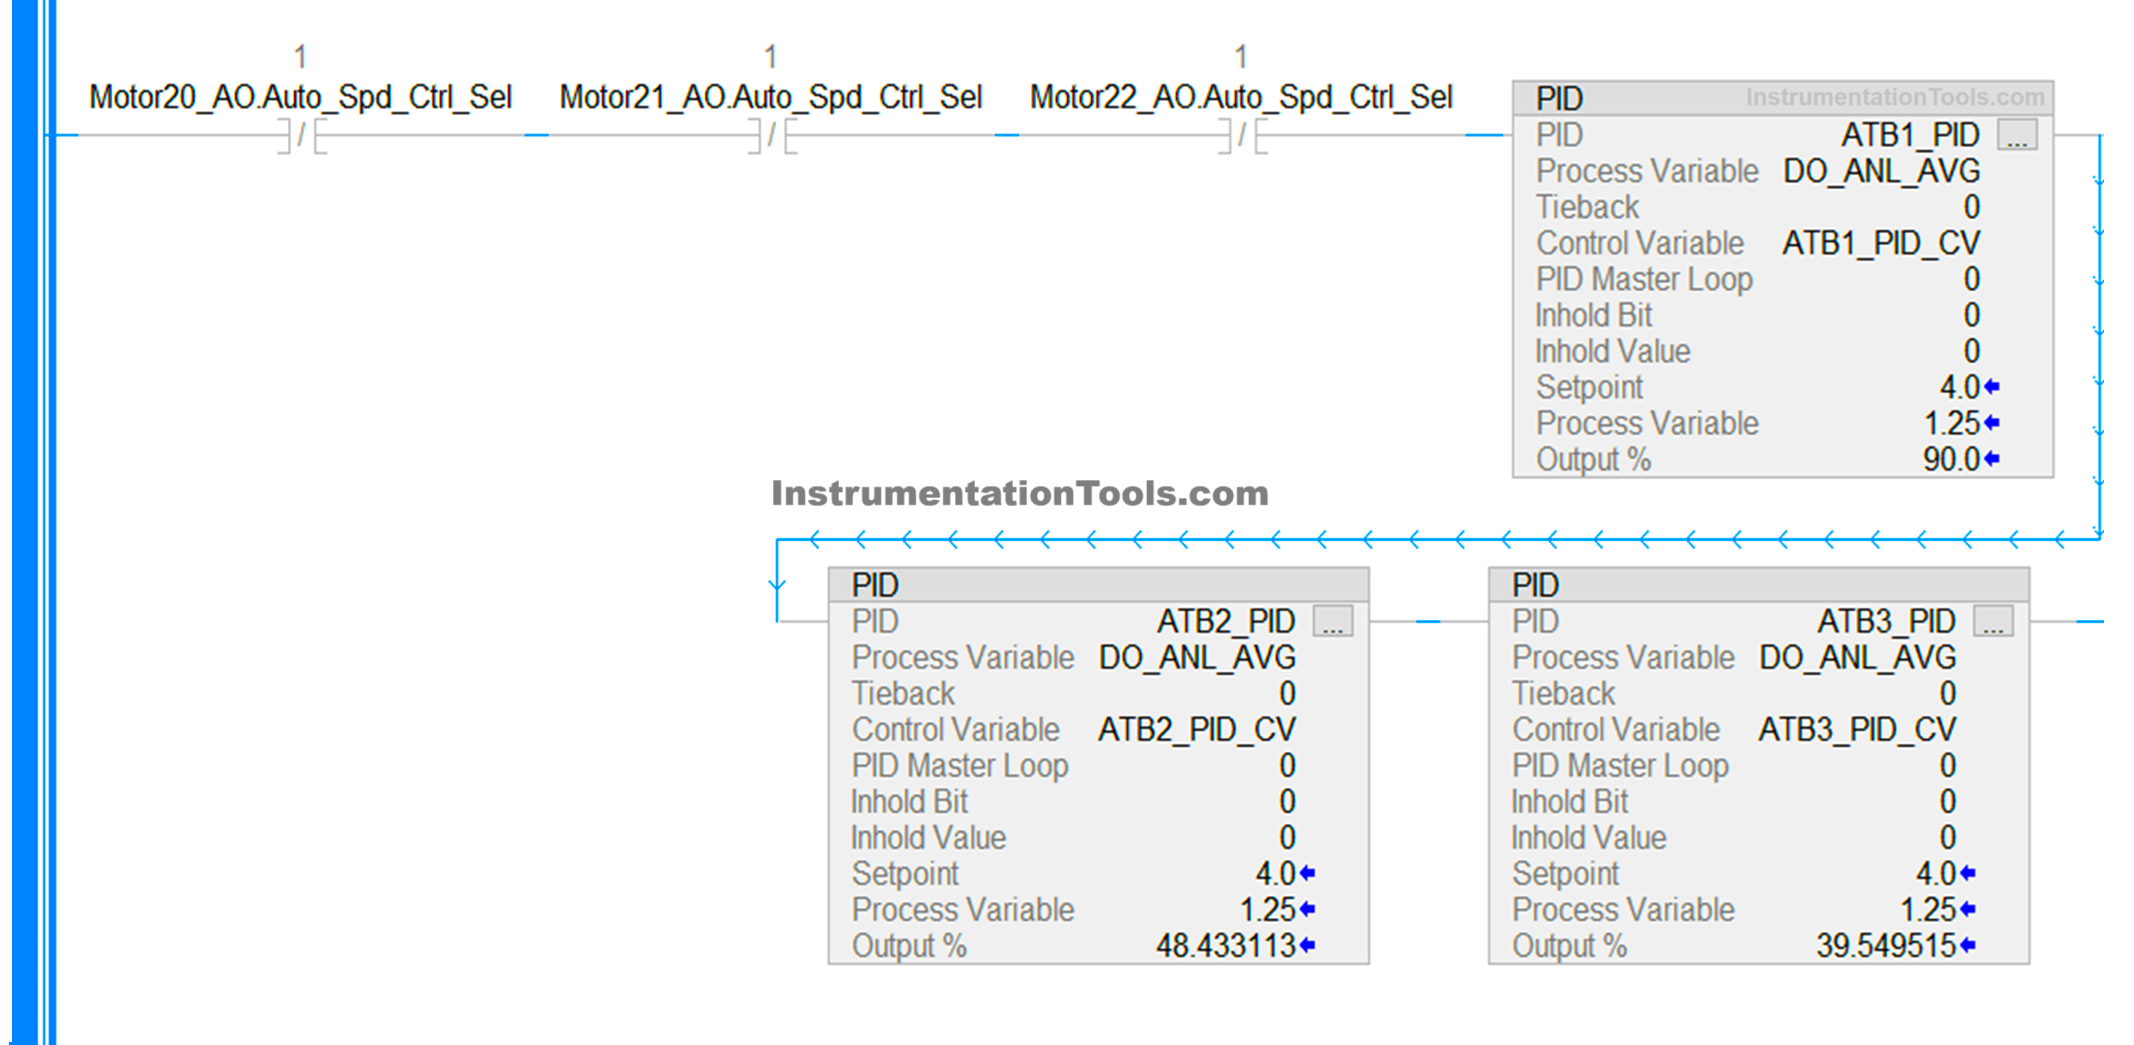
  1. As we are using a basic PID block, we will require ladder logic for programming. Refer to the below image. You can get this block from the section – special. As you can see, I have taken three PID blocks, but we will concentrate on only one – ATB1_PID. Any PID block has the following connections – setpoint, process variable, reset, PID values, and control variable/output. Similarly, even this block in Studio 5000 has all these connections to its block.
InstrumentationTools.com
  1. Now, let us first understand the terms we will use for our programming:

A] PID – Name of the block.

B] Process variable– Input variable to PID.

C] Control variable– Output variable from PID.

D] Setpoint (.SP)– Setpoint of PID.

E] Output %– Output of PID in percentage.

F] Proportional value (.KP)– KP value to be fed in PID.

G] Integral value (.KI)– KI value to be fed in PID.

H] Derivative value (.KD)– KD value to be fed in PID.

I] Low limit value (.MINO)– Minimum output of PID which will limit the actual output.

J] High limit value (.MAXO)– Maximum output of PID which will limit the actual output.

  1. As we have now understood the general terms that we will use for our program, let us go and program the PID now. We have already taken the block as we saw earlier. ATB1_PID is the name of the PID block taken. DO_ANL_AVG is the process variable which is given to PID for feedback. ATB1_PID_CV is the control variable which will be given by PID as output. You can directly link these variables in these connections. Remaining connections must be moved by a move block which we will see in the next point.
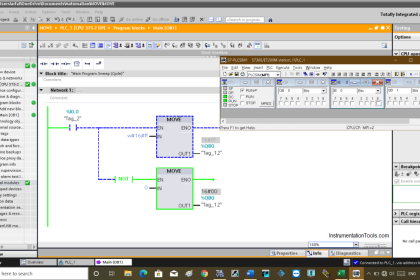
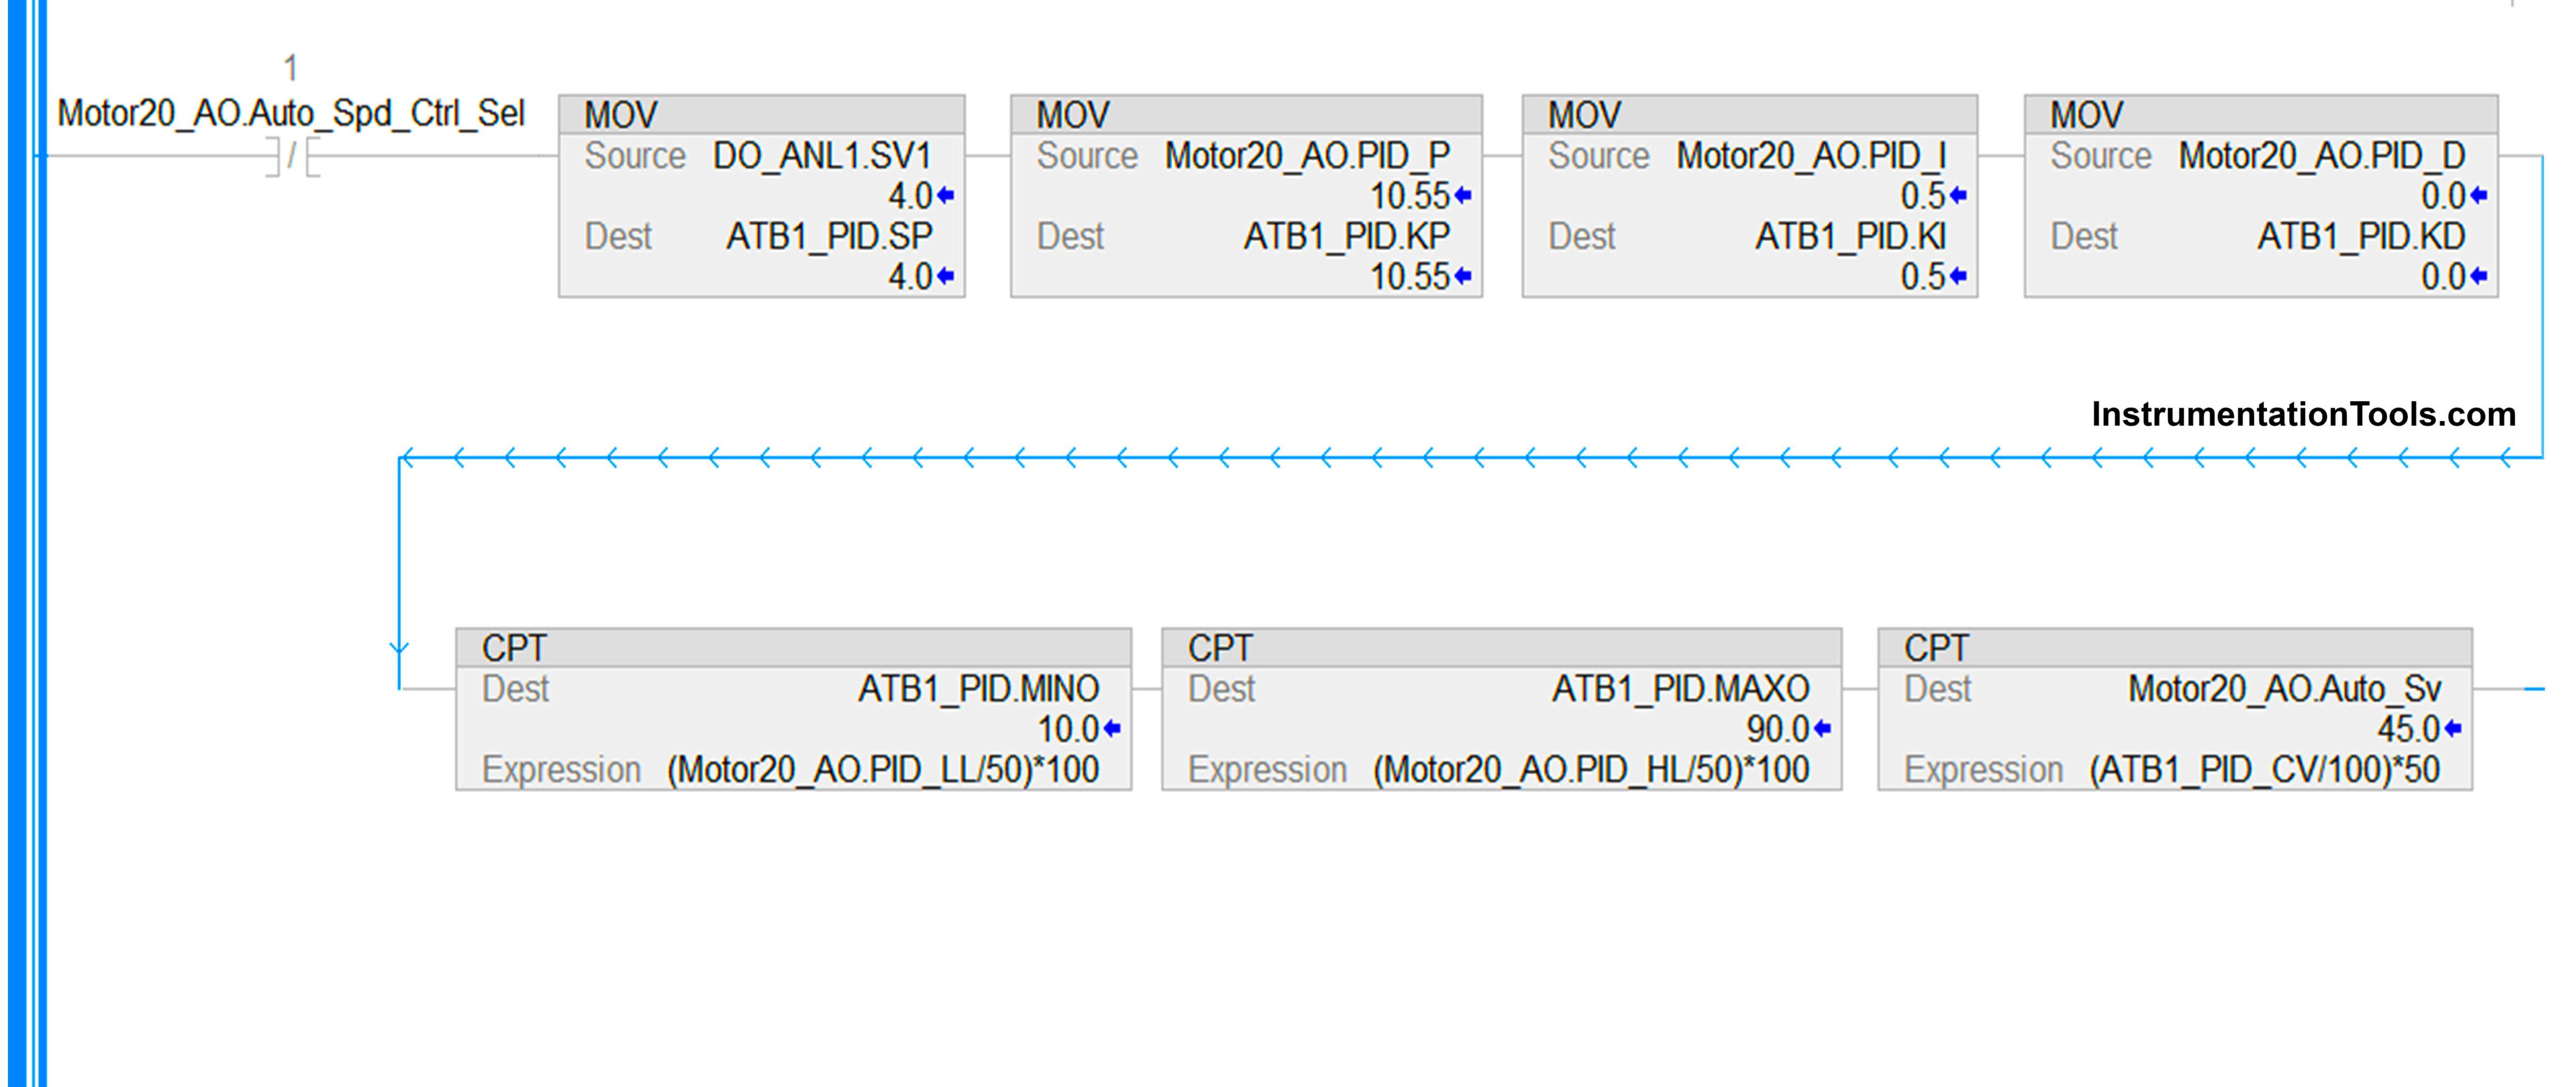
  2. Refer to the below image. We use move blocks to communicate between external variables and PID connections. We move the variables to the following terms we discussed before – .SP, .KP, .KI, .KD, .MINO, and .MAXO. Also, as we are using a VFD in our example and whose frequency needs to be varied between 0-50 Hz, we will divide the control variable output from PID by 100, multiply the result by 50, and then move to our analog output variable. In the program, you will be required to scale it further between actual raw counts the PLC gives in an analog output.
Studio 5000 PID function blocks
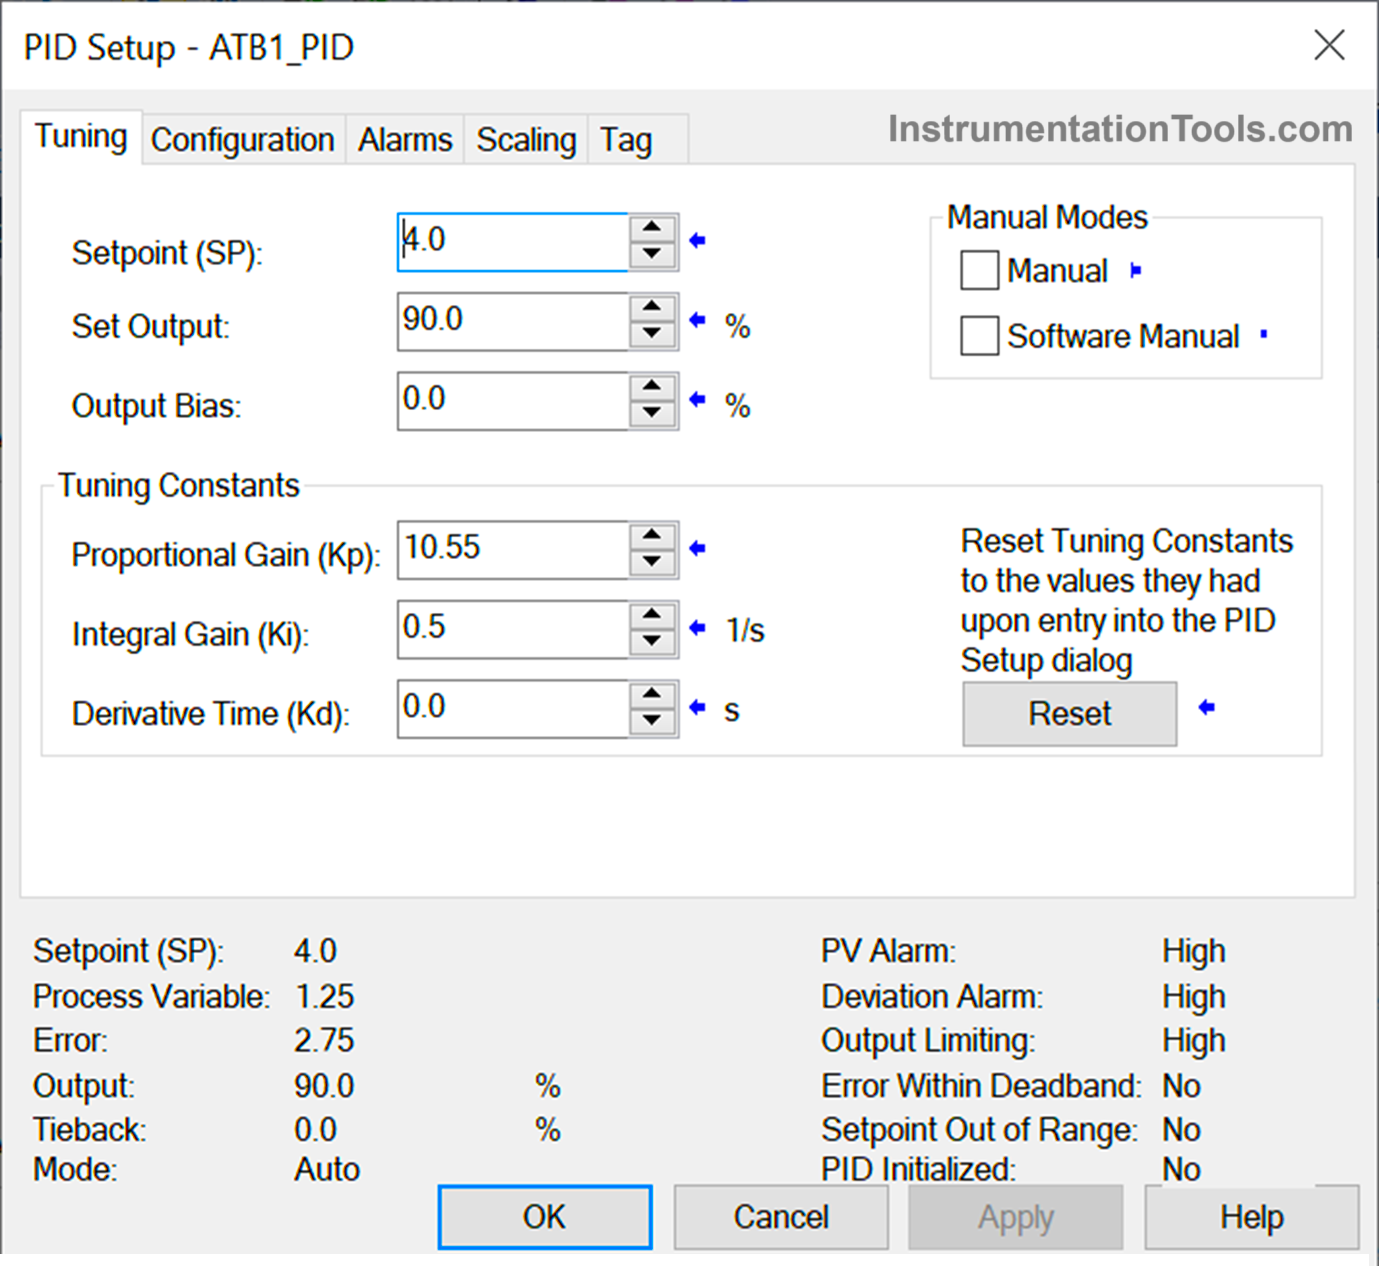
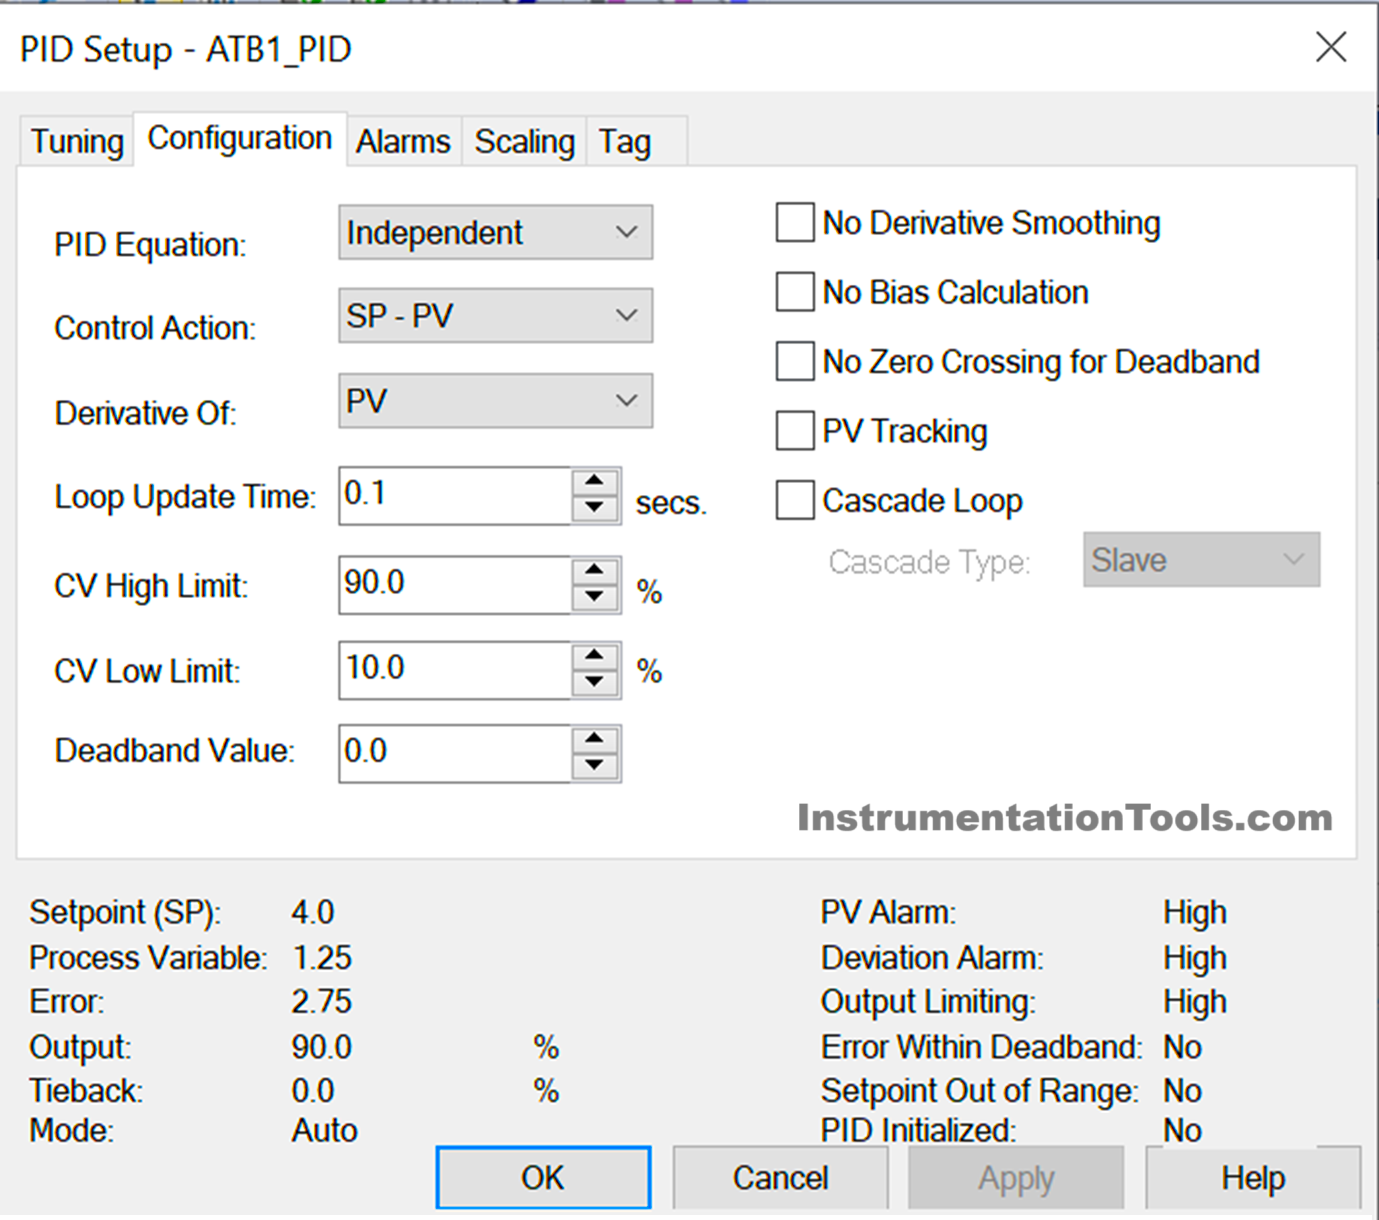
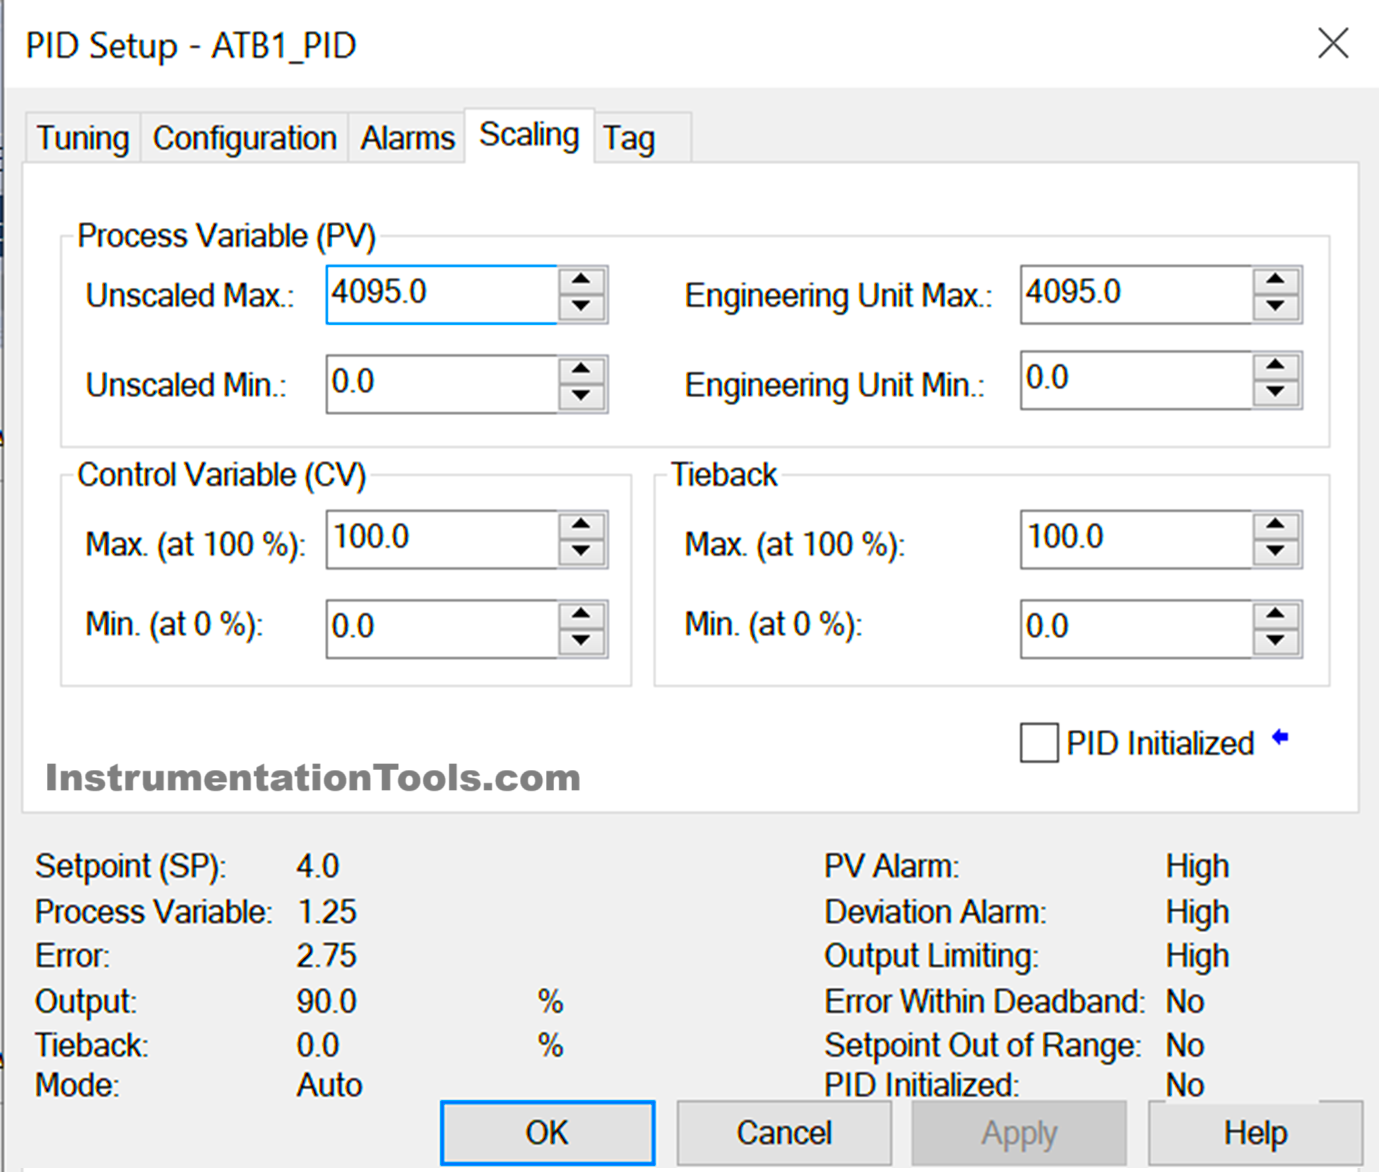
  1. Now comes the step to configure the PID block. Refer to the below images in sequence. In the first image, we see the tuning parameters which are derived from the logic we wrote in the previous step. When you go online, you have to press the reset button if the values are not taken or the PID is not giving output. In the second image, you see the configuration parameters where you have to generally select the control action – SP-PV or PV-SP. SP-PV means heating action, where the output increases if PV is below SP and decreases if PV goes more than SP. PV-SP works in a reverse direction as a cooling action. You will be required to set the loop update time once when online, after seeing the performance of the output variation. 0.1 seconds is the best value to set here. In the third image, we see the scaling parameters which are derived from the logic we wrote in the previous step. Here, PV scaling is just required to enter its minimum and maximum values. Keep the unscaled and engineering values as same as possible.
PID Setup
PID Tuning and Configuration
PID Scaling
  1. Once this step has been done, your PID is now ready to work. Download the code in PLC and check it’s output by varying the input. You will be required to vary P,I and D parameters in runtime according to the performance.

In this way, we saw how to write PID in Studio 5000.

Read Next:

  • Studio 5000 PLC Program for Digital Alarm
  • PLC Program for Pumping and Draining System
  • Allen Bradley Studio 5000 Motor Running Hours
  • Produced Tags and Consumed Tags in Studio 5000
  • Allen Bradley PLC to PLC Communication Tutorial
Don't Miss Our Updates
Be the first to get exclusive content straight to your email.
We promise not to spam you. You can unsubscribe at any time.
Invalid email address
You've successfully subscribed !

Continue Reading

PLC Programming to Control Lights in a Sequence
How to Work with Allen Bradley RsLogix Emulator?
Implement UDT in PLC Programming: User-Defined Data Type
Surface Grinding Process using PLC Program
PLC Programming Example on Multi-Motor Control for Beginners
Control Room and Field Instruments Questions and Answers
Share This Article
Facebook Whatsapp Whatsapp LinkedIn Copy Link
Share
Leave a Comment

Leave a Reply Cancel reply

Your email address will not be published. Required fields are marked *

Stay Connected

128.3kFollowersLike
69.1kFollowersFollow
210kSubscribersSubscribe
38kFollowersFollow

Categories

Explore More

Create Logic with InTouch Scada using Scripting
Wood Sawing and Blower System: PLC Control Design
PLC Program to Simulate Gate Array Logic
PLC Input Output Modules
Instrumentation and Control Project Packages – Detail Engineering
PLC Wiring Questions for Technicians and Engineers
3 Phase Motor Control using PLC Ladder Logic
PLC Interview Questions and Answers

Keep Learning

Tags in Functional Block Diagram in Studio 5000

Sheets, Tags, Elements in Functional Block Diagram of Studio 5000

PLC automation timers and counters

Medium-Level PLC Exercise for Students in Automation

Ethernet IP Commissioning Tool software

How to Configure IP Address in Rockwell PLC?

PLC Example to Control LEDs Via Switches

PLC Example to Control LEDs Via Switches

plc-analog-signals-wiring-techniques

PLC Analog Signals Wiring Techniques

Control Methods in Servo Motor Drives

Various Control Methods in Servo Motor Drives

PLC Program for Star Delta Starter using Functional Block Diagram

PLC Program for Star Delta Starter using Functional Block Diagram

Readings Mismatch between Field & Control Room

Readings Mismatch between Field & Control Room ? Why

Learn More

Common Causes of Imperfect Bends

Instrument Tube Fitting Installation – Part 3

10 Questions on Reforming Furnace Control System

10 Questions on Reforming Furnace Control System

Digital to Analog Converters Objective Questions

Digital to Analog Converters Objective Questions

Power Electronics Objective Questions

Power Electronics Objective Questions

PLC Program for an Alternate output circuit

PLC Program for Alternate Output Circuit with Latched Function

Capacitance-Level-Transmitter

Capacitance Level Switch Calibration

Addressable Fire Alarm System

Which One is Best – Conventional or Addressable Fire Alarm System?

Analyzers Questions and Answers

Sodium Analyzer Questions & Answers

Menu

  • About
  • Privacy Policy
  • Copyright

Quick Links

  • Learn PLC
  • Helping Hand
  • Part Time Job

YouTube Subscribe

Follow US
All rights reserved. Reproduction in whole or in part without written permission is prohibited.
Welcome Back!

Sign in to your account

Username or Email Address
Password

Lost your password?