Inst ToolsInst ToolsInst Tools
  • Courses
  • Automation
    • PLC
    • Control System
    • Safety System
    • Communication
    • Fire & Gas System
  • Instrumentation
    • Design
    • Pressure
    • Temperature
    • Flow
    • Level
    • Vibration
    • Analyzer
    • Control Valve
    • Switch
    • Calibration
    • Erection & Commissioning
  • Interview
    • Instrumentation
    • Electrical
    • Electronics
    • Practical
  • Q&A
    • Instrumentation
    • Control System
    • Electrical
    • Electronics
    • Analog Electronics
    • Digital Electronics
    • Power Electronics
    • Microprocessor
  • Request
Search
  • Books
  • Software
  • Projects
  • Process
  • Tools
  • Basics
  • Formula
  • Power Plant
  • Root Cause Analysis
  • Electrical Basics
  • Animation
  • Standards
  • 4-20 mA Course
  • Siemens PLC Course
Reading: Hierarchy of Calibration Organizations
Share
Font ResizerAa
Inst ToolsInst Tools
Font ResizerAa
  • Courses
  • Design
  • PLC
  • Interview
  • Control System
Search
  • Courses
  • Automation
    • PLC
    • Control System
    • Safety System
    • Communication
    • Fire & Gas System
  • Instrumentation
    • Design
    • Pressure
    • Temperature
    • Flow
    • Level
    • Vibration
    • Analyzer
    • Control Valve
    • Switch
    • Calibration
    • Erection & Commissioning
  • Interview
    • Instrumentation
    • Electrical
    • Electronics
    • Practical
  • Q&A
    • Instrumentation
    • Control System
    • Electrical
    • Electronics
    • Analog Electronics
    • Digital Electronics
    • Power Electronics
    • Microprocessor
  • Request
Follow US
All rights reserved. Reproduction in whole or in part without written permission is prohibited.
Inst Tools > Blog > Calibration > Hierarchy of Calibration Organizations

Hierarchy of Calibration Organizations

The calibration hierarchy helps us to record the sequence of calibrations performed on an instrument from a reference standard to the final measuring system.

Last updated: September 28, 2022 3:24 pm
Saurabh Vaidya
Calibration
No Comments
Share
4 Min Read
SHARE

The calibration hierarchy helps us to record the sequence of calibrations performed on an instrument from a reference standard to the final measuring system.

Contents
Calibration StandardsCalibration Organizations

Any type of local calibration performed in-house of an industry must be compared with a national standard and it must be documented.

It helps us to ensure proper record of instrument traceability.

There are different levels of calibration standards available from national level to the local level.

Calibration Standards

Calibration Organizations

We calibrate our instruments in our Local Calibration lab. The local calibration lab is accredited by NABL in India (National Accreditation Board for Testing and Calibration Laboratories). I.e. NABL is one level up from the local calibration lab. Similarly NABL is accredited by APAC and APAC is accredited by ILAC.

International Laboratory Accreditation Co-operation (ILAC) is Apex Organization.

ILAC is the international organization involved in the accreditation of conformity assessment bodies including calibration laboratories and testing laboratories.

As quality of product or Calibration results should be same all over the world, ILAC organization is formed to keep checked on this results.

As this body cannot reach every part of world, it has branches all over the world name as Regional Offices. Eg- EA, APAC, etc…

ILAC and IAF (International Accreditation Forum) work together and coordinate their efforts to enhance the accreditation and the conformity assessment worldwide.

Around the world, geo-political regions such as the European Community, and Asia-Pacific, the Americas and others, established regional cooperation to manage the work needed for such mutual recognition.

Regional Co-operation bodies under ILAC are EA in Europe, APAC in the Asia-Pacific, IAAC in America, AFRAC in Africa, SADCA in Southern Africa, and ARAC in the Arab region.

Regional Cooperation Bodies are those whose regional Mutual Recognition Arrangements (ILAC MRA) have been successfully peer-evaluated by ILAC.

ILAC and all regional bodies ensure that all accredited laboratories comply with ISO 17025 (for calibration and Testing).

EA– European Accreditation Cooperation

APAC– Asia Pacific Accreditation Cooperation

IAAC – Inter-American Accreditation Cooperation

 AFRAC – African Accreditation Cooperation

SADCA – Southern Africa Accreditation Cooperation

ARAC– Arab Accreditation Cooperation

EA has 50 Members. EA also cooperates with EURAMET (European Association of National Metrology Institutes) to publish several guidelines useful for accreditation calibration laboratories.

APAC was established on 01 January 2019 by amalgamation of two former regional accreditation bodies APLAC (Asia Pacific Laboratory accreditation cooperation) and PAC (Pacific accreditation cooperation). It has 48 full members across 29 Countries, 17 Associate Members and 6 Affiliates. NABL is one of the Full members.

National Accreditation bodies provides accreditation to calibration laboratories in respective countries.

National Accreditation bodies are UKAS in the UK, FINAS in Finland, NABL in India, A2LA in USA, and SANAS in South Africa.

UKAS– United Kingdom Accreditation Service

NABL– National Accreditation Board for Testing and Calibration Laboratories

A2LA– American Association for Laboratory Accreditation 

SANAS – South African National Accreditation System

Respective National Accreditation bodies are Member of Regional Co-operation bodies and ILAC.

Calibration Organizations
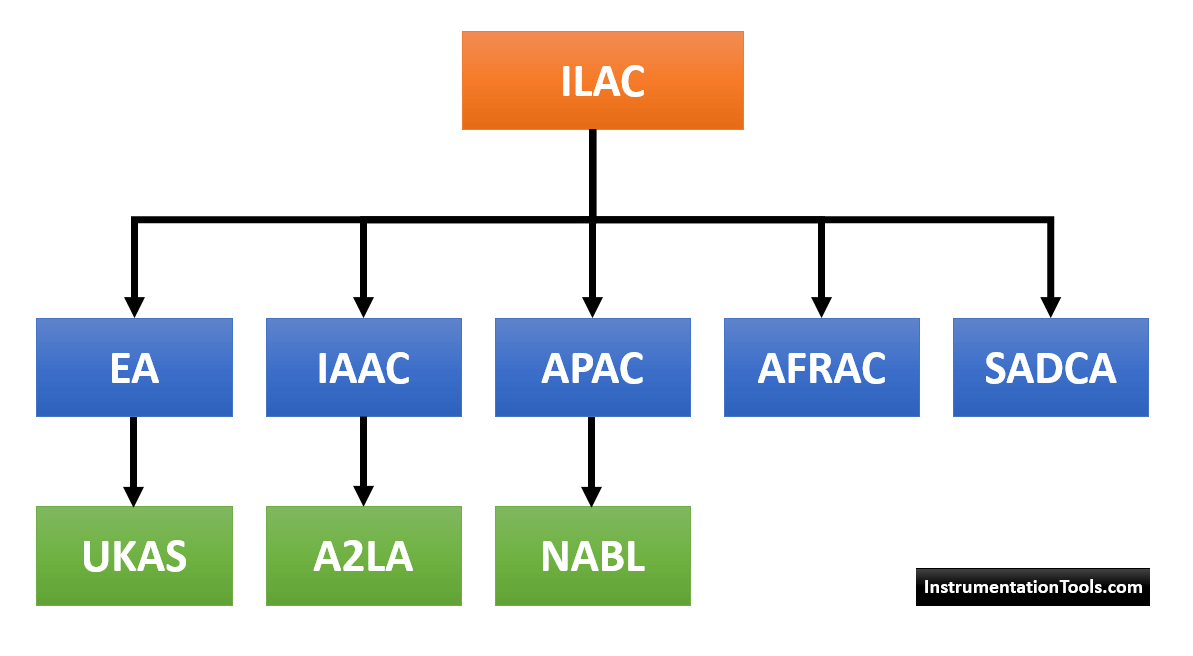
Hierarchy of Calibration Organization

If you liked this article, then please subscribe to our YouTube Channel for Instrumentation, Electrical, PLC, and SCADA video tutorials.

You can also follow us on Facebook and Twitter to receive daily updates.

Read Next:
  • History of Measurement
  • Selection of Master Instrument
  • Importance of Unit Measurement
  • Why Calibration is Important?
  • RTD Testing in Calibration Laboratory
Don't Miss Our Updates
Be the first to get exclusive content straight to your email.
We promise not to spam you. You can unsubscribe at any time.
Invalid email address
You've successfully subscribed !

Continue Reading

What is Bump Testing ?
Ammonia Gas Detector Working Principle and Calibration
Conductivity Transmitter Calibration Procedure
Closed tank DP Level Transmitter with wet leg elevation zero direct mount Calibration
Transmitter Calibration Procedure
Bently Nevada Vibration Probes Functional Testing
Share This Article
Facebook Whatsapp Whatsapp LinkedIn Copy Link
Share
Leave a Comment

Leave a Reply Cancel reply

Your email address will not be published. Required fields are marked *

Stay Connected

128.3kFollowersLike
69.1kFollowersFollow
210kSubscribersSubscribe
38kFollowersFollow

Categories

Explore More

How to Test a Pressure Switch ?
Difference between Calibration and Ranging
Methods of Measurement
Calibration Procedure of Voltmeter and Ammeter
Self Actuated Pressure Control Valve Functional Testing
DP type Flow Transmitter Preventive Maintenance and Calibration
Selection of Industrial Temperature Calibrator
Calibration of Gas Detectors

Keep Learning

DP Transmitter Capillary arrangement

DP Transmitter Interface Level Measurement Principle, Limitations, Selection, Installation, Design & Calibration

NIST Traceability

NIST Traceability

Solenoid Valve Functional Testing

Solenoid Valve Functional Testing

process chemical analyzer calibration

Automated Calibration

Smart Transmitter Calibration Tutorial

Smart Transmitter Calibration Tutorial Part 1

Infrared Temperature Calibrators

Different Types of Temperature Calibrators

Portable Gas Detectors Calibration Procedure

Portable Gas Detectors Calibration Procedure

Differential Pressure Transmitter Manifold

Field Instrument Calibration Errors

Learn More

Diode-testing-with-multimeter

How to Test a Diode using Multimeter

Four Wire HART Transmitters

4-wire Passive versus Active Transmitters

Impulse Line Pressure Testing Procedure

Impulse Line Pressure Testing Procedure

Stability in Frequency Domain

The Design Problem

Open Loop Control Block Diagram

Self-regulating Processes – Liquid Flow Control

Control Valve in Nutshell - Valve Design and Selection Factors

Control Valve in Nutshell – Valve Design and Selection Factors

Open Tank Interface Level measurement principle

Open Tank Interface Level Measurement

Difference Between Passive and Active Fire Protection

Active and Passive Fire Protection

Menu

  • About
  • Privacy Policy
  • Copyright

Quick Links

  • Learn PLC
  • Helping Hand
  • Part Time Job

YouTube Subscribe

Follow US
All rights reserved. Reproduction in whole or in part without written permission is prohibited.
Welcome Back!

Sign in to your account

Username or Email Address
Password

Lost your password?