In this article, you will learn how to do maintenance of control valve which is stuck in the field at a fixed position, and its detailed procedure.
Contents
Required Tools
- Hand tools such as spanner & Screw Diver
- Digital Multimeter
- Handheld configurable HART communicator if positioner is smart.
- Loop calibrator or multipurpose calibrator to feed 4 to 20 mA signal
- Cloth for cleaning
- Standard fittings with tubing to check actuator movement
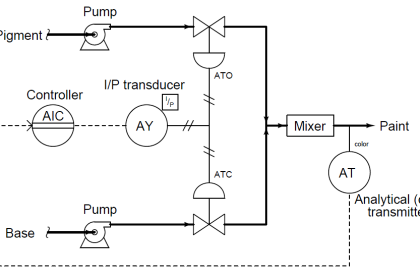
Maintenance of Control Valve
If Valve not operating properly follow the below points
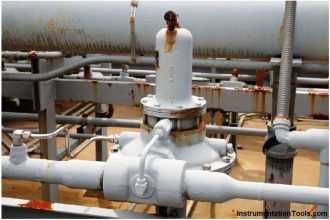
- Inspect the control valve along with its associated accessories.
- Inspect for physical damage or air leakages. Fix them if any problems are detected.
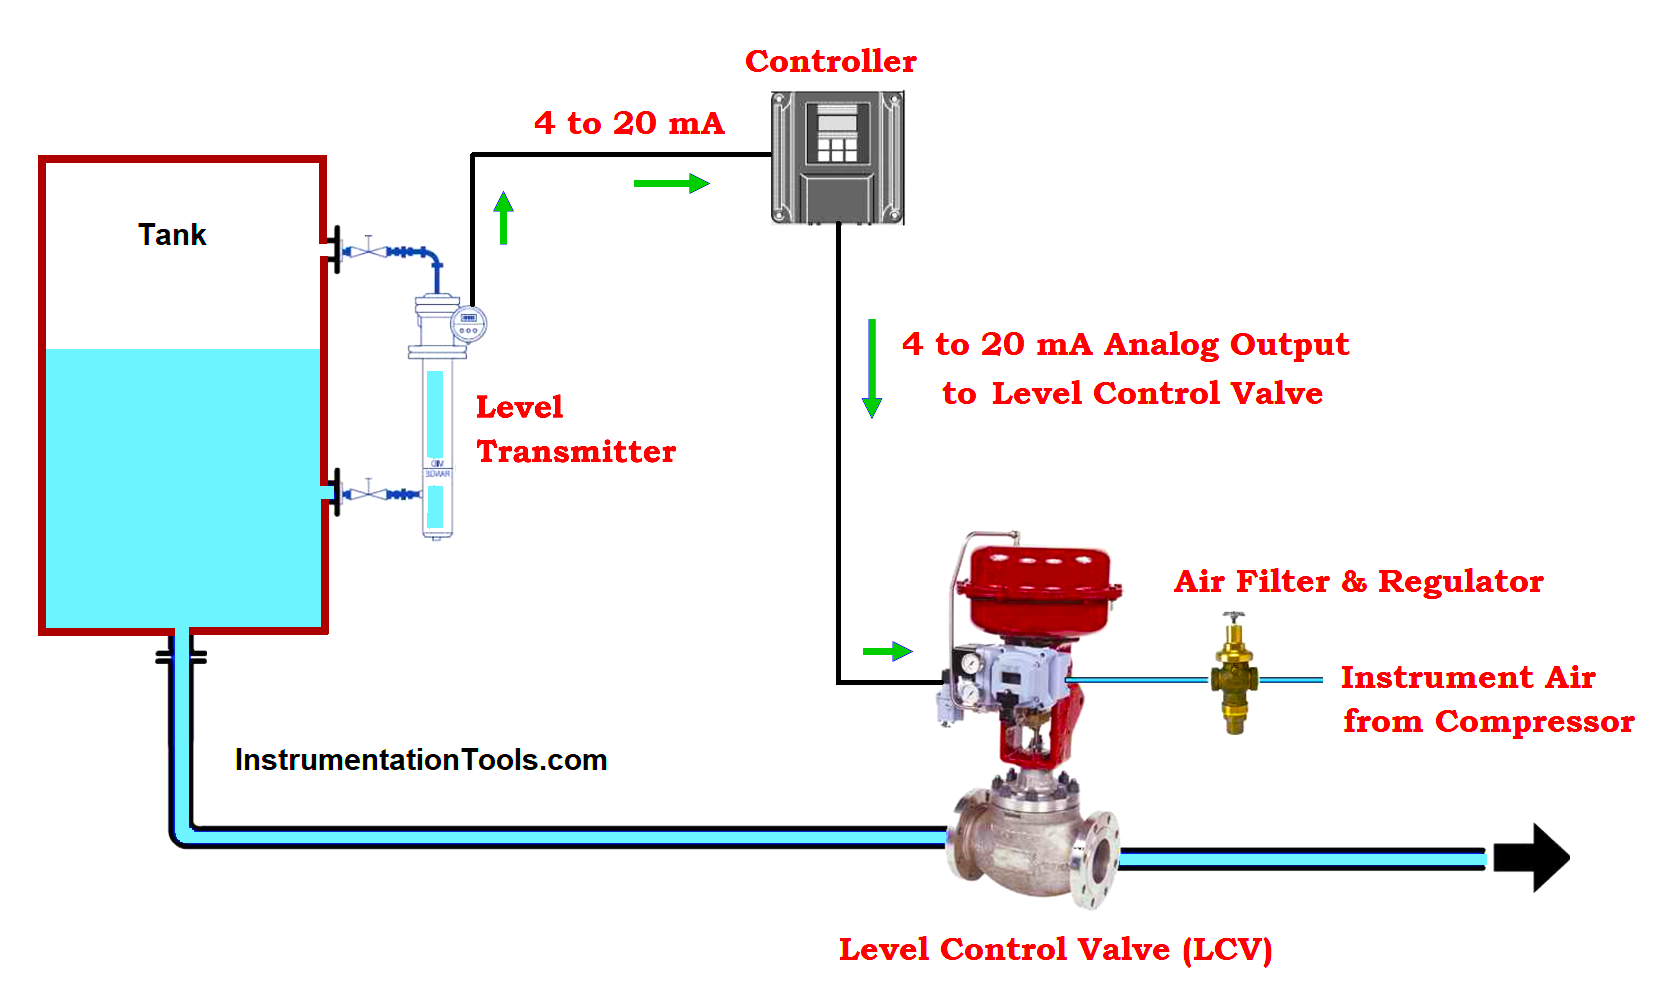
- Apply constant air supply to the control valve.
- Inspect instrument air supply to valve positioner coming from Air Filter Regulator.
- Ensure the set pressure of the Air Filter Regulator is matching with the value specified in the Control Valve datasheet.
- If air pressure is less than required then the valve moves very slowly.
- If air pressure goes high or more than required then there is a chance of actuator damage.
- To avoid this damage & slow working kindly adjust the air pressure to the required value.
- Evaluate the condition of the isolation valve located in the air supply header in absence of an air supply.
- Keep the isolation Valve in closed condition.
- Send the confirmation for control valve operation from the control room based on field condition.
- Check the current signal on the electro-pneumatic positioner, if the valve remains stationary.
- If there is no current signal available, check cable connections by referring loop drawing on both the field side and the marshaling cabinet side.
- Inspect the fuse condition in the marshaling cabinet. Replace the fuse with an equal rating if it is blown.
- Check the condition and resistance of the cable once again if there are any issues.
- If there is any issue with the cable pair, replace a new good cable with an equal rating as per design.
- Provide 0 to 100% instruction from the control system to perform valve stroke checking tests and ensure accurate control valve feedback in SCADA or HMI.
- Change the configuration or feedback setting if feedback is not available even after a healthy valve stroke is confirmed by the system command.
- Two valve feedback concepts such as open feedback closed feedback, and another one is analog feedback from 0% to 100% which depends upon valve design.
- The problem with analog feedback if occurred can be resolved by control valve calibration.
- Check system interlocks for analog output signals within the program, & control system permissive conditions.
- The control system doesn’t transmit any instruction for incorrect logic, and no stem movement occurs in the control valve.
- Calibration of a valve addresses if any problems occurred within the control valve stroke.
- After calibration is complete check the valve stroke again, & check mA to the valve positioner’s input for stroke problem if exists.
- Send some commands to the control system and check the field current in mA in an electro-pneumatic positioner or I-P converter.
- If any problem is found in the analog output channel within the control system, then replace the faulty analog I/O module with the new module of the same specification.
- Check the working condition of the air filter regulator.
- Check the operating condition of the volume booster, airlock relay, trip valve, vent port, and solenoid valve for subsequent addition.
- Check for any kind of blockages identified and ensure for no blockages by arresting.
- Replace respective components if any significant problems were identified.
- Ensure that the whole tube line is clear of choking.
- Ensure the absence of obstruction, and replace it if major issues are identified.
- Check and make sure no issues are present, if found any issues replace them.
- Check the condition of the valve positioner, & its output.
- Calibrate and repair the valve positioner if there is no output signal.
- Refurbish a control valve every time and calibrate a positioner accordingly with reference to calibration instructions, since the calibration procedure of each model varies whit is not the same.
- If there is any functional error in the valve positioner then remove and calibrate once again by ensuring the control valve’s stroke checking after calibration is done.
- If the above possibilities are not satisfying true then the problem is located in the actuator or valve body.
- If any problems occurred in the control valve function, remove all tubing and test control valve movement by supplying external air to the actuator directly.
- Perform manual valve operation to relieve the stuck state.
- Remove the actuator stem, & stem connection to check the actuator function to determine the point of the issue.
- Verify whether the actuator is passing or not since most control valve comes with air-passing ports to check the deterioration in the diaphragm.
- If the actuator is experiencing passing problems conduct an overhaul on the actuator.
- If the actuator is not operating well remove the cap and check the plate, spring, and other components within the control valve actuator.
- Inspect all internal actuator components.
Control Valve Inspection
During calibration inspect the following
- O-rings,
- Moving components such as cam, lever, spring, etc.
- Diaphragm pressure Gauges
- Cracks
- Nozzle & its Flapper.
- Supply air leakage.
- Ensure that Electric coils and electronic cards in I-P positioners are kept dry, & moisture free.
Why does a control valve get stuck, if the control valve is having stiction?
- Another problem is that the control valve loop is referred to as stiction.
- Basically, stiction means the combination of the words “stick” and “friction.”
- This condition allows the valve to retain in a constant position, without allowing it to travel freely like a valve Dead band.
- When a Stiction problem in a valve occurs the valve movement needs greater effort.
- This increased force makes the valve overshoot its position and dead band set-point, which makes the valve stacked in a new or incorrect position.
- The Valve Stiction problem exists mostly in all preset mode control loops, revealing a continuous cycle pattern in controller output and a square wave pattern in process variables, resulting in process disruption and valve tears.
Critical Components of Control Valve
Critical Components of the Control Valve Subjected to Inspection
- Actuator Diaphragm
- Actuator Shaft
- Trim elements such as Plug, Seat, Cage, and Stem.
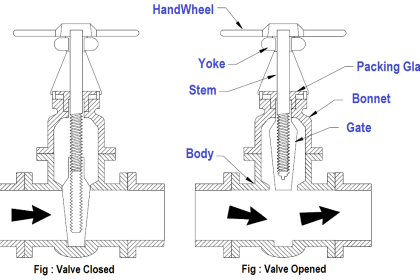
- Bonnet Gland Packing Box
- Gasket Seating Surface
- Body Wall NDT Test
- Valve Positioner Condition
- Valve body Stud Bolts and Nuts
- Actuator Spring
- Hand-Wheel (if installed)
- Flange Gasket Surfaces
How to Repair a Control Valve having a Stiction issue?
Follow the below points to repair a control valve.
- The valve actuator and positioner must be sized correctly to change the necessary force for the valve travel to address Stiction issues within the valve.
- Check the air pressure is within the specified range.
- Check the torque of the valve packing gland & inspect it.
- Inspect the valve’s internal portion for signs of scale, scarring, wear & tear, and replace it if required.
- Investigate the gasket seating surface on the valve bonnet
- Check for any fouling on the valve stem plug and seat assembly.
- If you are confused about fouling, replace it with a new one.
If you liked this article, then please subscribe to our YouTube Channel for Instrumentation, Electrical, PLC, and SCADA video tutorials.
You can also follow us on Facebook and Twitter to receive daily updates.
Read Next:
- Types of Pneumatic Valves
- Protect Pumps from Cavitation
- Pressure Relief Valve Principle
- Valve Multiple Choice Questions
- Control Valve Overhauling Job