A Pressure Gauge is a fluid intensity measurement device. The pressure gauge is required for the setup & tuning of fluid power machines and is indispensable in troubleshooting them without pressure gauges.
The fluid power system would be both unpredictable & unreliable. Gauges help us to ensure there are no leaks or pressure changes that could affect the operating condition of the processing system in industries.
Pressure Gauge Class
There are two sets of standards that define the accuracy grade of pressure gauges.
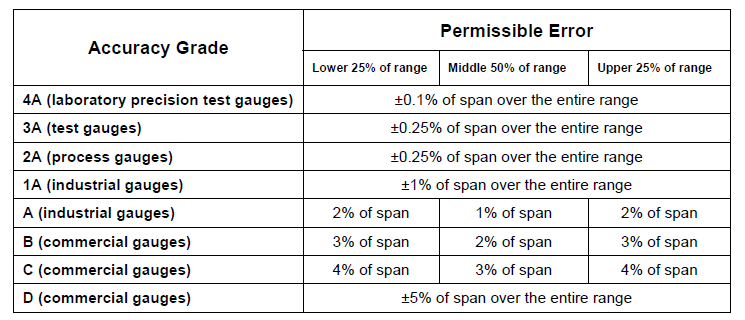
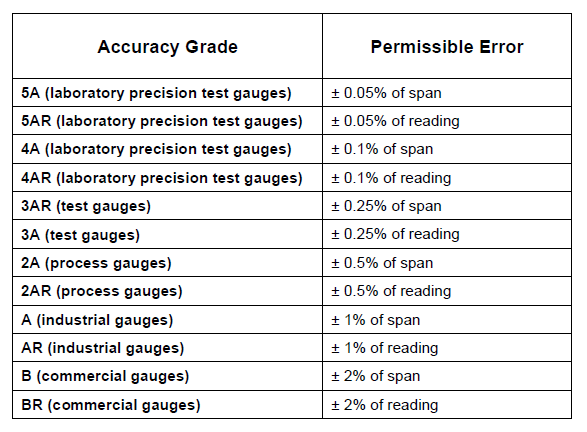
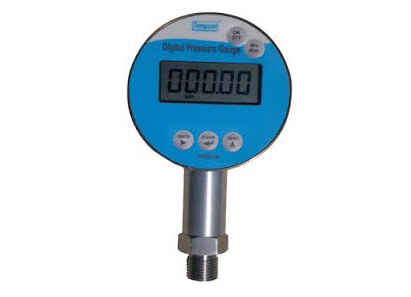
ASME B40.1 defines the accuracy grades of dial-type gauges while ASME B40.7 defines the accuracy grades of digital gauges.
ASME B40.1
ASME B40.7
Why we are discussing the above standards? because we should know all the basics & Standards before performing the calibration of Pressure Gauge. Then only we will be able to identify whether the Pressure Gauge under calibration is acceptable or not.
Master Equipment’s required for performing Calibration:
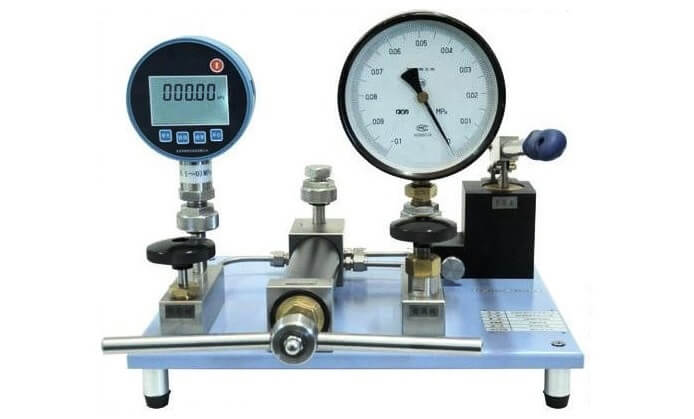
1. Pressure Comparator
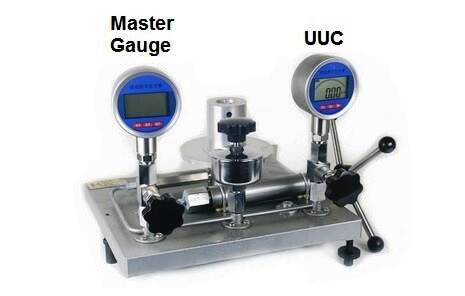
A Pressure Comparator operates in a similar manner to a dead-weight tester for the generation of pressure until the desired pressure is achieved.
In this case, we compare the UUC (Unit Under Calibration) with the Master Gauge.
2. Master Gauge
It is a digital gauge that is used to calibrate measurement instruments in ISO 9000 qualified laboratories. This calibration equipment can offer an accuracy of ±0.1%, mainly depends on the manufacturer.
Calibration Procedure
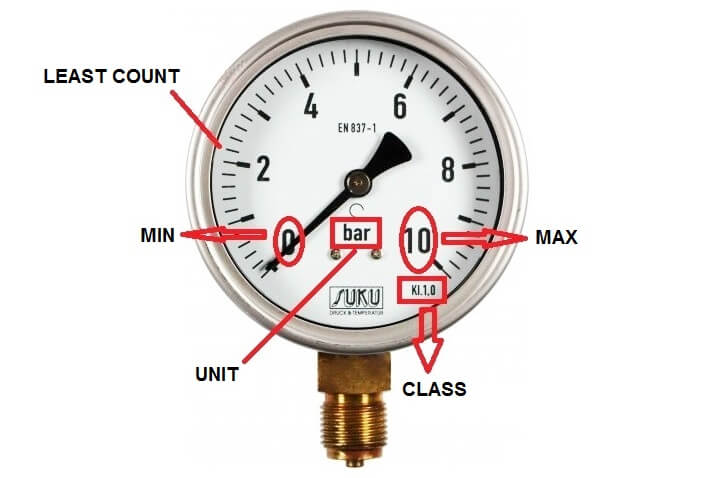
1. As shown in Picture below, first identify the basics parameters on UUC (Unit Under Calibration)
a) Class of Pressure Gauge
b) Minimum/Maximum Range of Pressure gauge
c) Least Count
d) Measuring Unit
Note: for identifying the Least Count, Calculate the lines in between major line, in the above picture the
2 bar is the first reading but followed by 10 small lines i.e.
2/10 = 0.2 which means 0.2 is the least count of this Pressure gauge.
2. According to the class of pressure gauge, we will able to identify the pressure gauge acceptable limits.
3. Release the pressure of pressure comparator before using it by the movable wheel.
4. Place the Master Gauge on the Left-Hand side as shown in the setup figure.
5. Select the unit/least count as per UUC on Master Gauge with selection keys.
6. Place the UUC (pressure gauges to be calibrated) to Right Hand Side, as shown in the figure.
7. Use the handwheel to pump the liquid in the comparator for proceeding calibration steps until it reaches the desired range.
8. Example:
Suppose the UUC Gauge shown in the above picture has following parameters,
Class: 1.0
Min Range: 0 Bar
Max Range: 10 Bar
Least Count: 0.2 Bar
Unit: Bar
Here we will calibrate the pressure gauge for 2, 4, 6, 8, 10 bar readings in comparison of Master Gauge.
We need to pump the oil till we reach 2 bar pressure on Master Gauge and note down the readings of Master as well as the UUC at that point.
9. Next, rotate the handwheel to increase the pressure to 4 bar, note down the readings of master and UUC gauges.
10. Similarly, take the readings for 6bar, 8bar, and 10bar.
9. We have taken the readings from 0 to 10 bar in an upward direction. Now do the same in the downward direction, meaning that decrease the pressure from 10 bar to 0 bar and note down the readings of both the gauges. We have to take the readings for 10bar, 8bar, 6bar, 4bar, 2bar, and 0bar.
Also Read: Why Upward & Downward Calibration?
10. After completing the above steps, release the pressure of the Comparator and remove the UUC and Master Gauge.
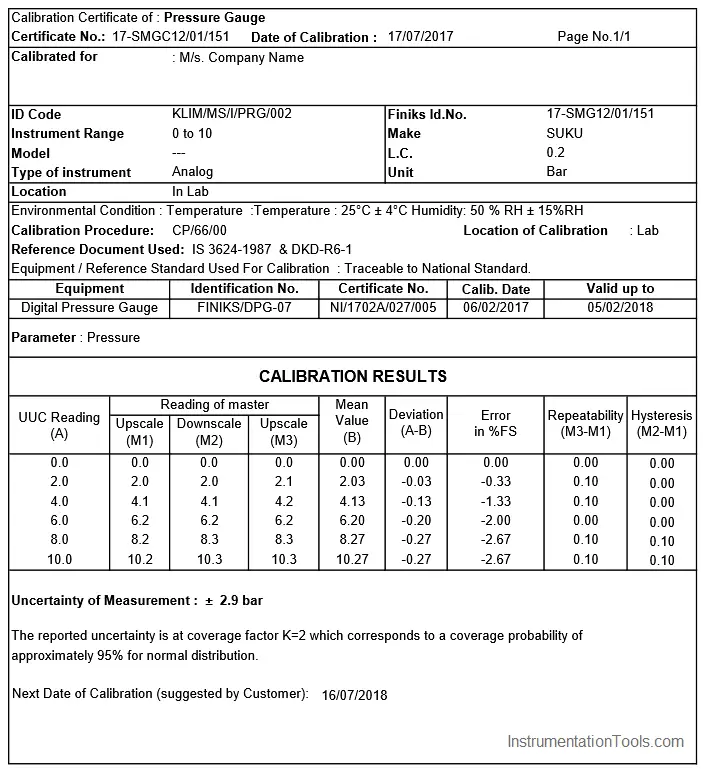
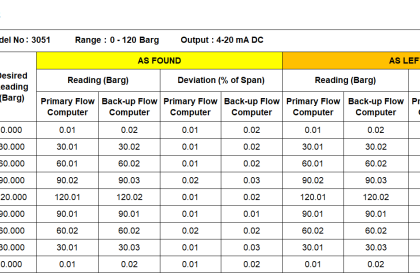
Pressure Gauge Calibration Certificate
For your reference the Final Calibration certificate will be followed by;
Author: Jadhav Amit R
Read Next:
- Pressure Transmitter Calibration
- Pressure Gauge Selection
- Bourdon Tube Gauges
- Turbine Meter Verification
- Hydraulic Load Cell Principle


uncertainty of the measurement: +2.9 bar ? isn’t it too much ?
Yes, it’s high but it just for example certificate. the actual may vary from 0.5 to 1 bar
so the pressure gauge error exceeds 1%. so it has no more class 1 category. practically this gauge is discarded or not?
second thing uncertainty of measurement 2.9 bar how this figure is calculated?
thank you.
hi, what is your reference standard for pressure gauge calibration procedure?
How to measure error (tolerance) limit?
i am looking calibration pressure gauge equipments
Why we do calibration by Dead weight tester?. and not with pressure druck calibrator or hand pump, please give some briefs.
How does one calculate repeatability and hysteresis for a measurement of two scale up and two scale down?