Bit shift registers are a very interesting concept in PLC programming. It is specially used in moving applications and reduces overall coding to a great extent. As the complexity of the program increases, means must be achieved eventually to simplify them, and bit shift registers play a very important role here. We will write a very simple logic in this post using bit shift registers to understand it more properly. For that, Studio 5000 software and ladder logic programming will be used.
PLC Light Sequence Control
- Let us understand the case scenario first. Refer to the below image. We have a conveyor which is used to move the jars. The conveyor runs and stops every 2 seconds. There are a total of 8 slots in the conveyor (corresponding to bit numbers 0-7 as shown). There are 2 sensors in the incoming line – sensor-1 to sense short jars and sensor-2 to sense tall jars. Whenever a short jar is sensed, we have to store it in our memory and when that particular jar reaches slot number 3 (bit number-2), a brown lamp will turn on to indicate the presence of a short jar in the line. Whenever a tall jar is sensed, we have to store it in our memory and when that particular jar reaches slot number 7 (bit number-6), a pink lamp will turn on to indicate the presence of a tall jar in the line. When the short jar has reached the last position after slot-8, a dark purple lamp will turn on to show that it has been thrown out of the conveyor. When the tall jar has reached the last position after slot-8, a light purple lamp will turn on to show that it has been thrown out of the conveyor. The sequence of jars will continue from incoming in line, and the short and tall jars will be sensed to turn on the required lamps.
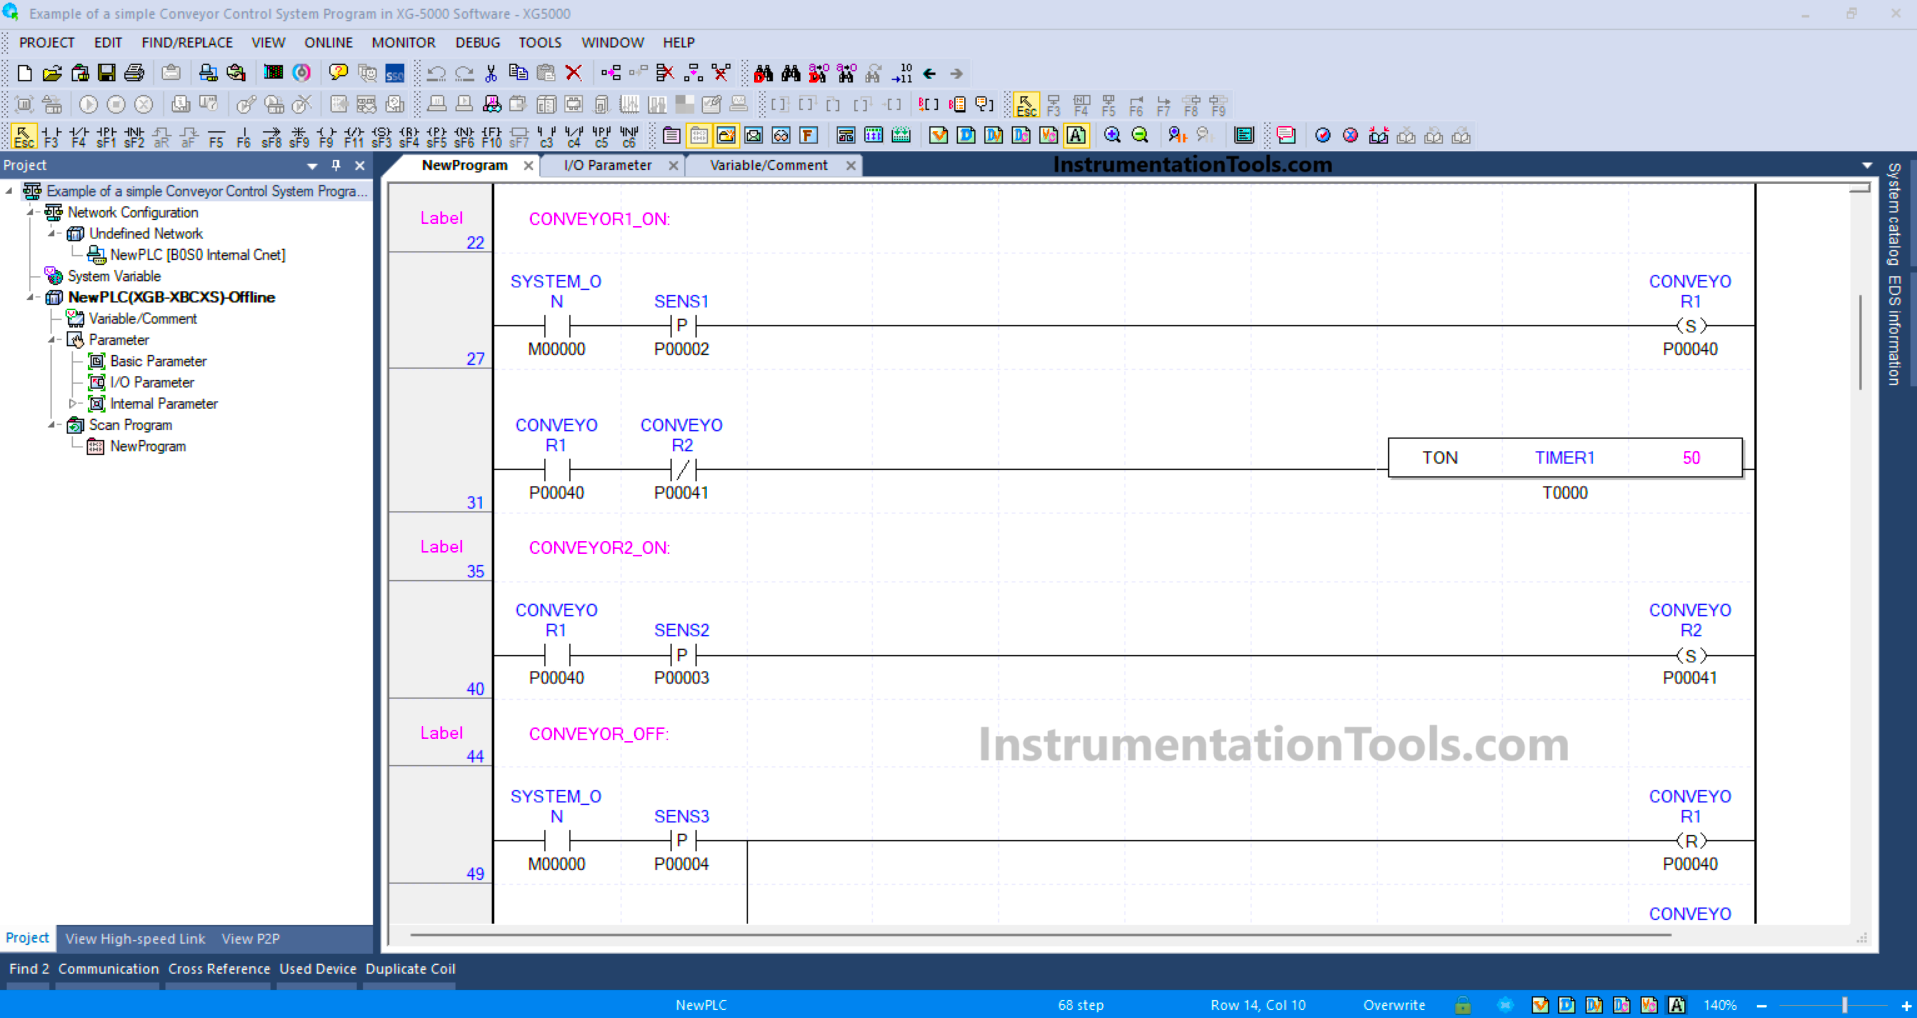
- To write this program, we will use Studio 5000 software here and write the coding in ladder logic language. Following are the PLC inputs – sensor-1 and sensor-2. Following are the PLC outputs – brown lamp for short jar, pink lamp for tall jar, dark purple lamp for short jar and light purple lamp for tall jar.
- Let us write the logic now by referring to the image below. The first two rungs are used to turn on and off the conveyor every 2 seconds. In the first rung, the conveyor remains on for 2 seconds and after that, the conveyor remains off for 2 seconds as in the second rung.

- The third and fourth rungs are used to code bit shift registers left. As the name suggests, a bit is shifted left by one bit on every trigger. Let us understand one BSL instruction. It has four inputs – array, control, source bit and length. The array contains the data that is to be modified and shifted. The control contains the data showing all the internal status of the BSL executing. The source bit contains the tag which writes 1 or 0 in the data present in the array. It is written in bit number 0 of the array tag. The length specifies the number of bits that will be shifted. Bits after that number will be ignored in the execution of BSL. To shift the bit, the BSL instruction must be triggered (here, we trigger when the conveyor is off as written.)
- Let us see the first BSL instruction. Refer to the below image. When the bit convy_on_time_over is on, the BSL instruction is executed once and bits are shifted from 0th to 7th position in every trigger. The value of bit 0 is determined by jar sensor-1. So, when a short jar is sensed, a 1 is written and when the jar is not sensed, a 0 is written. You can see the watch window on the left side, where currently, the data has shifted to bit number 1 when I took the snapshot. The same thing works for the second BSL instruction, which is modified by jar sensor-2.
- In the fourth rung, when the data of 1 has shifted to bit number 2 (slot number 3), the brown color lamp turns on. So, whenever a 1 is present in the sequence and it has reached that bit position, the lamp will turn on. In the fifth rung, when the data of 1 has shifted to bit number 6 (slot number 7), the pink color lamp turns on. So, whenever a 1 is present in the sequence and it has reached that bit position, the lamp will turn on.
- Now, the BSL control data has an output bit named UL or unload. As per our requirement, we need to turn on the purple lamps after the jar has reached the outlet and left slot number 8. So, when the UL bit of short lamp BSL is on, the dark purple lamp turns on and when the UL bit of tall lamp BSL is on, the light purple lamp turns on. The UL is used to store the value of the bit after the length has been achieved (in our case, it is bit number 8 as the length is 8 starting from 0 to 7).
In this way, we saw how to write a PLC program for controlling light sequences using bit shift registers.
Read Next:
- PLC Instruction List Example for Level Control
- Motor Direction Control using Limit Switches
- Star Delta Starter using Functional Block Diagram
- While Do Statement in Structured Text PLC Program
- PLC Instruction List for Motor Reverse and Forward


