This article provide step-by-step programming tutorials for Siemens S7 300 and STEP 7 PLC program using SIMATIC Software application.
1.Open SIMATIC Manager. SIMATIC Manager is a program which manages subprograms of STEP 7.
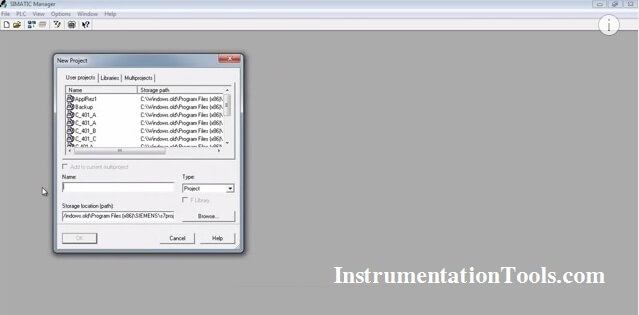
2.To start our programming first we need to create a new project by clicking on the “new” icon on the toolbar to open the “new project” window.
In this window we enter a name for our project in the “name” field.The path to our saved project is shown in the “storage location.”
However we can use the browse button to navigate to a different location other than the default.
 |
| Siemens S7 300 Program |
| STEP 7 PLC program |
| SIMATIC Software |
7.We need to install a “power supply” in the first slot to power our PLC modules and turn them on.
To do this we open this “PS 300” folder and double click on this two-ampere power supply to insert it into the first slot of the rack
| S7 300 PLC Programming |
8.In the second slot of the rack we always insert the “CPU” module.To select the desired module we open this “CPU 300” folder, which opens to show us all types of “300 CPUs.”
We want to select a “316 CPU”, so we need to open this “CPU 316” folder and click on the relevant part number to insert it into the second slot in the rack.We can add rest of the modules in similar way.
9.The addresses of the digital input module range from byte zero to byte number one means that the addresses we can use in this module for our program start at “I 0.0”for the first input and continue through to“I 1.7” for the last input.
Similarly you can see the addresses of our digital output module range from byte number 4 through to byte number 5 so there are 16 addresses that we can use for this module starting at “Q 4.0” continuing through to “Q 5.7. Finish the configuration and download it to PLC
| STEP 7 PLC program using SIMATIC Software |
| PLC Programming using Siemens S7 |
| Siemens S7 300 Application |
| Siemens PLC S7 300 Logic |
| Siemens PLC S7 300 Screenshot |
If you liked this article, then please subscribe to our YouTube Channel for PLC and SCADA video tutorials.
You can also follow us on Facebook and Twitter to receive daily updates.
Read Next:
In this article, we are going to discuss about shutter door control using induction motor…
Electrical Drives control the motion of electric motors. Motion control is required in industrial and…
PLC ladder logic design to control 3 motors with toggle switch and explain the program…
VFD simulator download: Master the online tool from the Yaskawa V1000 & programming software for…
The conveyor sorting machine is widely used in the packing industries using the PLC program…
Learn the example of flip-flop PLC program for lamps application using the ladder logic to…


View Comments
Mr. Bharadwaj please improve user interface of this app
You done awesome work your all articals are very helpful i am engineer in cement plant where we use abb compact builder and siemens simatic can u post topic related to siemens simatic stl programming.
Hello Shahnawaz khan, Noted Down your requests. Thanks
Sir, Awesome blog for instrumentation guys..
I also work in Oil & Gas sector. Plz add something related to Bentley Nevada vibration Monitoring and also some focus on Honeywell TDC300
Please give difference between volumetric flow & Mass flow?
plz...added plc programming related Queation and answers.....
Sir, your articles are very useful and informative for instrumentation people, I work in cement plant where we use Allen Bradley controllogix PLC, Can u post steps on Node scheduling for ControlNet using RSNetworx S/w.
i need this software simatic manager if some one have kindly help me
sir please share s7.300 profibus dp configuration articles.
Sir tell me why gap between 2 and 4 in hardware configuration??? Why we not used 3rd no slot.
where is the download option to download this SIMATIC MANAGER software ?