Industrial automation is majorly divided into two types of categories in terms of safety – hazardous and non-hazardous. Hazardous applications, as the name implies, regard a lot in terms of worker safety, environment safety, operational hazards, and machine safety.
So, it is most important to deal properly with them; because not only application constraints, but hazardous applications also deal with safety constraints. When you use graphical displays like HMI in a hazardous application, utmost care must be taken to design them efficiently.
This is because improper navigation and symbols can take a lot of time for the operator to troubleshoot, and this can badly hamper the maintenance and commissioning activities. In the worst case, if it is not handled properly and attended to on time, then it can even cause damage to human life.
In this article, we will learn the design standards to consider for HMI screen design in hazardous areas with PLC applications.
The first step in designing HMI is taking care of the header and footer. An operator will always require quick access to the processes, diagnostics, and settings. So, if you give all the necessary buttons in the header and footer, then the operator can easily go to any screen in a quick time.
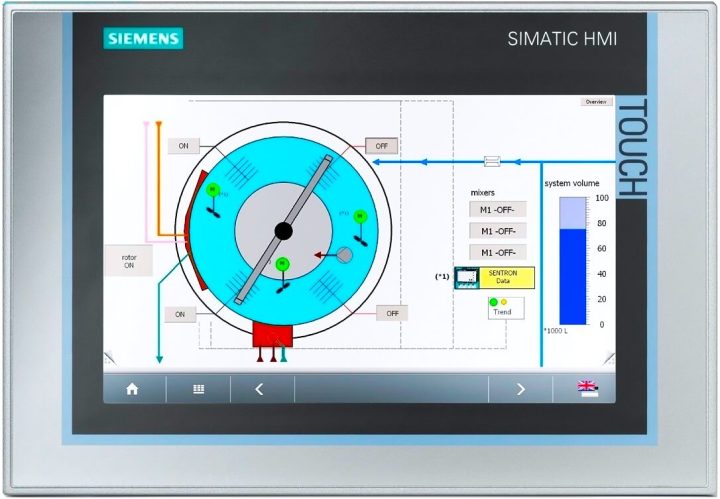
In the below image, you can see that all the important buttons, which will be used in the whole HMI navigation, like – user status, login, logout, IO status, mimic view, process selection, alarms, trends, settings, and plant status; are shown in the header and footer.
Also, apart from this, an alarm banner is shown in the header. You must be thinking that when we are already giving a button to view the alarm status screen, why this separate banner?
Well, in any critical system, if any alarm occurs, then it would be helpful if the user gets to see the alarm immediately without even touching anything. This saves time in troubleshooting. So, it is important to map all the critical buttons which will be used in the whole HMI program, in the header and footer.
The next step in designing is to give standard colors to the equipment used for indicating its off-state, on-state, and trip-state. Most of the users denote red color even in trip conditions. It would be very helpful if we indicate yellow color for trip indication. This will help the user in distinguishing between off-state and trip-state; prompting immediate action.
Otherwise, the operator will have to check the alarm screen every time to find out why a device is not working; because in both the cases of off and trip, the equipment is off and not running.
Refer to the below image for understanding, where a pump has been used and it will be animated by three color states for the corresponding stage. Easy color identification from a distance helps the user to monitor the plant more efficiently.
Next thing comes a faceplate. When the user finds any alarm or if he wants to just generally the status of equipment, a faceplate should be created, as shown in the figure.
A faceplate is a common box that opens when someone clicks equipment. This enables them to see or operate that equipment on that page only, rather than moving here and there. This makes troubleshooting easier and more efficient.
Also, in case of an alarm in the equipment, try to highlight a symbol near it. The symbol, like shown as a yellow triangle in the image, depicts some sign to be attended by the user for that corresponding equipment.
From this whole design, you can see how a user can easily navigate and operate the system with a single screen. If there are multiple HMI screens designed in a system and if the user has to navigate every time a lot, then for such hazardous and critical applications, the operator will take a lot of time to troubleshoot.
If you liked this article, then please subscribe to our YouTube Channel for Instrumentation, Electrical, PLC, and SCADA video tutorials.
You can also follow us on Facebook and Twitter to receive daily updates.
Read Next:
Electrical Drives control the motion of electric motors. Motion control is required in industrial and…
PLC ladder logic design to control 3 motors with toggle switch and explain the program…
VFD simulator download: Master the online tool from the Yaskawa V1000 & programming software for…
The conveyor sorting machine is widely used in the packing industries using the PLC program…
Learn the example of flip-flop PLC program for lamps application using the ladder logic to…
In this article, you will learn the STAR DELTA programming using PLC controller to start…


