In SCADA applications, it is often required to create faceplates. This reduces programming work to a great extent. Because SCADA is used for large applications with a vast amount of graphics, using faceplates as a common object and then linking different variables reduces work to a great extent. One of the most used SCADA software is FactoryTalk View (Rockwell Automation). In that SCADA, a method to link variables to a common faceplate is done by a method called parameter passing. In this post, we will see the concept of parameter passing in FactoryTalk View Site Edition.
What is Parameter Passing in FactoryTalk View?
As you know, a faceplate is a method to design a common screen, and then link different variables to that same screen. For example, suppose you have 10 motors with the same data to be shown for all of them. Instead of creating 10 different screens for the motors, you can just create the same screen for all the motors. Then, each motor’s data will just be linked to that same screen. So, whenever you open a motor-5 image, that faceplate will open with data showing only the motor-5. In FactoryTalk View, this method of linking variables to the faceplate is called parameter passing. Remember that this feature is available in both FactoryTalk ME (for HMI) and FactoryTalk SE (for SCADA).
FactoryTalk SCADA Faceplates
First, let us understand the case scenario. We have 5 motors, with the same data to be shown on the faceplate. So, to pass the data from each of the motors to the faceplate, we will use parameter passing. In our context, we will prepare parameters of 5 motors and pass only those that which is called. So, let us start designing now from the next point.
In the first step, create the pump object. That needs to be done in the option – Global object. Refer to the image below for more details. In the tab of the global object, we created an object called Glob_Obj. There, we have used a pump symbol. This symbol will then be used on the screen, where we have 5 such symbols.

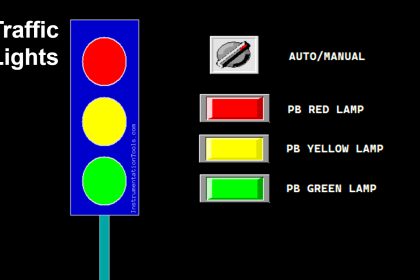
Next, we will create the faceplate, named PopWPS. Refer to the image below. Here, we have created a screen where we have the following objects – name of the pump (shown on the header as sss..s), auto-manual button, and start-stop button. This information will be common for all five pumps.
Now, we have to set the connections of these buttons, which we see in the image showing two property windows. We can see that, for example, we have written – {#1.MANUAL_PB}. We will describe this now in the next point.

#1 in the previous point refers to the pointer, which will point to the variable of the motor. So, we will define this pointer in two places – one will be in the symbol defined earlier, and one will be in the parameter file. Let us see these two things next.
First, we will define this pointer on the symbol. Refer to the image below. Here, you have to right-click the symbol created earlier, and there, you will find an option – global object parameter definitions. There, you have to define #1 in the first row. Also, you have to create a display action, where clicking this symbol will take you to the faceplate with the loaded pointer value. So, right click on the symbol and click touch animation, where you have to enter the following syntax – Display PopWPS /P”#1″. It means to display the screen named PopWPS and load it with the value entered in #1, which is nothing but the parameter file name.

Next, we will create a parameter file. Refer to the image below. As seen, we have created a parameter file named Motor1. In that, we have written #1 = Motor1. This means that motor1 tag data will be loaded in this pointer #1. Similarly, we have created the remaining four parameters with corresponding motor tags as 2,3,4, and 5.

Now, the last step is to place the object on the screen. Refer to the image below. Here, we will place five pumps on the screen, after which clicking any pump symbol will fetch the corresponding motor data. For that, right-click the symbol and go to the option – global object parameter values. There, you have to write Motor1 for the first motor, which corresponds to the parameter file name we defined earlier.
Similarly, link the corresponding parameter names for the corresponding motors. This completes your parameter passing. So, when you open motor-1 at runtime, then the following tags will be communicated – Motor1.MANUAL_PB and Motor1.MANUAL_START.

So, to summarize now more simply, let’s see how it works:
- Create a global object that will be the base symbol. Clicking this symbol on any screen should load the faceplate with the pointer values.
- Create your faceplate and link your connections inside the objects as #1, #2, and so on, as per your tag definition.
- Create a global object parameter definition in the symbol and link your faceplate (display name) with the parameter file name here.
- Create a parameter file and move the actual PLC tags here as pointers.
- Place the symbols on your screen and link the corresponding parameter file name. So, the flow will finally go in runtime like – clicking the symbol will open your faceplate with the loaded values from the parameter file. Those values will now be reflected in your faceplate.
In this way, we saw the concept of parameter passing in FactoryTalk Site Edition.
Read Next:
- PLC Programming to Control a Water Pump
- Create Templates in FactoryTalk View Studio
- Studio 5000 Programming for Digital Alarms
- Pump PLC Program using CX-Programmer
- FactoryTalk Studio and SQL Server for Data Log