In this post, we will learn how to create DFB in Schneider PLC.
Derived Function Block (DFB) is a very important tool in reducing the working time of a programmer for creating a repetitive type of logic. Basically, it is a function block created by the programmer; similar to the function blocks (libraries) which are predefined in the PLC programming software.
In this post, we will learn to create DFB’s in Schneider PLC. Here, we will see 3 types of programming software in Schneider PLC – Machine Expert Basic, Machine Expert and Control Expert.
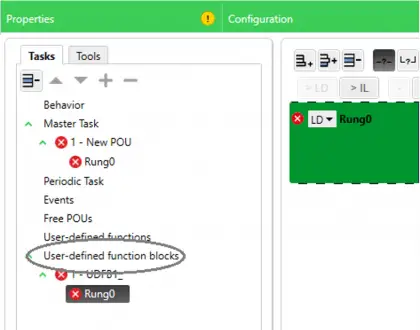
Right-click User-defined function blocks in the Tasks window as shown in figure. Then, you will get the option to add a DFB.
Add it and a by default DFB name of UDFB1_ will be created.
You can then rename it according to your needs. As you go on adding DFB, the number will be incremented as 2_, 3_, 4_ etc.
After DFB has been added, you will see the following window in the bottom of the software layout.
As a DFB has inputs and outputs similar to function block library, you have to add inputs and outputs to the DFB according to your requirement.
In the below image, I have added 2 inputs and 2 outputs to the DFB by clicking Add Boolean input and Add Boolean output button.
You can double-click the rectangle as an input or output is added and rename it.
In the below example, I have renamed it as IP1, IP2, OP1 and OP2.
Now, just an input and output is not enough to write a logic inside the function block.
You will need other local or in-out variables and other in-built software libraries to build the logic.
Refer the below image. I have added a parameter named PARAM0 and a local variable named VAR0.
Below image shows the logic written for all the variables created. You can use PARAM0 outside the DFB.
VAR0 can be used locally inside the DFB only.
Refer the below image for DFB’s used in the program. I have used two instances of the DFB in the logic – DFB1 and DFB2.
As you can see, if I had not used DFB, then I would have to write a total of 6 rungs (3 rungs of the DFB as mentioned above earlier * 2) in the program. But here, due to use of DFB, rungs are saved.
You just have to link the variables to the inputs and outputs. All the DFB’s work simultaneously with the same logic inside.
Also, I have used PARAM0 variable outside in the logic as shown; to write it’s value to a memory word.
You can use a DFB in the program by clicking the following option as shown below.
For creating a DFB, right-click on the application tab and click Add POU. You will get the following window as shown.
Choose Function Block and select the corresponding programming language you want to develop the logic in.
Now, refer to the below image. You can see that I have added one input named IP1 in the input variable list; and one output named OP1 in the output variable list.
A local variable named TEMP has been defined.
Now, in the main program where you want to use the DFB, insert a box and assign the DFB defined earlier.
In the below image, I have created two instances of the DFB – POU_0 and POU_1.
Refer to the below image. You can see the option of Derived FB Types.
Double click it and a window will open in the right side as shown.
In the below image, you can see that I have added an input named IP1 and an output named OP1 in the variable list.
Also, a local variable named Temp has been added.
In the below image, right click the Sections and you will get an option to add the logic. In the logic, create your logic part and add it’s instance in the main program then as discussed in earlier sections.
It is the same procedure.
In this way, we saw how to create DFB’s in Schneider PLC.
If you liked this article, then please subscribe to our YouTube Channel for Electrical, Electronics, Instrumentation, PLC, and SCADA video tutorials.
You can also follow us on Facebook and Twitter to receive daily updates.
PLC ladder logic design to control 3 motors with toggle switch and explain the program…
VFD simulator download: Master the online tool from the Yaskawa V1000 & programming software for…
The conveyor sorting machine is widely used in the packing industries using the PLC program…
Learn the example of flip-flop PLC program for lamps application using the ladder logic to…
In this article, you will learn the STAR DELTA programming using PLC controller to start…
Lube oil consoles of rotary equipment packages in industrial process plants are usually equipped with…


