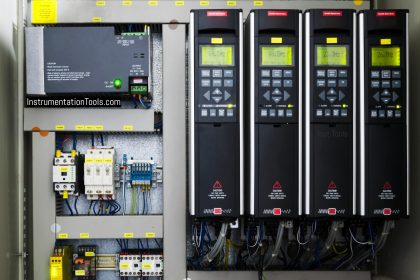
In this post, we will see how to conduct routine tests of circuit breakers.
Circuit breakers are an essential part of an electrical circuit. It is a device that is used as a protective switch for passing electrical current with tripping conditions checked.
When it detects a trip condition, the breaker opens its contact and isolates the input and output voltage from contacting each other.
Practically speaking, when a circuit breaker is installed in the panel, it can sometimes remain idle too for a long duration of time.
This means, there will be cases where that circuit breaker has not been turned on for many days and suddenly, it is turned on for use.
Routine Tests of Circuit Breakers
In any case, whether used or unused, the circuit breaker should be ready to perform its function, without failing.
So, before dispatching the breaker from a manufacturer’s premises, it is subjected to various routine tests to see its functionality and whether it is able to survive in abnormal conditions or not.
You can simply relate it to a quality test. If the quality of a product is not properly before dispatch, then it will be rejected and not allowed to be sold in the market.
Likewise, every product that we use undergoes its respective tests in the factory and a circuit breaker is one of them.
In this post, we will discuss some standard routine tests that are performed on a circuit breaker before it is dispatched from a manufacturer’s factory.
Dielectric Test
The dielectric constant is related to insulation property. Basically, the dielectric test is performed to check the insulation properties of a circuit breaker.
In the field, there will be conditions where an abnormal over voltage will occur and hamper the internal circuitry of the breaker (main circuit, auxiliary circuit, and control circuit).
So, these circuits are gone through short-duration power frequency tests. In this, the circuit breaker is subjected to a very high voltage (typically around 2000V) for a short duration of time (may be 1 minute).
There are cases where if the insulation is not proper and when it is stressed with such high voltages, then it may start to leak and begin to discharge leakage currents.
So, the motive of this test is to see whether the insulation is able to withstand such high voltages, and also, that there should not be any harmful discharge from it.
Standard input frequency will be used – 50 or 60 Hz.
Tightness Test
There are gas-insulated circuit breakers available in the market. The objective of the tightness test is to check the tightness of gas insulated breakers.
For your information, it is to be noted that the gas used inside these breakers is SF6 (Sulphur Hexafluoride).
Basically, you can compare this test to a leakage test. All the joint points (which contain gas) are covered air tight with thin sheets of polythene, for more than 8 hours.
As the joints are now covered, the gas density inside them is measured by inserting a gas detecting port of a detector through these covers.
If the density received is more, then it means that the breaker is not tight and gas is leaking through it.
The unit used in measuring the density is ppm.
Resistance Measurement Test
The resistance is measured between the switching contacts of the breaker so that we can identify the power losses that it will cause during the running condition. Less the resistance, lower will be the losses that occurred.
A circuit analyzer test kit is used to inject DC voltage between the contacts, and too in closed conditions. The current will be measured when the voltage is inducted.
So, as R= V/I; suppose if the resistance is more. Then, as P (Power Loss) =I²R, more resistance will cause more power loss.
Visual Checks
Visual checking is also a very basic testing method to verify the quality of the breaker.
The parameters checked are – identification of any auxiliary equipment, corrosion on the metallic surface, quality and color of paint, and language and data on the templates.
Mechanical Test
Here, the circuit breaker is repeatedly opened and closed at a high frequency (means more number of times in a short duration).
The objective is to see that such frequent mechanical switching does not hamper the desired duty and operation of the breaker.
Also, the breaker must not go into a failure mode due to such high mechanical switching rates. Normally, it is operated at least 5 times with a minimum and maximum voltage limit (85 to 110% of control voltage respectively).
The breaker must be able to handle such pressure with ease and not fail in such conditions.
Thermal Test
When a high current flows through the breaker, the temperature of the pole increases. This test is done to check whether the temperature of the pole is under-rated degrees and not exceeding it.
Routine tests are a must for a circuit breaker to be sold in the market, as it verifies the proper functionality of the breaker.