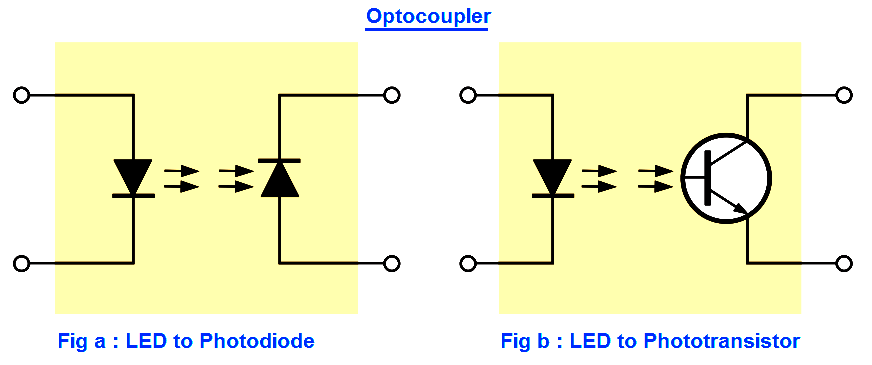
An optocoupler uses an LED optically coupled to a photodiode or a phototransistor in a single package.
Two basic types are LED-to-photodiode and LED-to-phototransistor, as shown in Figure.
Optocouplers are used to isolate sections of a circuit that are incompatible in terms of the voltage levels or currents required.
For example, they are used to protect hospital patients from shock when they are connected to monitoring instruments or other devices.
They are also used to isolate low-current control or signal circuits from noisy power supply circuits or higher-current motor and machine circuits.
Examples of typical packages are shown in Figure.
OptoCoupler Operation Animation
The LED requires 1mA to 15mA.
What does this mean?
If the current-limiting resistor connected to the LED has a high value, only a small current will flow through the LED and it will not glow very brightly. (The LED is inside the chip – you cannot see it).
The transistor will not turn on very much and the resistance between the collector-emitter terminals will be fairly HIGH. The output voltage will remain fairly HIGH.
As the current through the LED increases, (the current-limiting resistor is reduced in value) the LED will glow brighter and the transistor will turn on harder. The output voltage in the diagram above will reduce.
If the current through the LED is allowed to rise and fall, the output voltage of the circuit above will fall and rise.
If the current through the LED changes instantly from zero to say 15mA, the output will change from HIGH to LOW. This is the principle of SWITCHING or passing a DIGITAL SIGNAL.
In this article, a simple example will teach you the conversion from Boolean algebra to…
In this article, you will learn the PLC cooking timer example for kitchen automation using…
Learn an example PLC program to control a pump based on level sensors using ladder…
In the PLC timer application for security camera recording, when motion is detected then camera…
In this example, we will learn batch mixing with PLC ladder logic program using timer…
This PLC example on manufacturing line assembly is an intermediate-level PLC program prepared for the…


