Inst ToolsInst ToolsInst Tools
  • Courses
  • Automation
    • PLC
    • Control System
    • Safety System
    • Communication
    • Fire & Gas System
  • Instrumentation
    • Design
    • Pressure
    • Temperature
    • Flow
    • Level
    • Vibration
    • Analyzer
    • Control Valve
    • Switch
    • Calibration
    • Erection & Commissioning
  • Interview
    • Instrumentation
    • Electrical
    • Electronics
    • Practical
  • Q&A
    • Instrumentation
    • Control System
    • Electrical
    • Electronics
    • Analog Electronics
    • Digital Electronics
    • Power Electronics
    • Microprocessor
  • Request
Search
  • Books
  • Software
  • Projects
  • Process
  • Tools
  • Basics
  • Formula
  • Power Plant
  • Root Cause Analysis
  • Electrical Basics
  • Animation
  • Standards
  • 4-20 mA Course
  • Siemens PLC Course
Reading: How to Read Gauge Analog Scales
Share
Font ResizerAa
Inst ToolsInst Tools
Font ResizerAa
  • Courses
  • Design
  • PLC
  • Interview
  • Control System
Search
  • Courses
  • Automation
    • PLC
    • Control System
    • Safety System
    • Communication
    • Fire & Gas System
  • Instrumentation
    • Design
    • Pressure
    • Temperature
    • Flow
    • Level
    • Vibration
    • Analyzer
    • Control Valve
    • Switch
    • Calibration
    • Erection & Commissioning
  • Interview
    • Instrumentation
    • Electrical
    • Electronics
    • Practical
  • Q&A
    • Instrumentation
    • Control System
    • Electrical
    • Electronics
    • Analog Electronics
    • Digital Electronics
    • Power Electronics
    • Microprocessor
  • Request
Follow US
All rights reserved. Reproduction in whole or in part without written permission is prohibited.
Inst Tools > Blog > Pressure Measurement > How to Read Gauge Analog Scales

How to Read Gauge Analog Scales

Last updated: January 18, 2019 8:17 am
Editorial Staff
Pressure Measurement
2 Comments
Share
5 Min Read
SHARE

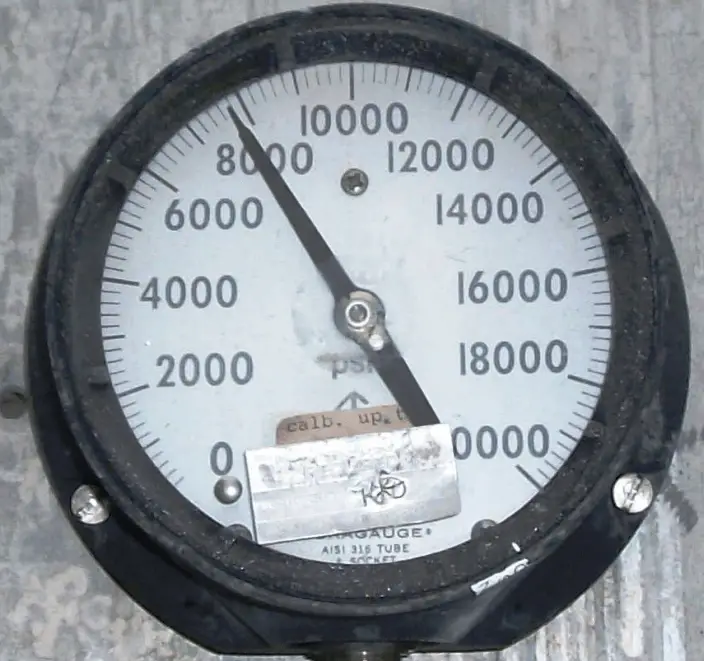
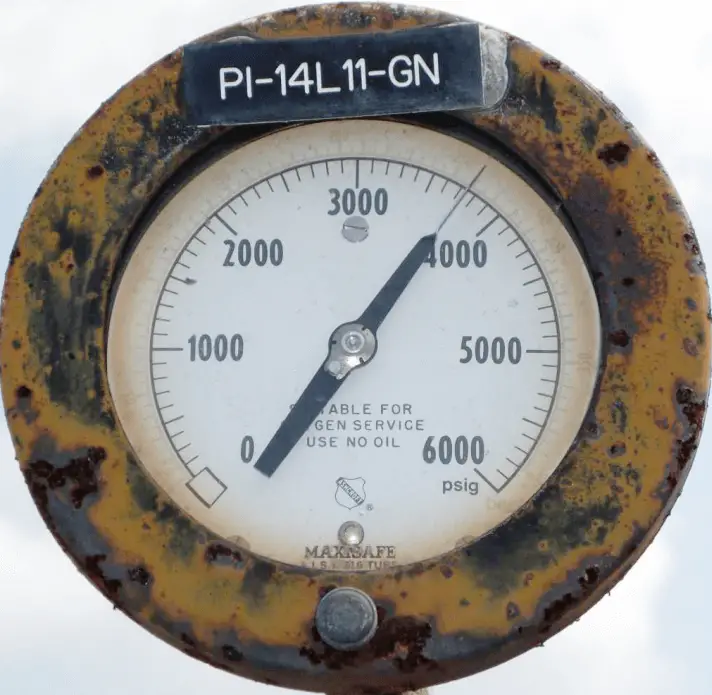
1. Interpret the pressure measurement displayed by this gauge mechanism, assuming a gauge accuracy of ± 1% full scale:

Pressure Gauge Analog Scale

How low and how high could this pressure actually be, given the stated accuracy of this gauge?

Answer

Pressure = 3750 PSI ± 60 PSI

This means the actual pressure could be as low as 3690 PSI or as high as 3810 PSI

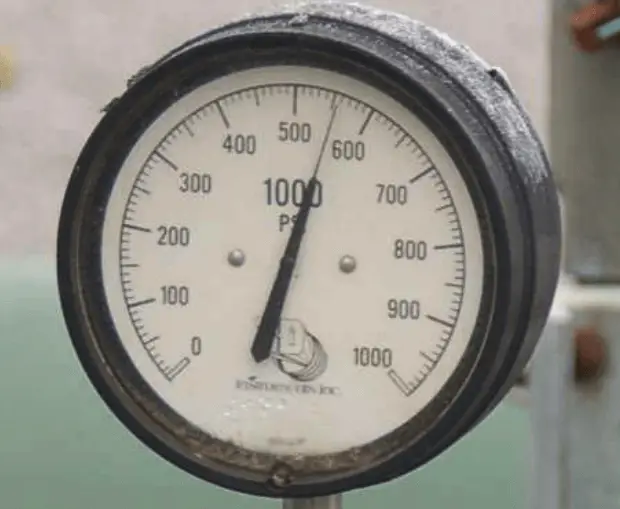
2. Interpret the pressure measurement displayed by this gauge mechanism, assuming a gauge accuracy of ± 2% full scale:

Pressure Gauge Scale

How low and how high could this pressure actually be, given the stated accuracy of this gauge?

Answer

Pressure = 7800 PSI ± 400 PSI

This means the actual pressure could be as low as 7400 PSI or as high as 8200 PSI

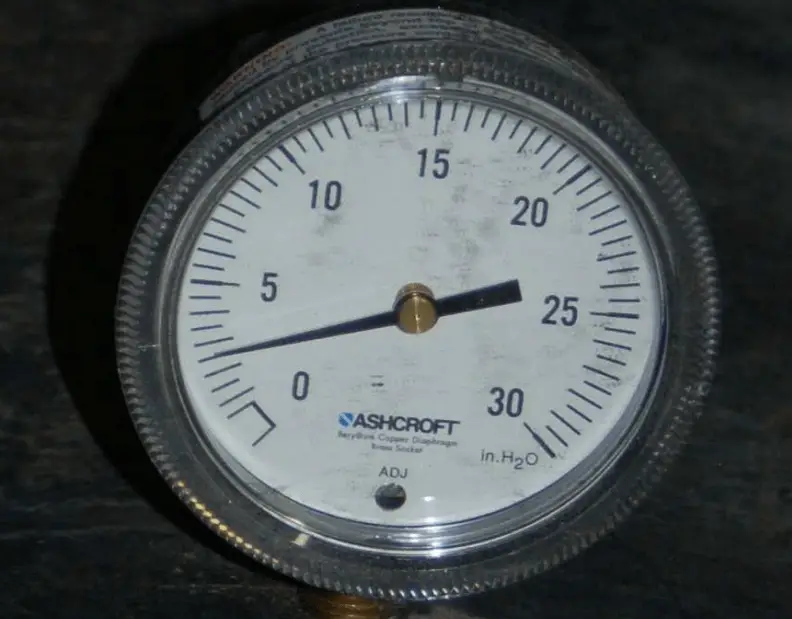
3. Interpret the pressure measurement displayed by this gauge mechanism, assuming a gauge accuracy of ± 0.5% full scale:

Pressure Gauge Measurement

How low and how high could this pressure actually be, given the stated accuracy of this gauge?

Answer

Pressure = 560 PSI ± 5 PSI

This means the actual pressure could be as low as 555 PSI or as high as 565 PSI.

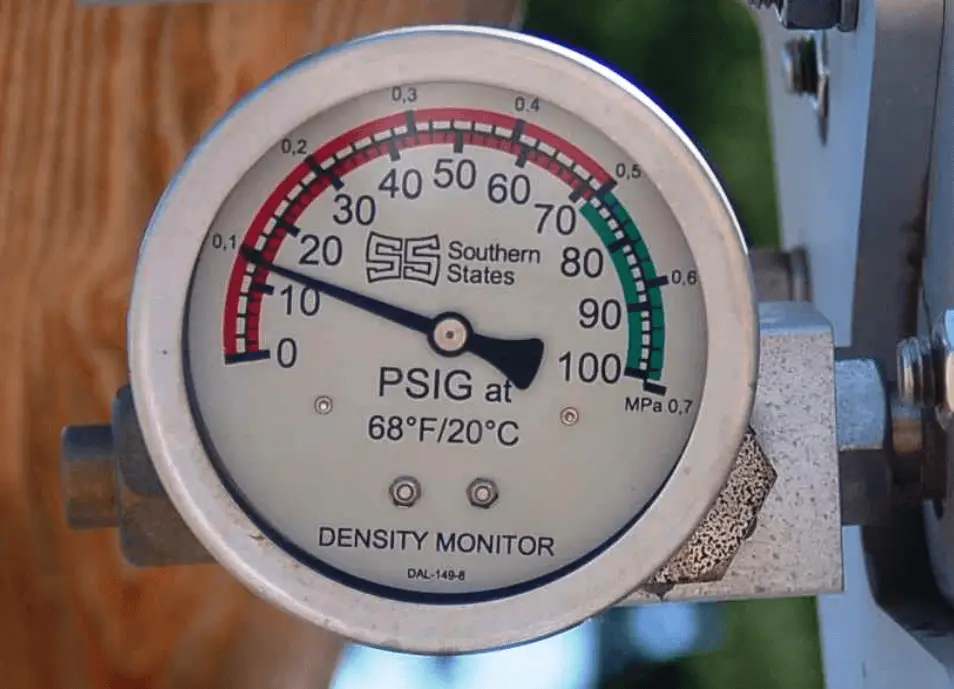
4. Interpret the pressure measurement displayed by this gauge mechanism, assuming a gauge accuracy of ± 2% full scale: 

Pressure Gauge Reading

How low and how high could this pressure actually be, given the stated accuracy of this gauge?

Answer :

Pressure = 2.5 ”H2O ± 0.6 ”H2O. This means the actual pressure could be as low as 1.9 ”H2O or as high as 3.1 ”H2O.

If you look closely at the photograph, you can see that the camera’s angle to the gauge face is not straight-on, and therefore there will be some parallax error in reading this gauge’s face.

If we were to lower the camera’s view to get a more direct look at the gauge, we might see the needle pointing between the 2.5 and 3 divisions, which would mean a pressure of 2.75 ”H2O ±0.6 ”H2O.

5. Interpret the pressure measurement displayed by this gauge mechanism, assuming a gauge accuracy of ± 2% full scale:

Gauge Display Scale

How low and how high could this pressure actually be, given the stated accuracy of this gauge?

Answer :

Pressure = 14 PSI ± 2 PSI

This means the actual pressure could be as low as 12 PSI or as high as 16 PSI.

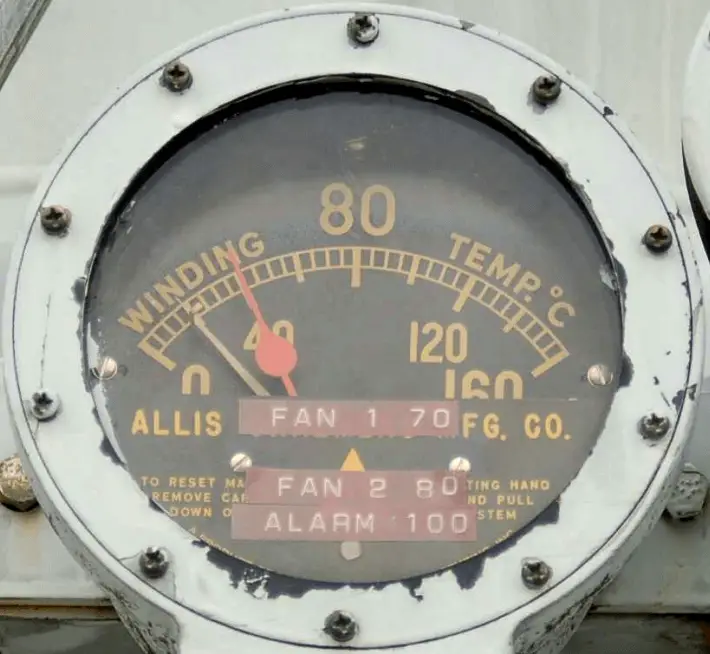
6. Interpret the temperature measurement displayed by this gauge mechanism, and also identify the meaning of the other pointer:

Temperature Gauge Reading

Answer :

The current temperature is 40 degrees Celsius (red pointer), and the other pointer is a low-temperature capture. In this case, the “capture” pointer shows that the temperature went down as low as 20 degrees Celsius (or perhaps a bit lower, since parallax error is making that pointer appear to read higher than it actually is).

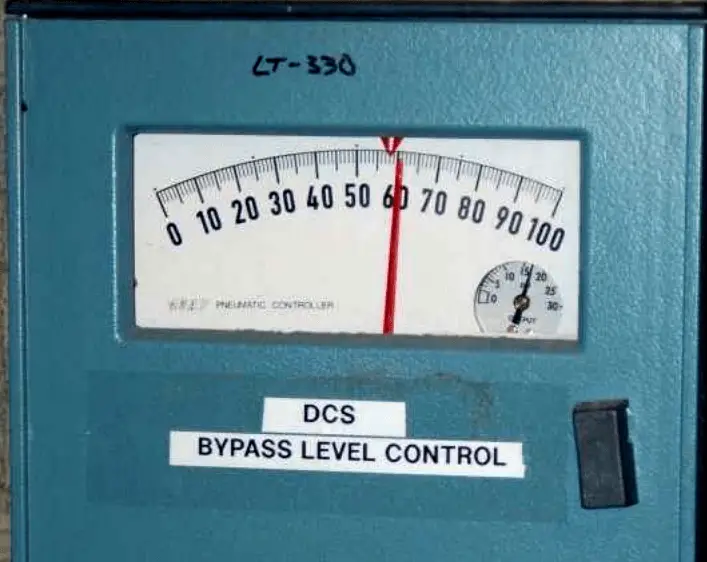
7. Interpret the measurement displayed by this Level Indicator :

Level Indicator Display Scale

Answer :

The red pointer shows 61% process level. The setpoint is a few percent less than that.

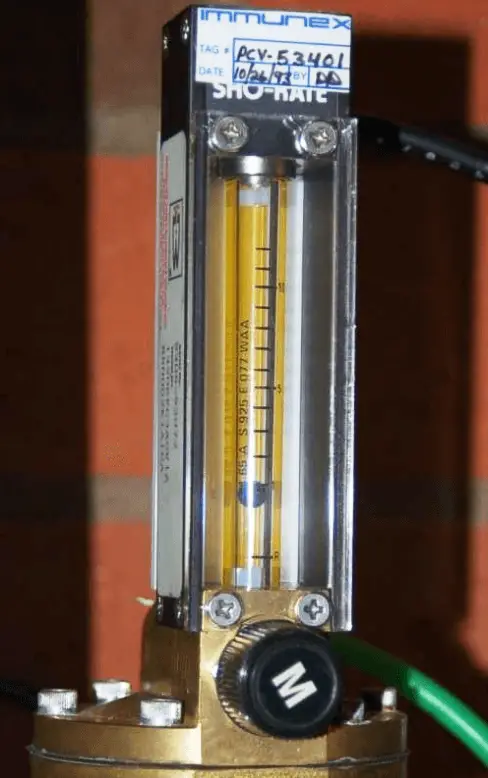
8. Interpret the air flow measurement displayed by this rotameter:

Rotameter Scale Reading

Answer :

Rounding to the nearest half-division, we see the center of the ball-plummet nearest the “1” mark. No units of measurement are specified on the scale (from this viewing angle, anyway), and so we cannot say if this is 1 SCFH, 1 SCFM, or anything else.

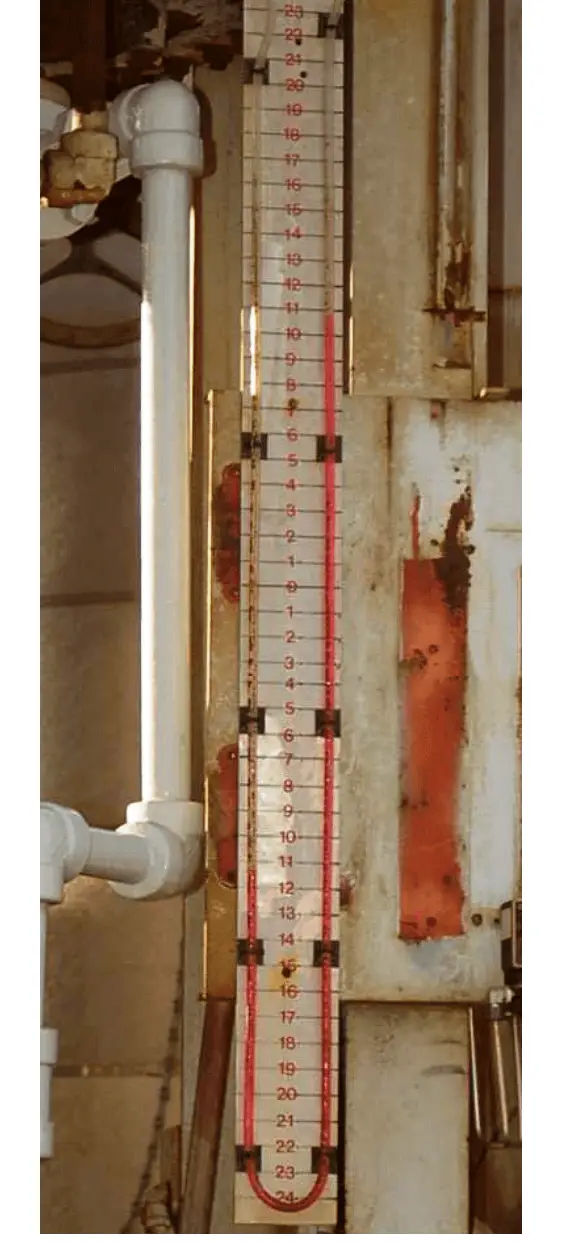
9. Interpret the pressure measurement displayed by this U-tube manometer, recalling that the pressure will be equal to the difference in heights between the two liquid columns:

Level Gauge using Manometer

Answer :

The pressure difference is approximately 22 inches of liquid column.

Credits : by Tony R. Kuphaldt – under CC BY 1.0
Don't Miss Our Updates
Be the first to get exclusive content straight to your email.
We promise not to spam you. You can unsubscribe at any time.
Invalid email address
You've successfully subscribed !

Continue Reading

What is Static Pressure Limit in DP Transmitter ?
Pressure Gauge Calibration Procedure
Pressure Gauge with Block and Bleed Valves
Pressure Transmitter Calibration Procedure
Temperature Compensation for Pressure Measurement
Closed Tank Remote Seal Capillary type DP Transmitter
Share This Article
Facebook Whatsapp Whatsapp LinkedIn Copy Link
Share
2 Comments
  • Fred says:
    March 9, 2020 at 2:56 pm

    question 5 – is that right 700kpa = 101psi I think

    Reply
  • Scott says:
    November 18, 2022 at 11:28 pm

    That is the way I was taught to do in working at powerplants for many years.
    Now, I have worked in pharma and they insist what you’re saying is impossible.
    They insist you put the gauge needle exactly on the cal value, then record the number off of the test standard! They put like 50.248 PSI. Where I came from they would be like you can’t read that on a gauge. I was taught the gauge could increment could be read in half; unless the gauge had a mirrored back (standard gauge), then it could be read in 1/4 increments.

    Reply

Leave a Reply Cancel reply

Your email address will not be published. Required fields are marked *

Stay Connected

128.3kFollowersLike
69.1kFollowersFollow
210kSubscribersSubscribe
38kFollowersFollow

Categories

Explore More

Vacuum Gauges Working Principle
Interview Questions on Pressure Measurement
What is a Barometer?
Metal Foil Strain Gauge Principle
Fine Wire Strain Gauge Principle
Questions on Pressure Transmitter Calibration Setup
Inductance Type Pressure Transducers Principle
Instrument Protection Methods: Seals

Keep Learning

Bourdon Tube Pressure Gauge Parts

Bourdon Tube Pressure Gauge

Diaphragm

Diaphragms

Pressure Gauge Selection

Pressure Gauge Selection

Pressure Gauge Installation

Pressure Gauge Installation at Pump Discharge

pressure-gauge-animation

Bourdon Tube Pressure Gauge Working Principle Animation

Linear Variable Displacement Transducer (LVDT)

What is LVDT ?

Impulse Line Problems

What are Impulse Lines? – Impulse Line Problems & Solutions

Pressure Sensor Specifications

Pressure Sensor Specifications

Learn More

HART Communication Tutorial 1

HART Communication Tutorial Part 4

PLC Project Examples for EcoStruxure Machine Expert

PLC Project Examples for EcoStruxure Machine Expert

How to set password in Siemens HMI

How to Password Protect HMI in Siemens TIA Portal?

Introduction of Urea Bagging machine

Introduction to Urea Bagging Machine

SCADA Run

PLC Based Industrial Conveyor Ladder Logic

High Frequency Amplifiers Objective Questions

High Frequency Amplifiers Objective Questions

Siemens Tia Portal PLC Training Course

Siemens Tia Portal PLC Training Course

Instrumentation and Control General Specifications

Instrumentation and Control (I&C) General Specifications

Menu

  • About
  • Privacy Policy
  • Copyright

Quick Links

  • Learn PLC
  • Helping Hand
  • Part Time Job

YouTube Subscribe

Follow US
All rights reserved. Reproduction in whole or in part without written permission is prohibited.
Welcome Back!

Sign in to your account

Username or Email Address
Password

Lost your password?