One of the most misunderstood concepts when dealing with transmitters is zero elevation and suppression. Elevation and suppression adjustments are frequently necessary in liquid level measurement when the transmitter cannot be installed on a level with the zero level of the tank.
The definition is following, but to understand elevation and suppression, its easiest if you look at it from a mathematical viewpoint, that is described in the second part of this paragraph.
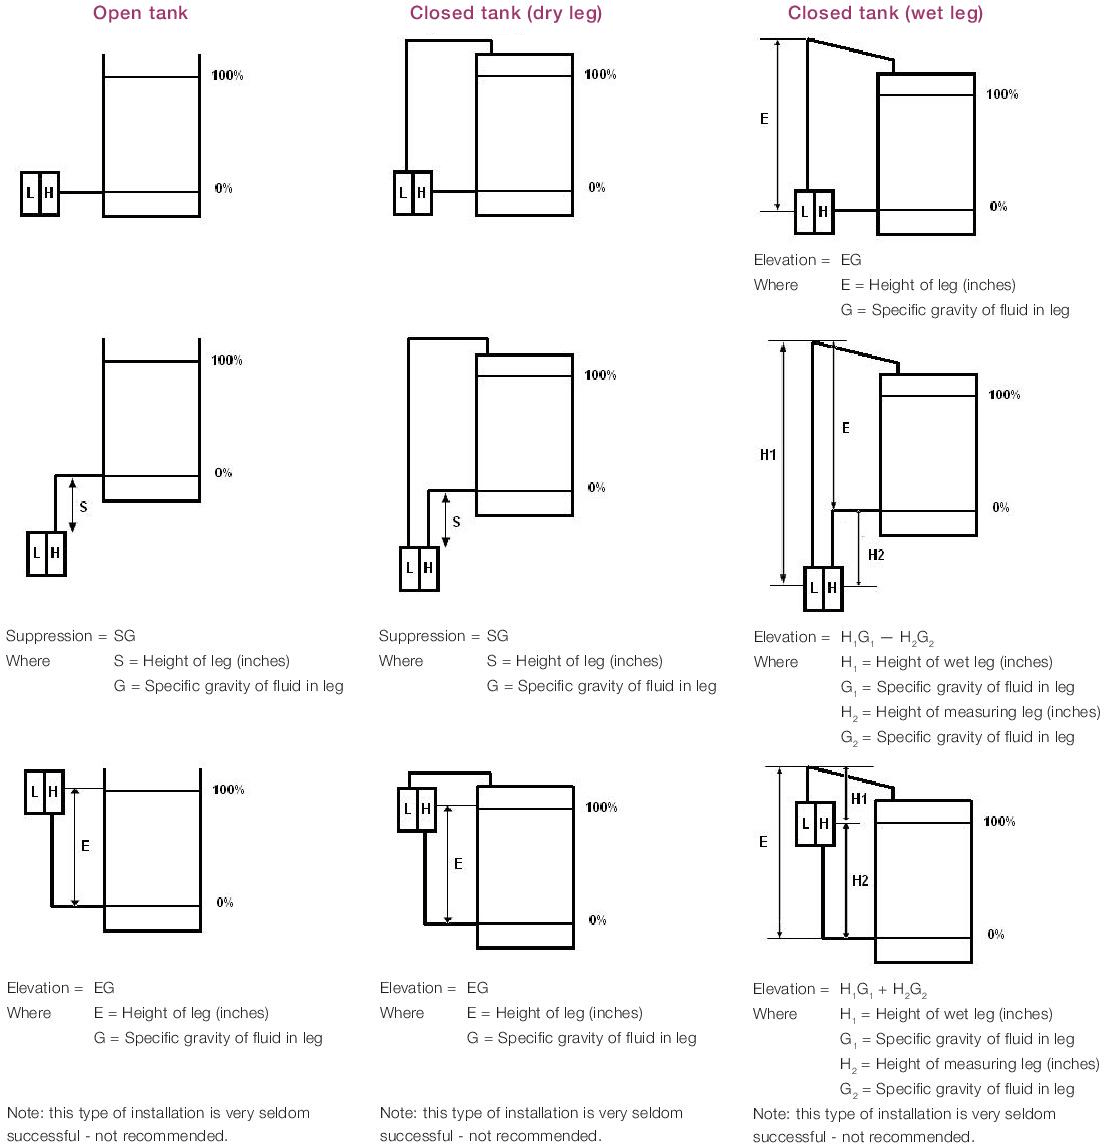
for an elevated zero range, the amount the measure variable zero is above the lower range value. It may be expressed either in units of measured variables or in percent of span.
for a suppressed zero range, the amount the measured variable zero is below the lower range value. It may be expressed either in units of the measured variable, or in percent of span.
Also Read: Zero Suppression & Zero Elevation Examples
Mathematically you can develop equations that will let you calibrate the transmitter for any given application requiring zero elevation or suppression. It’s important to understand some basic facts about differential pressure transmitters.
First, in order to obtain an increasing output, the high side of the transmitter must always be increasing in pressure relative to the low side.
Therefore, to achieve a 20 mA output, the net result of all forces on both the high and low sides of the transmitter must be such that the high side is greater than the low side by an amount equal to the calibrated span of the transmitter.
Second, the purpose of the calibration biases (elevation and suppression) is to apply a differential pressure to those situations where a 4 mA output is desired at some point other than 0 differential pressure.
Download the Zero Suppression & Zero Elevation Image
We know that for any situation, the sum total of effects on a transmitter should be zero for a 4 mA output.
Therefore at the desired 4 mA condition:
H – L+ B = O
Where:
H = is the pressure (relative to atmosphere) applied at the high side of the transmitter in inches H20
L = is the pressure (relative to atmosphere) applied at the low side of the transmitter in inches H20.
B = is the bias factor, in inches H20, which can be either positive or negative.
At a 20 mA condition:
H – L+ B = S
Where:
S = is the calibrated span of the transmitter, which can never be zero or negative.
So this gives us two equations:
H – L + B = O at 4 mA
H – L + B = S at 20 mA
With these two equations, it is now possible to determine the calibration for any situation according to the following procedures:
Analyse the specific application to identify all fluid forces on both sides of the transmitter at the point where you want 4 mA Output and the point where you want 20 mA output.
Using the 4 mA condition, solve for B in: H — L+ B = O
Using the 20 mA condition, and the value of B obtained from the above calculation, solve for S: H — L+ B = S
Calibrate the transmitter to a range of: (— B) to (— B + S)
For example, Figure below represents a closed tank application where we want a 4 mA output when the level is at the bottom tap and 20 mA output at the top tap.
We also know that the low side leg is always filled with material whose specific gravity is 1.1. If the specific gravity of the fluid in the tank is 1.0, what is the calibration?
At 4 mA:
H = 0
L = 100” x 1.1 = 110” H20
So that:
H — L + B = 0
0 —110 + B = 0
B = 110
At 20 mA:
H = 100. x 1.0 = 100” H20
L= 100. x 1.1 = 110” H20
So that:
H — L + B = S
100 -110 + 110 = S
S = 100” H20
So our calibration for this application is: (— B) to (— B + S)
So: — 110 to (— 110 + 100)
calibration Range is: — 100 to -10” H20
Also Read: Pressure Transmitter Uses & Applications
In this article, a simple example will teach you the conversion from Boolean algebra to…
In this article, you will learn the PLC cooking timer example for kitchen automation using…
Learn an example PLC program to control a pump based on level sensors using ladder…
In the PLC timer application for security camera recording, when motion is detected then camera…
In this example, we will learn batch mixing with PLC ladder logic program using timer…
This PLC example on manufacturing line assembly is an intermediate-level PLC program prepared for the…


View Comments
Dear Sir,
We have installed a level transmitter from E&H model PMD75 for measuring level of a tank (52 meter diameter) with height 14.5 meters.
The transmitter is installed 1 meter above the zero level of the tank from the tapping which is 1.8 meter below tank zero level. (tapping is in the drain line of the tank below ground level)
Actually we need to measure from the zero level of the tank.
What shall be the LRV and URV to be put in the transmitter and in the PLC SCADA.
Hi, Please CLICK HERE & follow the calculation formulas as mentioned.
dear sir… i have one doubt..as you said that Zero elevation means measure variable is above the LRV
Zero suppression means measure variable is below the LRV.
for example:- My tank height is 1000mm and its an closed tank so i provided seal pot on LP side my seal pot inside liquid density is 1 and process liquid density also 1.. i just mount transmitter below the hp tapping approximately 500mm…
so for Zero= HP(d) – LP(d)
= 500(1)- 1500(1)
= -1000mmwc
for span= HP(d) – LP(d)
= 1500(1) – 1500(1)
= 0 mmwc
so Range= -1000 to 0 mmwc
example 2:- my tank height is 1000mm. i just place the transmitter above the hp tapping approximately 500mmwc. due to close tank i just put seal pot on lp side. from Lp tapping to transmitter also 500mm.
so for Zero = HP(d) – LP(d)
= 0(1) – 500(1)
= -500 mmwc
so for span = HP(d) – LP(d)
= 1000(1) – 500 (1)
= +500mmwc
Range will be -500 to +500mmwc
how can i say both of the installation is Zero suppression
Zero elevation and Zero suppression occurs in which type of level measurement and why?