In the last articles, we discussed how to establish a connection between two PLCs using the TCON and TDISCON blocks and how to move data between them using the TSEND and TRCV blocks.
In this article, we will learn a new instruction that can be used to communicate and transferring data across PLC systems using TSEND_C and TRCV_C blocks.
The TSEND_C instruction is a TIA Portal instruction that is used to set up and establish a connection between two PLCs. Once the connection has been set up and established, it will be automatically maintained and monitored by the PLC.
The TSEND_C instruction is executed asynchronously and has the following functions:
Hence, the name compact is giving to the TSEND_C as it acts as more than 3 blocks in the same time.
The TRCV_C instruction is also a TIA Portal instruction that is used to set up and establish a connection between two PLCs. Once the connection has been set up and established, it will be automatically maintained and monitored by the PLC.
The “TRCV_C” instruction is executed asynchronously and implements the following functions in sequence:
Hence, the name compact is given to the TRCV_C as it acts as more than 3 blocks at the same time.
In the last article, when we needed to establish and move to send data from PLC_1 into PLC_2 we had to use three different blocks in each PLC. See picture 1.
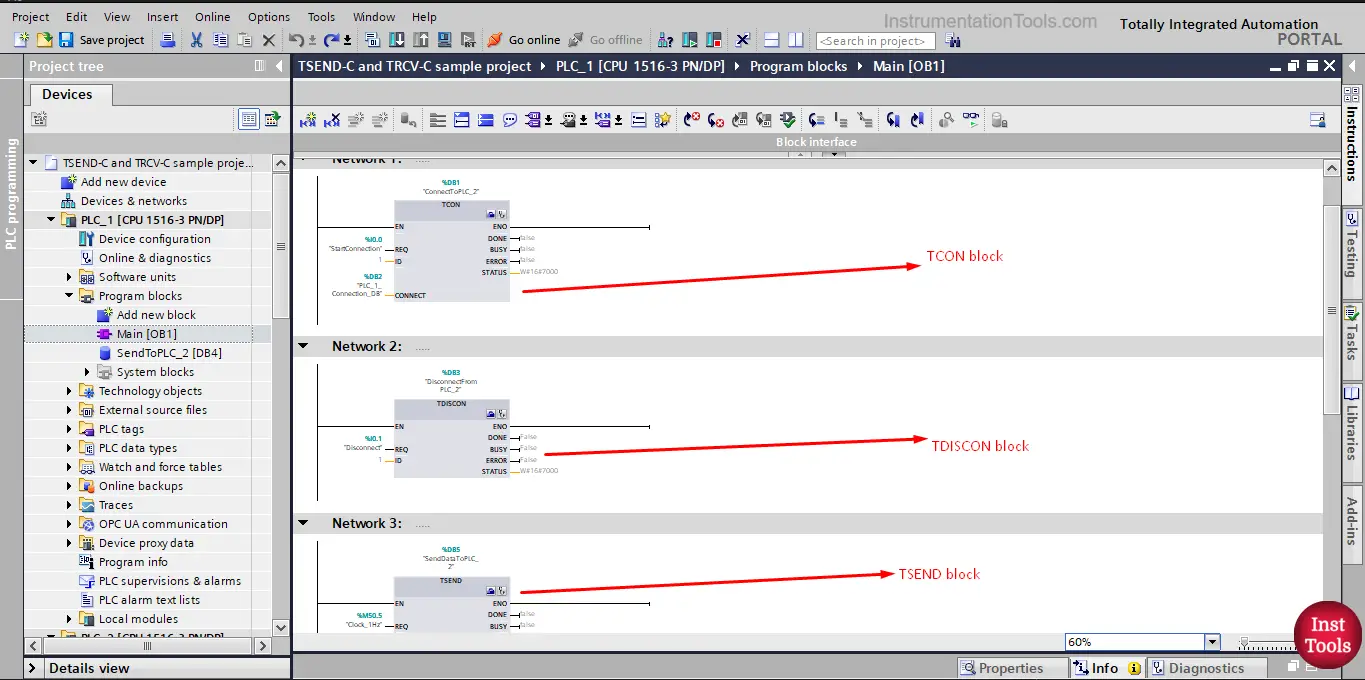
picture 1. Logic inside PLC_1
As you can see, we used the TCON and TDISCON blocks to establish and reset the connection and we used TSEND to send the data from PLC_1. And the same was done for the PLC_2. See picture 2.
picture 2. Logic of PLC_2
Again, we used the TCON and TDISCON blocks to establish and reset the connection and we used TRCV to receive the data from PLC_1.
Now, we want to replace all these blocks and try to use the TSEND_C and TRCV_C instead to achieve the same functionality.
First, in PLC_1 where we need to send data, we will use the TSEND_C block, just drag and drop the block inside the main OB1. See picture 3.
picture 3. Add TSEND_C block.
As the TSEND_C is essentially a function block, you will be asked to create a data instance. See picture 4.
picture 4. Create an instance for the TSEND_C
The TSEND_C looks similar to the TSEND block in the sense that you need to make some configurations and add some signals. See picture 5.
picture 5. TSEND_C block
Now, we need a signal for the REQ and Data to send and also to configure the connection. For the REQ signal, we created a SendData tag.
Also, we can just drag and drop the data block that we created last article which we need to send it to PLC_2, we can just drag it and drop at the DATA input of the block. See picture 6.
picture 6. Configuration of TSEND_C block.
To configure the connection parameter for the block, we can press the small configuration icon on top of the block to open the configuration view.
The configuration view will look something very similar to that of the TCON block. See picture 7.
picture 7. Connection parameter of TSEND_C
We already showed how to configure the connection parameter in previous articles, so we can just do the same as we did with the TCON block, see picture 8.
picture 8. Configuration of connection parameter
With this connection configuration, we finished all configurations of the TSEND_C. Notice how much faster it was compared to configuring TCON, TDISCON, and TSEND blocks.
Now, we need to add the TRCV_C to the PLC_2 so it can receive the data sent from PLC_1. In the main OB1 of PLC_1 just drag and drop the TRCV_C into your logic. see picture 9. Remember to create a data instance for the TRCV_C block.
picture 9. Add the TRCV_C
Once the TRCV_C is added to your logic, we need to configure it. As we did with the TSEND_C we need to add a signal to enable the data receive and also we need to add the data block we will save the data inside. See picture 10.
picture 10.TRCV_C
We defined a RecieveData tag as the EN_R signal. See picture 11.
picture 11. Define EN_R tag
Remember to uncheck the “optimized block access” option of the data block or the block won’t work as we showed last articles.
Next, we need to configure the connection parameters of the TRCV_C block, as we did with the TSEND_C just keep in mind that the unspecified Partner PLC is now the PLC_1 see picture 12.
picture 12. Connection parameter of TRCV_C
Now that we have configured the TSEND_C and TRCV_ C block, we want to simulate our project and see how they will work but first, we will create a simple logic to automatically update the data of PLC_1 which will be sent to PLC_2. See picture 13.
picture 13. Simple logic to update data automatically.
Now let’s compile and start a simulation for our project. The first thing you will notice is that PLC_1 and PLC_2 will try to establish a connection right away because we set up the TSEND_C and TRCV_C they automatically try to establish a connection. That is why there will be a connection between the two PLCs. See picture 14.
Picture 14. Connection is established directly.
As you can see the connection between the PLCs is directly established, because the CONT parameter in the TSEND_C and TRCV_C is set to TRUE, which means the block will automatically try to establish a connection with the partner PLC. We can put any controlling signal in here to control the connection establishment.
The other thing you can see is that the REQ of the TSEND_C and the EN_R of the TRCV_C are set to FALSE, and that is why there will not be any data moving between the PLCs. See picture 15.
picture 15. No data transfer between PLCs.
If the REQ signal of the TSEND_C is set to true, the PLC_1 will try to send the data but it will wait for the other PLC to enable the data to be received, see picture 16.
picture 16. REQ is true.
As you can see the SendData is TRUE, but no data was sent because the RecieveData is still false.
The PLC_2 will only receive data from PLC_1 only when the ReceiveData is set to true. See picture 17.
picture 17. Data is sent to PLC_2
As you can see when the RecieveData is true. Data will be sent from PLC_1 into PLC_2, However, you can see that the data inside the two PLCs are different because the data of PLC_1 changes automatically as per the simple logic we made before. That means the EN_R signal allows the transfer of data one time, when I need to transfer data again this signal has to become false and then true again.
Check out the attached TIA Portal project and see the data transfer between PLCs.
Downloads:
If you liked this article, then please subscribe to our YouTube Channel for Instrumentation, Electrical, PLC, and SCADA video tutorials.
You can also follow us on Facebook and Twitter to receive daily updates.
Read Next:
In the PLC emergency stop example program, when the emergency button is pressed, the elevator…
This article is about controlling the double-acting pneumatic cylinder movement control with a timer circuit.
In this article, we will review the main responsibility scopes of the instrumentation and electrical…
Learn the daily alarm PLC program using real-time clock instruction as per the required timings…
A Real-Time Clock accurately tracks time from seconds to years and stores the data in…
Omron PLC logic for sorting the number of products and counting the number of products…


