often-found fret-pitted shaft and coupling bore tapers repair caused frequent and lengthy shutdowns.
| Article Type: | Root Cause Analysis (RCA) |
| Category: | Mechanical |
| Equipment Type: | High Speed, Hi KW Major Rotating Machines |
| Author: | S. Raghava Chari |
Note: This root cause analysis (RCA) is from real-time scenarios that happened in industries during the tenure of one or two decades ago. These articles will help you to improve your troubleshooting skills and knowledge.
Root Cause Analysis
RCA Queries (Q), Answers and Actions taken (A) follow:
Q: What is fretting Corrosion (FC) and Why?
A: FC is localized surface damages of tightly fitted parts. The author attributes it to the crew used coupling assembling method: Crew lap the shaft taper and coupling bore using CI lappers until the shaft and coupling tapers blue match min 80% contact. They wipe the blue, oil the parts and hand tighten the coupling nut. With a dial gauge touching the coupling face, they spanner tighten the end nut to realize the specified coupling travel aka coupling draw in compressor parlance to realize 0.5 o/00 (per thousand) interference fit.
Author Query
How do you prevent the following while tightening to torque the coupling-nut?
- Rotor turning while spanner-tightening coupling-nut N5.
- Marred dial gauge readings from rotor likely axial travels while tightening N5.
- Does not oiling reduce the dry shaft to coupling friction grip factored in torque transmission calculations substantially? Maybe this is one reason for the seen fret corrosion damages
- Will not force sliding the tightly fitting coupling over the shaft taper injure the surfaces? Maybe these injuries misled us as fret corrosion
Crews silence on these convinced the author to Root Cause Analyze the problem and finding a solution.
Author Solution
The author concluded one or more of the above led to inadequate grip between the shaft and coupling half bore.
Hence, after considerable thought he developed below given the above deficiencies free procedure:
- Ensure min 80% blue match contact of coupling bore on shaft taper as before
- Wipe the blue well. Do not oil the mating parts; rather solvent clean and clean rag wipe both
- Fix the CH on the shaft taper, easy spanner-tighten the coupling nut unscrew and save it.
- Screw in studs S1 on to a CH hole and S2 on diametrically opposite hole (figure)
- Screw in nuts N2 and N4 on the studs till they touch CH face – do not tighten
- Placing feelers of total thickness = coupling draw on the shaft end, easy spanner tighten nuts N1 and N3 to touch the feelers and prevent pulling them out.
- Tighten nuts N2 & N4 well
- Loosen N1 & N3 in 5O increments till able to pull out the feeler assembly. Remove and save the feeler pack
- Tighten Locknuts LN well taking care not to disturb N1 and N3
- Remove the coupling half and studs assembly from the shaft
- Soak the assembly in an 80 to 1000 C higher than room temperature oil bath for 15 minutes
- Remove and wipe well coupling bore & shaft taper free of oil.
- Push the hot assembly on to the shaft taper until the flat butts on shaft end.
- Allow to cool – the coupling fit on the shaft taper is 0.5 0/00 interference
- Unscrew the studs from CH and save the parts for future coupling fit ups.
- Hand-tighten the coupling nut N5 and with toque wrench confirm adequate torque tightening
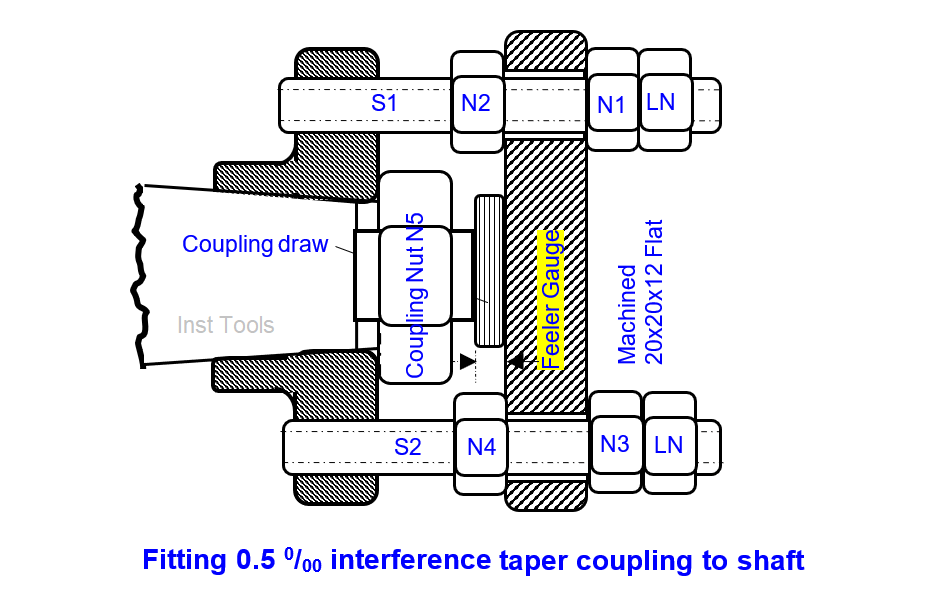
Fretting corrosion was history after following the scientific procedure
Author: S. Raghava Chari
Do you face any similar issues? Share with us through the below comments section.
If you liked this article, then please subscribe to our YouTube Channel for Instrumentation, Electrical, PLC, and SCADA video tutorials.
You can also follow us on Facebook and Twitter to receive daily updates.
Read Next:
- Turbo-Compressor Problem
- Process Air Compressor Overhauls
- Heat Exchanger Root Cause Analysis
- Mechanical Variable Speed Drives RCA
- Compressor Case Discharge Temperature
