On the previous article, we saw how the output of a gate goes HIGH or LOW according to the voltage level on the inputs. But how is a gate used in a circuit?
To answer this we need to have a circuit that requires a gate. Suppose we have a circuit producing a constant tone. We want the output to be a beep – beep – beep. To do this we can turn the tone on and off or send it through a GATE that allows the tone to pass to the output amplifier then SHUTS IT OFF and repeats the action.
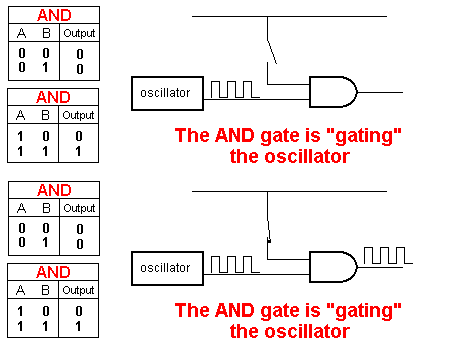
For this to work, the amplitude of the tone must be equal to rail voltage. In other words it must be a DIGITAL SIGNAL. In the animation below, the tone entering the gate is CONTROLLED by the action of input A – the GATING LINE. The tone actually passes through the gate. This may be hard to visualise but the tone is identical to a switch on input B, taking the line HIGH, then LOW at a very rapid rate.
If we look at the Truth Table for an AND gate, we see that if input A is LOW, any signal on line B does not appear on the output. This is shown in the top half of the Truth Table.
When input A is HIGH, the output reflects the voltage level on input B. This is shown in the lower Truth Table and is exactly what we want. In the final version of the circuit, the switch will be replaced by a low-frequency oscillator to produce the beep – beep – beep effect.
When the signal is prevented from appearing on the output it is said to be INHIBITED.
When the signal appears on the output, the gate is said to be ENABLED.
In the diagram above, you will notice the oscillator and AND gate are not connected to the power rails. This is a BLOCK DIAGRAM and power connections are never shown. They are assumed to be connected.
WHAT DOES A GATE DO?
This question has almost been answered above. A gate ENABLES (allows) a signal to pass from one part of a circuit to another. It also prevents (INHIBITS) a signal. The action of allowing and preventing a signal is called GATING.
MAKING A GATE
Suppose the amplitude of the waveform from the oscillator above is not sufficient to activate the AND gate – in other words the amplitude is not rail voltage. If this is the case, we cannot use a “GATE” as it will not be activated.
The solution is to turn the waveform ON and OFF with a GATING LINE.
A gating line is slightly different to a GATE. A waveform passes through a GATE but a Gating Line “KILLS” the waveform (attenuates it) then “allows it to pass.”
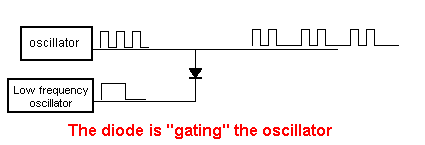
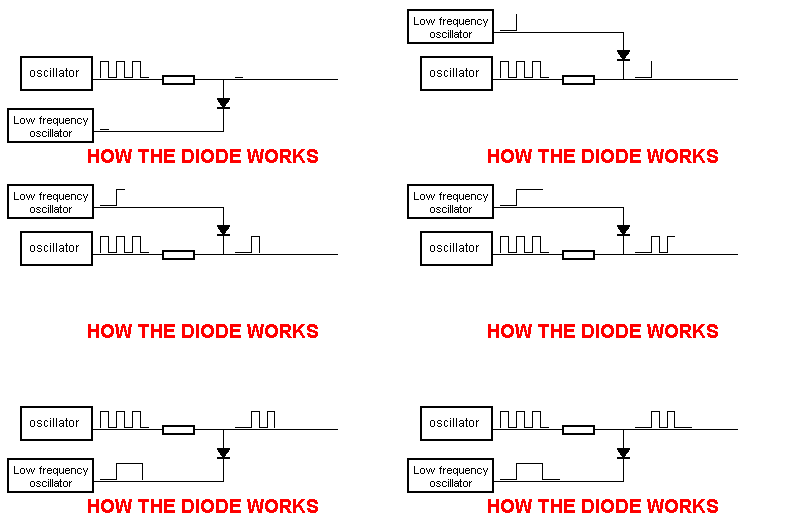
The simplest gating line is a diode connected to the output of a low frequency oscillator as show in the diagram below. You will notice the output waveform consists of the oscillator frequency “in bursts.” This is the beep – beep – beep sound we require.
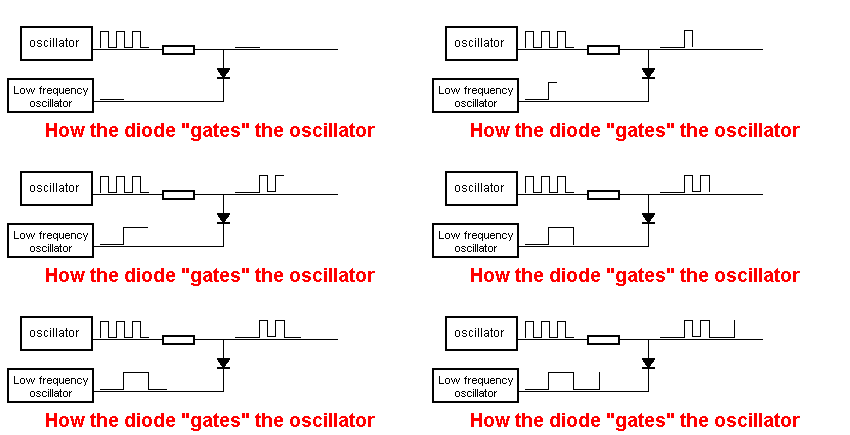
The operation of the low-frequency oscillator is shown in the animation below: It simply goes HIGH, the LOW to produce the pulses of tone. The resistor on the line prevent damage to the oscillator as the diode “kills” the waveform by acting like a very low resistance and the and the resistor in the circuit is a “safety resistor.”
When the output of the low-frequency oscillator goes HIGH, the signal from the oscillator appears on the output.
When the output of the low-frequency oscillator goes LOW, the signal on the output is LOW.
To understand how the diode GATES the oscillator, we have to study the DIODE.
THE DIODE
Just like most electronic components, the diode performs a number of “jobs” according to where it is placed in a circuit and the value of the surrounding components.
A diode has a number of characteristics (features that cannot be altered) and the feature used in the gating line is the fact that a diode passes electricity in ONLY ONE DIRECTION.
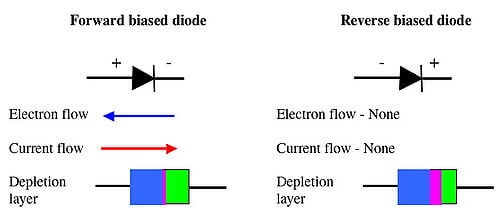
A diode is made up of two different materials that have been fused together to create a “junction.” This junction passes current in only one direction. If the voltage is applied in the reverse direction to the junction, a “barrier layer” or insulating layer develops to block the passage of current. If the voltage is applied in the forward direction the barrier layer is very thin and current is allowed to flow.
You can read about the technicalities of how a diode works in any text book but the essential point to understand is the fact that current only flows in one direction and the arrow on the symbol shows the direction.
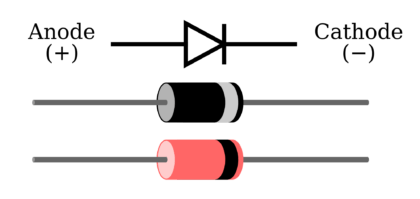
Diodes come in all shapes and sizes and two of the most popular types are shown below. A signal diode is shown at top and a Power diode below: Basically a signal diode will only pass a small current and a power diode will pass a large current.
It’s fortunate the symbol shows the direction of current flow and the reason is the symbol was created in the early days when current (electricity) was considered to flow from positive to negative.
This convention is still maintained today and is called CONVENTIONAL CURRENT FLOW.
When describing our circuits, it is convenient to use conventional current flow as the arrows on the diodes, transistors and LEDs all point in the direction of current flow. (The other convention is called ELECTRON FLOW and electrons flow from negative to positive.)
Normally we talk about the cathode lead of a diode as this is the lead that is identified on the body of the diode. It can be identified by a black ring or band at one end, a dimple or cut-out near the cathode lead or the letter “k.”
When the voltage on the ANODE is higher than the CATHODE, CURRENT WILL FLOW through the diode.
If the voltage on the cathode is higher than the anode NO CURRENT WILL FLOW.
We can now go into more detail and show how the diode in the oscillator circuit above, BLOCKS the signal when the low-frequency oscillator is LOW and allows the signal to pass when the output of the low-frequency oscillator is HIGH.
It is important to “see” what a diode is doing in a circuit. You must be able to VISUALISE it operating.
There are two facts to remember:
1. If the ANODE voltage is HIGHER than the CATHODE, the diode is passing current and the voltage across it is very low. (about 0.6v to 0.7v)
2. If the CATHODE voltage is HIGHER than the ANODE, no current will pass through the diode and it is the same as if it is removed from the circuit.
So, you can think of the diode as two things:
- In the first case: A length of wire.
- In the second case: An open circuit.
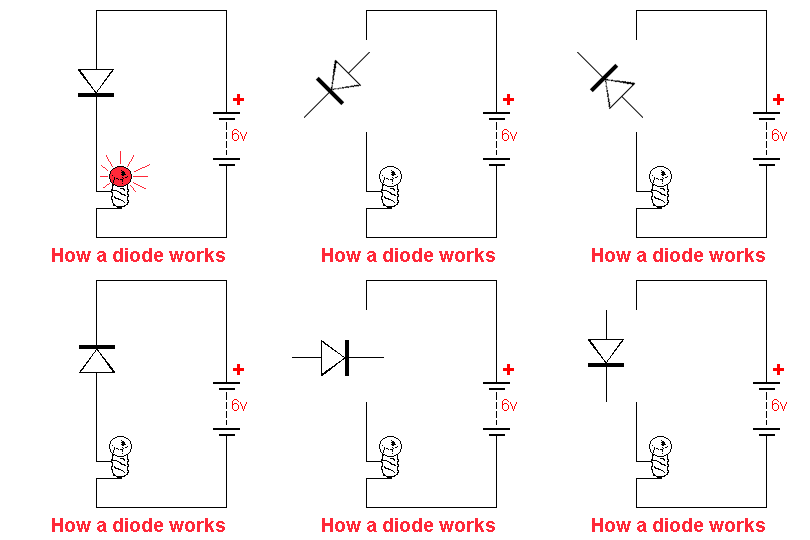
Understanding how a diode operates is very important. There are 4 ways a diode can be placed on the output line: The following 4 diagrams show you the effect of the diode.
If a diode is placed between positive rail and the signal line, the output is a constant HIGH.
This is shown below. The voltage on the anode “turns on” the diode and current flows though it. The voltage on the cathode is 0.7v less than the anode and this makes the signal line a constant HIGH.
If the diode is placed between the signal line and the 0v rail, the output is a constant LOW.
This is shown below. When the signal rises above 0.7v, the diode “turns on” and conducts. Current flows through it and the voltage does not rise above 0.7v.
If the diode is placed as shown below, the anode is never higher than the cathode and so it is never “turned on.” The diode has NO EFFECT on the signal and it is the same as if the diode is removed.
If the diode is placed as shown below, it has no effect on the signal. (you can consider the diode is removed from the circuit).
HOW THE DIODE “GATES” THE SIGNAL
Using the following two facts, we can show how the diode on the output of the low frequency oscillator CONTROLS the signal:
- When the output of the low frequency oscillator is LOW, the output signal is LOW.
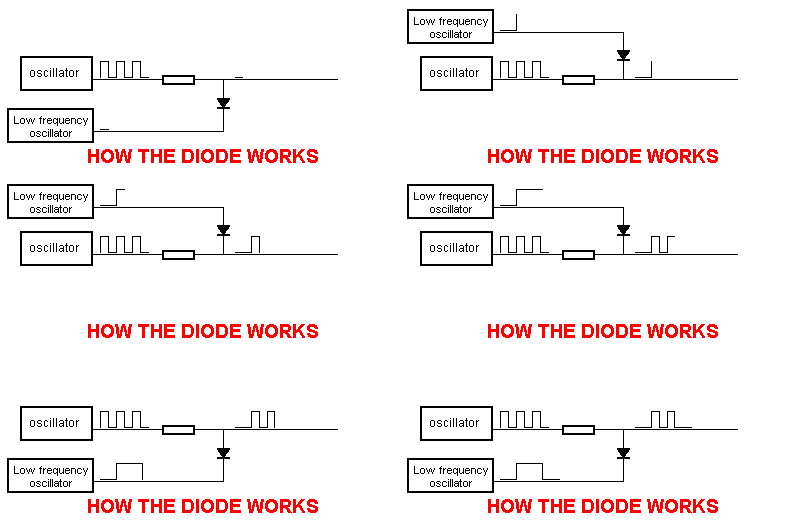
- When the output of the low frequency oscillator is HIGH, the high-frequency waveform appears on the output. (the diode is effectively “out of circuit” and it has no effect on the signal).
The amazing animation below shows exactly how the diode is creating the output waveform:
Here is a slowed-down version so you can see exactly what is happening:
THE DIODE OR GATE
Diodes can also be used to create gates, where the signal passes through the diode.
The diode OR gate is a simple example. The voltage and current is passed to the output by the incoming signal and a pull-up resistor is not needed. A pull-down resistor will prevent the output “floating.”
The output will go HIGH when line A OR line B is HIGH (and also when BOTH inputs are HIGH).
A voltage-drop of 0.6v is lost across the diode but this will not affect the any circuit using this gate.
THE DIODE AND GATE
For the diode AND gate, BOTH input A AND input B must be HIGH for the output to be HIGH.
The diode AND gate works in a slightly different way to the diode OR gate.
The pull-up resistor delivers the output voltage and current (in the diode OR gate, the input line(s) deliver the voltage and current to the output).
The input lines ALLOW the output voltage to rise when BOTH inputs are HIGH.
The output current of the AND gate is determined by the value of resistor R. When the output is low, this current is termed BLEED CURRENT and flows through the diode(s) to the 0v rail. This current is “waste” current and must be kept to a minimum for good design.
Name the gate that requires both inputs to be HIGH for the output to be HIGH.
Ans: The AND gate.
Name the gate that goes high ONLY when one input is HIGH.
Ans: The XOR gate.
Name the gate that goes HIGH when one input goes HIGH.
Ans: The OR gate.
Can an OR gate be produced with diodes?
Ans: Yes.
What is the voltage drop across a diode?
Ans: 0.6v
When a gate is INHIBITED, does the signal appear on its output?
Ans: No.
When the voltage on the anode of a diode is greater than the cathode, does current flow through the diode?
Ans: Yes.
Current flows from ANODE to CATHODE or CATHODE to ANODE, in a diode?
Ans: Anode to Cathode.
What does the letter “k” on a diode symbol represent?
Ans: The cathode. (Kathode in German)




Good job ,excellent it helps for pupils future.