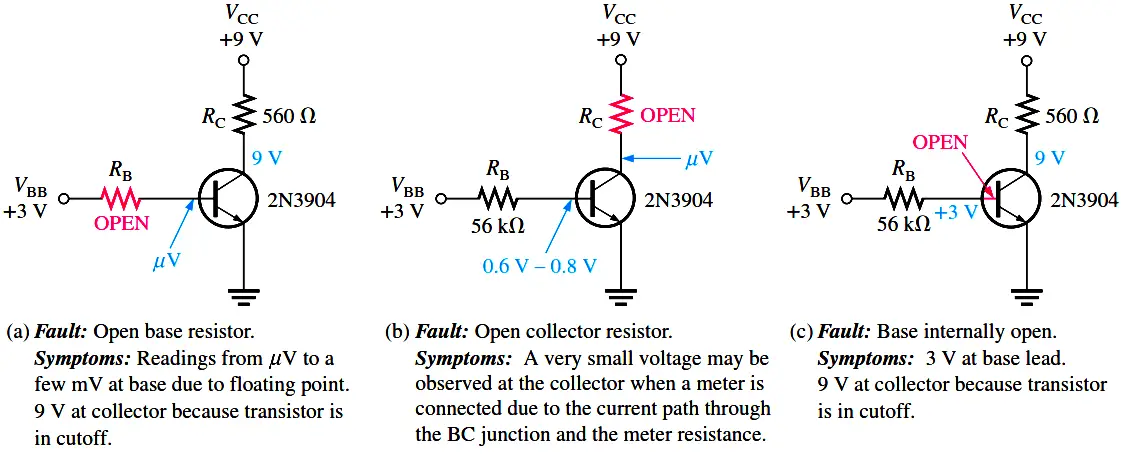
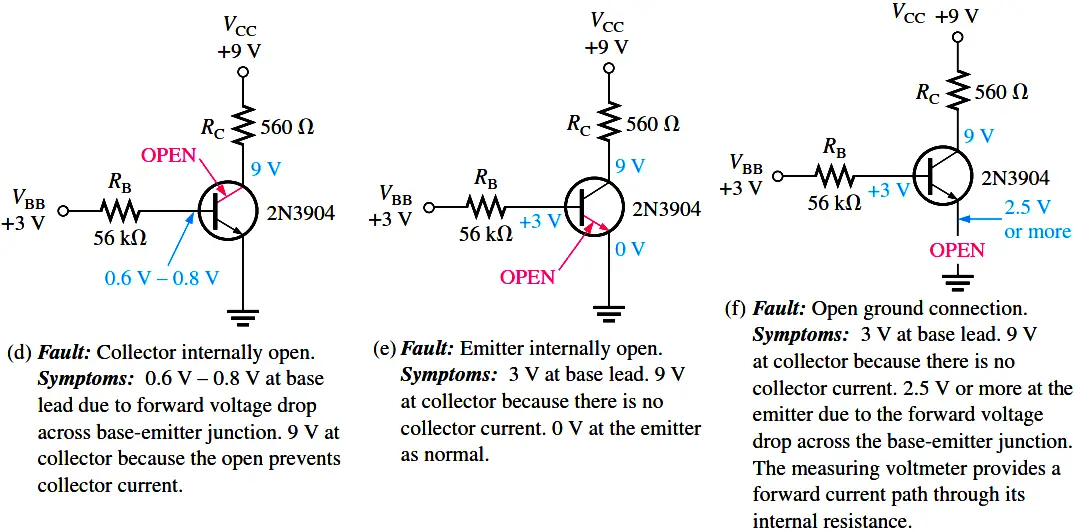
Several faults that can occur in the circuit and the accompanying symptoms are illustrated in Below Figure. Symptoms are shown in terms of measured voltages that are incorrect. If a transistor circuit is not operating correctly, it is a good idea to verify that VCC and ground are connected and operating. A simple check at the top of the collector resistor and at the collector itself will quickly ascertain if VCC is present and if the transistor is conducting normally or is in cutoff or saturation.
If it is in cutoff, the collector voltage will equal VCC; if it is in saturation, the collector voltage will be near zero. Another faulty measurement can be seen if there is an open in the collector path. The term floating point refers to a point in the circuit that is not electrically connected to ground or a “solid” voltage. Normally, very small and sometimes fluctuating voltages in the mV to low mV range are generally measured at floating points. The faults in Below Figure are typical but do not represent all possible faults that may occur.
Testing a Transistor with a DMM
A digital multimeter can be used as a fast and simple way to check a transistor for open or shorted junctions. For this test, you can view the transistor as two diodes connected as shown in Below Figure for both npn and pnp transistors. The base-collector junction is one diode and the base-emitter junction is the other.
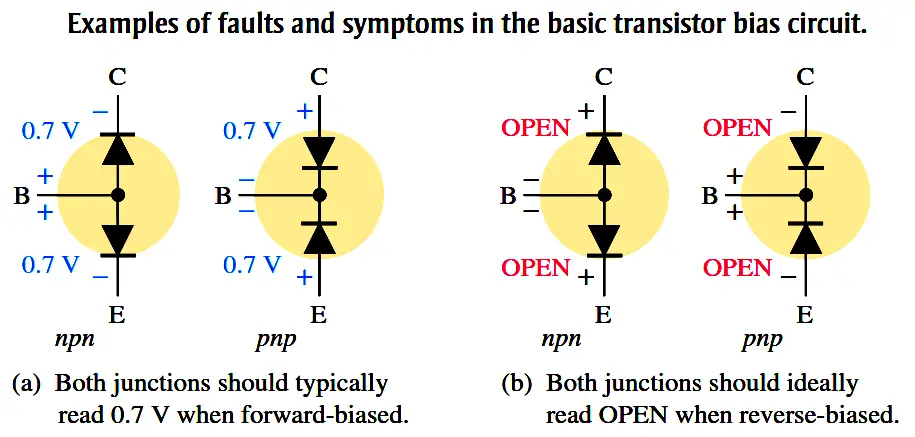
A good diode will show an extremely high resistance (or open) with reverse bias and a very low resistance with forward bias. A defective open diode will show an extremely high resistance (or open) for both forward and reverse bias. A defective shorted or resistive diode will show zero or a very low resistance for both forward and reverse bias. An open diode is the most common type of failure. Since the transistor pn junctions are, in effect diodes, the same basic characteristics apply.
The DMM Diode Test Position
Many digital multimeters (DMMs) have a diode test position that provides a convenient way to test a transistor. A typical DMM, as shown in Below Figure, has a small diode symbol to mark the position of the function switch. When set to diode test, the meter provides an internal voltage sufficient to forward-bias and reverse-bias a transistor junction.
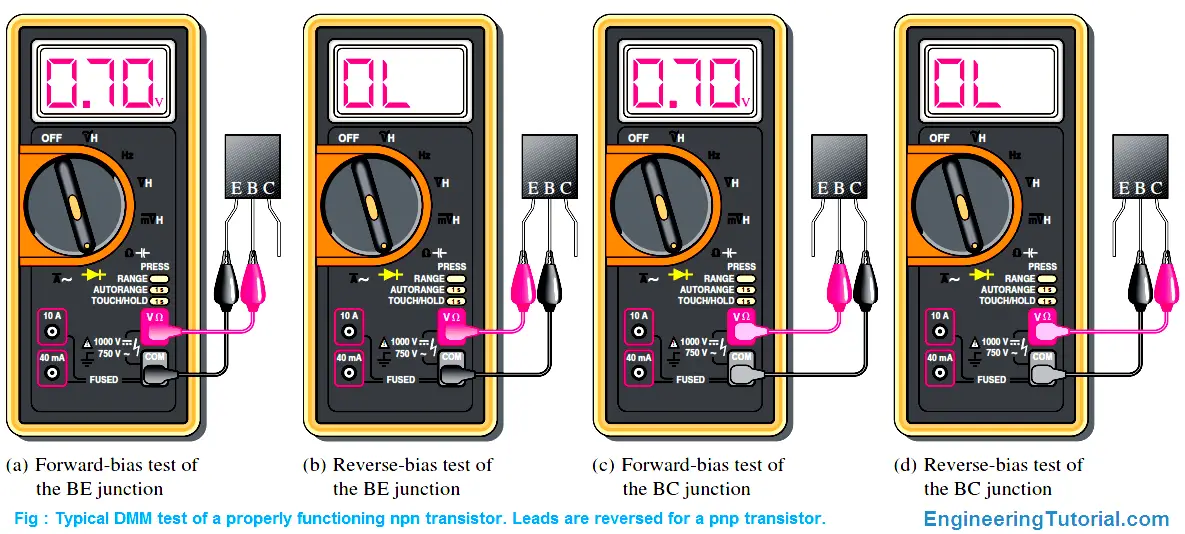
When the Transistor Is Not Defective
In Figure (a), the red (positive) lead of the meter is connected to the base of an npn transistor and the black (negative) lead is connected to the emitter to forward-bias the base-emitter junction. If the junction is good, you will get a reading of between approximately 0.6 V and 0.8 V, with 0.7 V being typical for forward bias. In Figure (b), the leads are switched to reverse-bias the base-emitter junction, as shown. If the transistor is working properly, you will typically get an OL indication. The process just described is repeated for the base-collector junction as shown in Figure (c) and (d). For a pnp transistor, the polarity of the meter leads are reversed for each test.
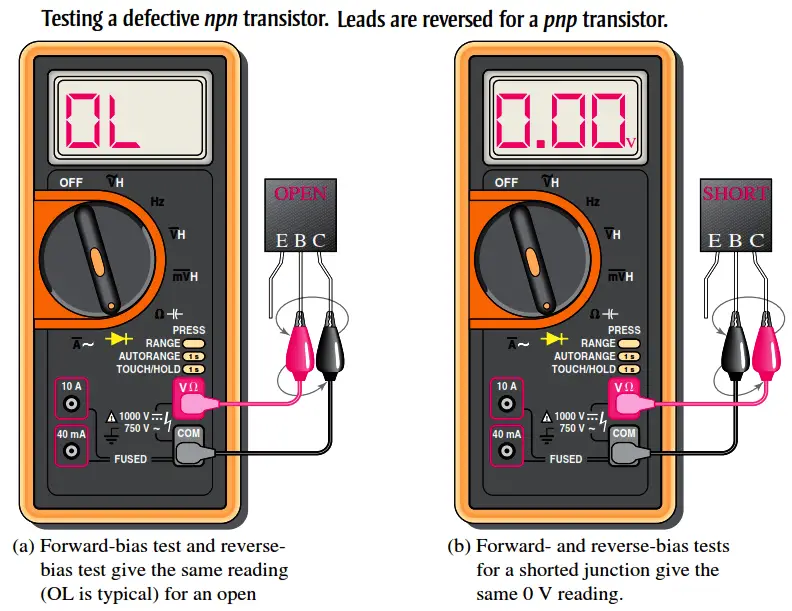
When the Transistor Is Defective
When a transistor has failed with an open junction or internal connection, you get an open circuit voltage reading (OL) for both the forward-bias and the reverse-bias conditions for that junction, as illustrated in Figure (a). If a junction is shorted, the meter reads 0 V in both forward- and reverse-bias tests, as indicated in part (b). Some DMMs provide a test socket on their front panel for testing a transistor for the hFE (βDC) value. If the transistor is inserted improperly in the socket or if it is not functioning properly due to a faulty junction or internal connection, a typical meter will flash a 1 or display a 0. If a value of βDC within the normal range for the specific transistor is displayed, the device is functioning properly. The normal range of βDC can be determined from the datasheet.
Checking a Transistor with the OHMs Function
DMMs that do not have a diode test position or an hFE socket can be used to test a transistor for open or shorted junctions by setting the function switch to an OHMs range. For the forward-bias check of a good transistor pn junction, you will get a resistance reading that can vary depending on the meter’s internal battery. Many DMMs do not have sufficient voltage on the OHMs range to fully forward-bias a junction, and you may get a reading of from several hundred to several thousand ohms.
For the reverse-bias check of a good transistor, you will get an out-of-range indication on most DMMs because the reverse resistance is too high to measure. An out-of-range indication may be a flashing 1 or a display of dashes, depending on the particular DMM.
Even though you may not get accurate forward and reverse resistance readings on a DMM, the relative readings are sufficient to indicate a properly functioning transistor PN junction. The out-of-range indication shows that the reverse resistance is very high, as you expect. The reading of a few hundred to a few thousand ohms for forward bias indicates that the forward resistance is small compared to the reverse resistance, as you expect.
good engineering stuff